Your business should be able to validate the transactions it receives without having to keep all block data and validate every transaction to ever have existed.
You can achieve this by listening to block announcements from peers on the bitcoin network, inspecting each header to verify that it contains a reference to the last, forming a hash chain back to the well-known genesis block.
Third parties need only send you:
A transaction
A Merkle path connecting that transaction to a particular block header
With that data alone you can validate the transaction. First you hash it, and run a Merkle proof to get the root hash. If that Merkle root is contained in the block header at the specified height then the transaction is proven to be contained in that block.
Extrapolation
You may have noticed that in the above scenario, the transaction had been broadcast in advance.
For small casual payments we need to be able to run SPV without either party waiting for a transaction to be mined first. This is possible by extrapolating the idea. We stipulate that the sender must include:
A transaction
Each transaction which contains an output we are spending in the new transaction.
A Merkle path for each of those input transactions.
It is possible to iterate this recursively so long as every transaction always has parent transactions or a Merkle path associated with it.
With this extrapolated approach, we must also validate each transaction which doesn't have a Merkle path. The validation should confirm that the unlocking scripts evaluate to TRUE, the satoshi amounts are as expected, and the transaction is generally well formed without error. This way we know that when we broadcast it will be accepted by the nodes.
Common Push Back
"How do you know that the outputs in question haven't been spent already elsewhere?"
What we are able to factually determine is that the scripts all evaluate to TRUE, the satoshi amounts are all as expected, the structure of the transaction is valid, and that the sender (at least at one point) owned the outputs being spent. What we cannot know without broadcasting the transaction to miners is whether the outputs have been spent by another transaction already.
Rebuttal
It is a good question, but misses the point:
There is a high cost to faking this data because a hypothetical scammer would have to create genuine spendable outputs with which to attempt to trick someone.
The recipient would find out within a fraction of a second of broadcast if the tx is a double spend attempt. Nodes have callback services for this exact purpose.
The recipient would then have signed evidence that the counterparty they were doing business with attempted to defraud them.
Payments are negotiated after KYC and AML checks have been completed by each counterparty, so prosecution would be trivial.
In conclusion - SPV works for the same reason Bitcoin itself works - the incentive models guide the behavior of participants.
Functionality & Roadmap
What it does today and what it will do as we continue development.
Available Now
Roadmap
Available Now
Roadmap
Quickstart
This guide will show you how to run the spv-wallet toolkit with the start.sh script.
Using the start script is not recommended for production environments. It is designed for development and testing purposes only.
Description
spv-wallet provides a start.sh script which significantly speeds up the startup of the entire environment. This bash script is designed to facilitate the setup and configuration of an environment for running an SPV Wallet application and its associated components. It is structured to handle various scenarios such as selecting database and cache storage options, running specific components like the SPV wallet, block headers service, wallet frontend and backend, configuring PayMail domains, exposing services, and managing background execution.
Applications that can be selected are run by the docker compose command, and their configuration file docker-compose.yml should not be edited. It is adapted specifically to the start.sh script.
git clone https://github.com/bitcoin-sv/spv-wallet.git
cd spv-wallet
Start the script
Then you can use the start.sh script to run the spv-wallet toolkit. Using this script is very simple. Just run the script and follow the instructions.
./start.sh
After running this command, user will be asked several questions about how to run the environment. Questions like:
Which database and cache storage should be used?
Which applications should be started?
Which domain should be used for Paymail?
If you want to expose the services on the public domains please read the section Exposing on public domains.
After answering all the questions, the script will start the environment and the selected applications. Example of the script output:
Welcome in SPV Wallet!
Select your database:
1. postgresql
2. sqlite
> # Here you can choose database for spv-wallet -> we recommend to use PostgreSQL (pick the number)
Select your cache storage:
1. freecache
2. redis
> # The second question is about cache storage for spv-wallet -> using Redis will launch Redis server in Docker container. (pick the number)
Do you want to run spv-wallet? [Y/n]
> # Choose if you want to start SPV Wallet in docker container. (Defaults to yes, so just press Enter)
Do you want to run spv-wallet-admin? [Y/n]
> # Choose if you want to start SPV Wallet Admin. (Defaults to yes, so just press Enter)
Note: You can read more about SPV Wallet Admin here and here
Do you want to run block-headers-service? [Y/n]
> # Choose if you want to start Block Headers Service. It is required to run allow SPV and work with BEEF transactions.
# (Defaults to yes, so just press Enter)
Note: If you want to read about Block Headers Service role in SPV -> go here and here
# The following two questions are about running referential custodial web wallet (its frontend and backend)
# if you want to check how such thing could be created and used then choose yes (which is default)
Do you want to run spv-wallet-web-frontend? [Y/n]
>
Do you want to run spv-wallet-web-backend? [Y/n]
>
Define admin xPub (Leave empty to use the default one)
> # Here you can define your admin xPub. If you leave it empty, the default one will be used.
Define admin xPriv (Leave empty to use the default one)
> # If you choose to run web wallet and defined your admin xPub, you also need to define your admin xPriv here. It must match the xPub. If it won't match, you won't be able to authenticate in SPV Wallet Web Backend.
What PayMail domain should be configured in applications?
> # Choose the PayMail domain which should be handled by the SPV Wallet.
# It will be used to receive transactions. And it needs to be owned by you and pointing to the server where the spv-wallet is running.
Do you want to expose the services on and its subdomains? [y/N]
> # If you want to expose services on your domains, you can use this option.
# Locally it's better to set "N" and work with services on localhost.
Do you want to run everything in the background? [y/N]
> # choose y if you want to run everything in the background and n if you want to see logs in the current terminal and stop the server when closing terminal.
It's worth to mention that after first go through those questions, the script can be started next time with the saved configuration. To do this, simply run the script with option --load or -l:
./start.sh -l
Utilized Ports
Each of the running components uses a different port which is exposed so that they can be externally connected to or only certain components can be run in a Docker environment while the rest locally.
List of Used Ports:
Service
Port(s)
spv-wallet-admin
3000
spv-wallet-frontend
3002
spv-wallet
3003
Exposing on public domains
There is an important topic that should be mentioned in this place. If you want to expose the services on the public domains (for example to receive transactions), you must pay attention to the two options (questions in the script).
You must enter your chosen domain on which the spv-wallet should be available as the Paymail domain.
You need to choose the option to expose the services on the paymail domain and its subdomains.
When you choose the options above the following subdomains could be used (need to be also registered by you):
your.domain.tld - for the spv-wallet application
wallet.your.domain.tld - for the web wallet frontend
api.your.domain.tld - for the web wallet backend
admin.your.domain.tld - for the admin panel
headers.your.domain.tld - for the block headers service
All of those domains/subdomains should have a DNS record pointing to the server where the spv-wallet is running.
Configuration
When using this script, configuration file .env.config is created. It contains all the settings that were selected when the script was last run. There is an option to run the script with defined settings without having to go through the entire configuration process, just add -l/—load flag.
-h/—help flag will show all available script configuration arguments before running it. This is another option to run the application with previously defined settings.
You can use the arguments to override previously chosen options. For example, if you want to change the database type from sqlite to postgres, you can run the script with the following command:
./start.sh -l -db postgres
Two things are important to notice here:
The -l flag is used to load the previous configuration.
Any argument passed to the script will override the previous configuration also in the .env.config file.
Launch Verification
SPV Wallet by default is running on port 3003 and you can access it by http://localhost:3003 (if you run it locally). After calling this address you should see this:
{"message":"Welcome to the SPV Wallet ✌(◕‿-)✌"}
FAQ
How to stop the environment?
If you run the environment in non-background mode, you can stop it by pressing Ctrl+C in the terminal.
If you run the environment in background mode, you can stop it by running the following command:
docker compose down
Sometimes it is necessary to clean up the environment to apply some changes, this especially can be required when you choose to change between exposed and not exposed services. In this case, you should run the following command:
docker compose down
How to configure domains for my server?
The simplest way to do that is to configure 2 records type A on your domain provider. One for the main domain and one for the wildcard subdomain.
For example, if you want to use example.com as your main domain, you should add DNS records A:
example.com -> pointing to your server IP
*.example.com -> pointing to your server IP
How to configure Paymail on different domain then spv-wallet?
Before starting SPV Wallet you need to have a paymail domain properly configured.
At first it is necessary to add SRV record to domain which you want to use as paymail domain. This record will be used for service discovery by Paymail clients - pointing them to your host.
Example of SRV record:
Service _bsvalias
Proto _tcp
Name <domain>.<tld>
TTL 3600
Class IN
Priority 10
Weight 10
Port 443
Target <endpoint-discovery-host>
More information about setting up SRV record here.
After setting up SRV record you need to activate DNSSEC for your domain. DNSSEC, short for Domain Name System Security Extensions, is a set of security measures designed to add cryptographic integrity to the Domain Name System (DNS). DNSSEC aims to provide authentication and data integrity to DNS responses, protecting against various types of attacks such as DNS spoofing and cache poisoning.
Note: it is possible to use subdomains as paymail domains e.g. paymail1.spvwallet.compaymail2.spvwallet.com ...
Paymails follow the same format as email addresses {handle}@{domain.tld} e.g. [email protected]. This is used to address a particular user within a particular domain.
How can I log in to the admin panel?
If you chose to use a default admin xPub during configuration phase, then the default admin xPriv will be displayed to you in the terminal.
In case if you can't saw it because of long log output from working services, you can also find it in a comment near the RUN_ADMIN_PANEL variable in the .env.config file.
Then access web wallet at https://wallet.your.domain.tld and register a new account. After that, you can log in and see your paymail address. Then you can access any public wallet which supports paymail and send a transaction to your paymail address.
This is TypeScript / JavaScript library used to communicate with SPV Wallet.
It allows to create an admin or normal user client and then call methods to work with transactions, xpubs, paymails and access keys.
Installation
NPM
Yarn
User / Wallet / Account creation
To create a new user (which some may also interpret as creating a wallet or account), you need to register a new xPub.
You can find example of how to do that .
Authentication
To authenticate within the SPV Wallet, you need to use HD key pair either for admin or normal user.
Detailed instruction on how to authenticate the client can be found .
Examples
We have prepared some examples for you to get started with the library.
All of them are available on the SPV Wallet Client GitHub repository, in the directory.
BSV enables direct transactions between parties without the need for a trusted third party, reducing transaction costs and increasing efficiency.
Lower Transaction Fees
BSV's efficient design supports micropayments and low-value transactions with minimal fees, making it ideal for small casual transactions and enabling new business models.
Efficiency in Payment Systems
BSV transactions are confirmed within seconds, making it suitable for time-sensitive transactions without the delays common in traditional banking systems.
Flexibility in Use Cases
BSV supports a variety of applications beyond simple payments, including smart contracts, tokens, and complex data operations - all on one blockchain layer - enhancing its utility while maintaining its native efficiency.
Rules
Introduction
The Network Access Rules is the set of rules regulating the relationship between the BSV Association and the nodes on BSV. It details their duties and obligations to the network and their relationship with the Association. The rules are grounded in the principles of the Bitcoin Protocol and the Bitcoin White Paper, ensuring that all nodes contribute to a lawful and honest network environment, providing transparency and guidance for network participants. Network activities in this instance include collecting, validating, or accepting a block, collating transactions into a block, attempting to find a proof-of-work for a block, or broadcasting a block.
Version: 1
Upload Date: 15/02/2024
Changelog:
27/02/2024: Minor v1 grammatical and formatting corrections and added FAQ
FAQs
Alongside the release of the new Network Access Rules, this FAQ aims to help nodes and other interested parties better understand the new rules and what they mean for them clearly and concisely.
Disclaimer
The content of these documents is provided for informational purposes only and is not intended to modify or supersede the contractual rights or obligations of any party to the Network Access Rules. Parties are encouraged to carefully review the Network Access Rules to verify the accuracy of the information presented here. It is assumed that, where necessary, parties will seek guidance from their legal counsel and any other advisors they consider necessary.
Any statements here do not purport and should not be considered to be a guide to, advice on, or explanation of all relevant issues or considerations relating to the contractual relationship established by the NAR. The BSV Association assumes no responsibility for any use to which the BSV network is put by any miner or other third party.
\
High Level
Details
SPV
GetMiningCandidate
The getminingcandidate RPC call is an improved API for Miners, ensuring they can scale with the Bitcoin network, by mining large blocks without the limitations of the RPC interface interfering as block sizes grow. Based on and credited to the work of Andrew Stone and Johan van der Hoeven, GMC works by removing the list of transactions from the RPC request found in getBlockTemplate and supplying only the Merkle proof of all the transactions currently in the mempool/blockcandidate.
It is strongly recommended that Miners begin the necessary steps to adapt their mining pool software to use GMC. As block sizes grow, Miners still using getBlockTemplate will begin to run into issues trying to produce blocks. At best, they will be leaving fees on the table for other Miners, and at worst their mining environment will fall behind the chain tip as they are waiting on block templates to be generated, in some cases bringing block production to a complete stand still.
For Miners wishing to test the limitations of their pool setup it is recommended they start a test deployment on the Scaling Testnet.
Network Environments
There are 4 defined “networks”:
mainnet – the main public network.
STN (S_caling Test Network_) – a public test network targeted at testing scaling.
testnet – a public test network, typically used for testing of software before release.
regnet – a private “regression” test network, meant for local testing.
Nodes from different networks can co-exist on the same physical network; each public network uses a different set of seed nodes (if any) and ports for communications.
The BSV server software defaults to mainnet.
Bug Bounty
The Bitcoin SV Bug Bounty Program only applies to the code for the Bitcoin SV full node implementation.
We certainly appreciate any issues with the website reported to us. But as we use largely off the shelf products for the website and the website is informational in nature, the Bug Bounty Program does not apply to the website.
This component does the heavy lifting. It exposes the secure Client API, and public Paymail Endpoints; runs SPV on inbound transactions; stores transactions and metadata; and broadcasts valid transactions, exposing a callback for Merkle paths.
At a high level there are admin functionalities exposed like creating a new alias, adding a new xpub, deleting things.
The client functionality is more about drafting new transactions, modifying them, signing an actioning them in terms of sending to counterparty hosts, generating new locking scripts.
The public facing endpoints are all associated with Paymail service discovery and capabilities, which are detailed in Payments Flow.
Web Admin
Hosted control console for service management.
This is a UI for the SPV Wallet server that allows you to inspect stored data and metadata. It enables the manual addition of user accounts and facilitates paymail transactions. This tool is especially helpful for troubleshooting purposes.
Payments Flow
Paymail Capability Extensions
The SPV Wallet uses Paymail capabilities to publicly reveal their ability to interpret SPV transaction data.
What is Paymail?
It's a service discovery mechanism for counterparty web APIs. It allows users to pay something which looks like an email address, but under the hood resolves a specific endpoint for a wallet to use for payment negotiation.
[email protected] -> https://domain.tld/api/some/specific/endpoint
Sequence Diagram
Capability Specifications
Further details on exactly how these requests and responses should be formulate are defined in these BRC documents:
Broadcasting
Transaction Broadcasting from SPV Wallet
The SPV Wallet broadcasts all valid transactions it receives or creates to ARC.
ARC Endpoints
We use the first endpoint to determine the correct fee model to use when creating a transaction.
Thereafter we simply broadcast to ARC and expect a SEEN_ON_NETWORK txStatus response in most cases.
Usually a callbackUrl would be set for async status updates - but if you'd like to manually check the most recent state of a given transaction, you can use this:
Data Models
What data is sent between counterparties for SPV Payments?
There are two main data models used in SPV transactions. Firstly, the Merkle paths of transactions are contained
BUMP format demo
Secondly a list of BUMPs and transactions are serialized:
These formats are baked in to the ecosystem's core libraries such that they are easy to deal with across many applications.
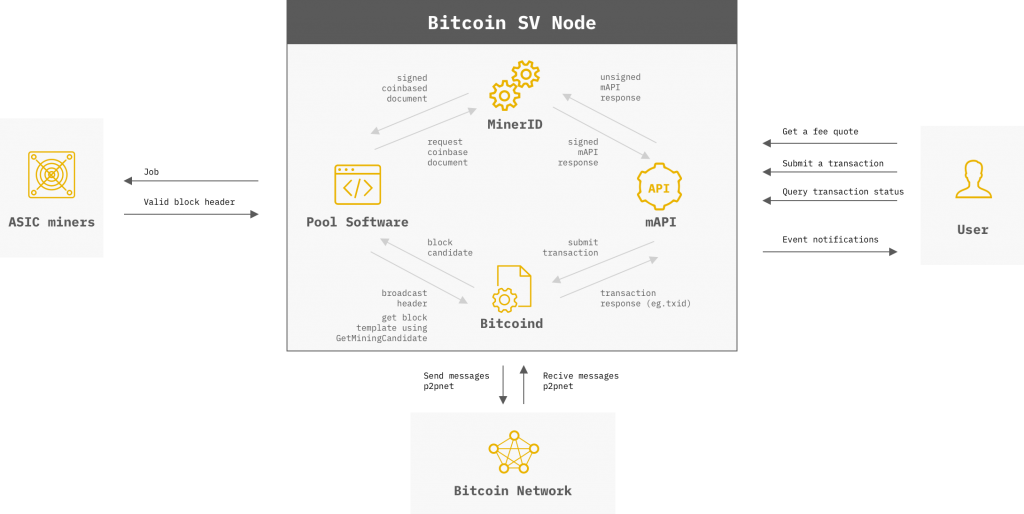
Architecture
External (p2p network):
discovers and connects to other nodes
send and receive messages to and from other nodes
Internal:
exposes RPC to pool software and other tools
optional REST Interface can be enabled
External (stratum protocol):
exposed API for ASIC Miners to connect and start mining block headers
send jobs to ASIC Miners
receive valid shares or valid block headers
Internal (Bitcoind RPC):
connect to Bitcoind RPC to submit transactions
receive transaction response (eg. txid)
provide event notifications for double spends and Merkle Proofs.
Components
Overview of the implementation
Deploying the SPV Wallet will spin up a number of containerized services to create something which at a high level looks like the diagram below.
High Level Components of the SPV Wallet
We see that there are two user interfaces, the Wallet App, and the Admin Console. These drive an API hosted by the SPV Wallet Server. This Wallet Server also accepts payments from Other Wallets, and Broadcasts Transactions to ARC. ARC returns Merkle Paths to confirm transactions, which are validated by checking Merkle roots stored by Blockheader Service.
The SPV Wallet combines the components to form a fully operational hosted non-custodial open-source reference wallet for the ecosystem.
What Can I Do?
BSV Blockchain has a few properties which allow us to solve a vast number of problems across many applications. The two fundamentals are tokenization and data integrity.
Tokenization
BSV Blockchain is a massively scalable utxo based system. What this means is that each transaction output can be dealt with independently by different systems, without worrying about any global state. This means transaction throughput is theoretically unbounded.
There have been many token protocols defined on top of BSV over the years. The most basic way to create a token system on BSV is to simply use an Overlay Service to track specific utxos which have been "minted" as tokens via some tokenization method.
PART IV - DISPUTE RESOLUTION RULES
PART IV - DISPUTE RESOLUTION RULES
Arbitration
Table of Contents
The Rules in overview
Agreement to the Rules
Timestamping
Timestamp Server
BSV uses a distributed timestamp server to create a public record of transactions. This is achieved by hashing transactions into an ongoing chain, forming a record that is computationally impractical to alter. Each timestamp includes the previous timestamp in its hash, forming a chain of blocks, or a “blockchain.”
Hash Functions
What is a Hash?
In the context of computer science, a hash is a function that converts an input (or 'message') into a fixed-size string of bytes. The output, typically a 'digest', represents concisely the original input data. A hash function is a type of one-way function, meaning it's easy to compute a hash from a given input but nearly impossible to recreate the original input just by knowing the hash value. This property ensures data integrity, as any alteration of the input data will result in a dramatically different hash.
Merkle Trees
A Merkle tree (or hash tree) is a data structure used in computer science and cryptography to efficiently and securely verify the integrity of large sets of data. It is a binary tree where each leaf node is a hash of a block of data, and each non-leaf node is a hash of its children.
To get from a leaf node (such as a transaction ID, txid) to the root in a Merkle tree, you follow these steps:
Using a Merkle Tree rather than simply hashing the list of transaction IDs (txids) offers several advantages:
Script
Bitcoin uses a scripting system for transactions, specifically output locking scripts. Similar to Forth, Script is simple, stack-based, language that is processed from left to right as a series of sequential instructions. Data is pushed onto the stack and opcodes are used to perform operations on the items on the stack.
Script is Turing-complete despite not having jump instructions. Finite state machines can be built which hold their current state in one or more UTXOs. Among other methods, these machines can receive information from oracles, generate deterministic pseudo random values or look back to previous transactions on the ledger for the data needed to determine the next-state. A loop is formed by checking these input conditions and asserting a particular output state for the next UTXO holding the Turing machine. In this way, the Turing machine is held in a continually operating state until such a time as a transaction is created that determines that the process can halt. One such technique called 'OP_PUSH_TX' uses the ECDSA message pre-image to enforce conditions for the next stages of each computation. Techniques that are considered Turing complete can be described as using the Bitcoin ledger as an unbounded ticker tape to store computational results and future instructions.
A transaction output script is a predicate formed by a list of instructions that describe how the next person wanting to transfer the tokens locked in the script must unlock them. The script for a typical P2PKH script requires the spending party to provide two things:
a public key that, when hashed, yields the destination address embedded in the script, and a signature to prove ownership of the private key corresponding to the public key just provided. Scripting provides the flexibility to change the parameters of what's needed to spend transferred bitcoins. For example, the scripting system could be used to require two private keys, or a combination of several keys, or even a file and no keys at all. The tokens are unlocked if the solution provided by the spending party leaves a non-zero value on the top of the stack when the script terminates.
Smart Contracts
A smart contract is a self-executing contract where terms of the contract are implemented in code. A common misconception is that Bitcoin is incapable of executing smart contracts, paving the way for the creation of other blockchains like .
The bitcoin scripting language is designed to be as primitive as possible. Using a set of OP codes, the language achieves maximum security while minimising attack surfaces through intentional limitations, which often leads to an underestimation of Bitcoin’s true potential. In fact, by simply focusing on the Bitcoin scripting language, there is a risk that many other interesting features of the protocol may be overlooked. To understand how Bitcoin is smart-contract friendly, one needs to zoom in and out on the bitcoin transaction, as well as the entire stage on which the bitcoin transaction plays its role.
By doing this, it becomes apparent that there are many ways to construct smart contracts on bitcoin. We can summarise them roughly as
smart locking scripts
Nodes
The Bitcoin white paper defines the actions of a node in section 5:
New transactions are broadcast to all nodes.
Each node collects new transactions into a block.
Each node works on finding a difficult proof-of-work for its block.
Mandala Upgrade
An evolution of the BSV Blockchain network topology
The Mandala Upgrade is a significant advancement in the blockchain network, enhancing scalability, cost-efficiency, and overall performance. This upgrade primarily focuses on improving the Bitcoin SV (BSV) network, making it more robust and suitable for enterprise solutions.
Key Components
Installation
Deployment of Bitcoind can be done in many ways, depending on the requirements of your deployment, it could be fairly minimal, or very involved.
Before undertaking such a process, it is important to consider if you really need a Bitcoin node. Services such as ARC provide transaction processing and informational services to merchants, exchanges and anyone else who needs to interact with the blockchain without the encumbrance of running a Bitcoin node themselves.
If you are a Miner, at the bare minimum you will need to by running bitcoind and setup the .
Recommendation for non-mining entities
SV Node
SV Node is a full node implementation for the BSV Blockchain, developed by the BSV Association. It allows users to run a full node on the BSV network to validate transactions and blocks.
The SV Node software is written in C++ and focuses on performance, scalability, and enterprise-grade operations. Key features include support for massive block sizes, parallelized validation for high throughput, fee management controls, security hardening, detailed logging, and monitoring integrations. SV Node aims to provide a robust and reliable full node solution for professional use cases like mining operations, enterprise applications, and service providers building on the BSV Blockchain.
This documentation provides an overview of the SV Node software, but it is not intended as a definitive source for dictating settings that miners should or should not use. Instead, it serves as a guide to help you understand the , , and steps for . Before proceeding with the installation, it is recommended to carefully review the sections on architecture and system requirements, as they contain essential information for running SV Node effectively.
Docker
Included in this repo are docker images for the Bitcoin SV Node implementation. Thanks to Josh Ellithorpe and his , which provided the base for this repo.
This Docker image provides bitcoind, bitcoin-cli and bitcoin-tx which can be used to run and interact with a Bitcoin server.
To see the available versions/tags, please visit the .
To run the latest version of Bitcoin SV:
To run a container in the background, pass the -d option to docker run, and give your container a name for easy reference later:
Regtest
regtest is a private “regression” test network, meant for local testing.
There are no seed servers for this network and all nodes need to be manually connected. regtest is used by the node’s functional test suite.
By default:
Uses port 18332 for RPC
Uses port 18444 for P2P
Startup Script
For convenience, there is a helper script with the SV Node software release that will automate the startup of the Alert System in conjunction with the SV Node daemon. This script will startup the Alert System and wait for it to be synced and healthy prior to starting the bitcoind daemon. To view the help for the script, run:
This script assumes that the alert-system, bitcoind, bitcoin-cli binaries are in the system's PATH.
Example when using the installation guide:
It also expects that the user has configured the needed environment variables as outlined above for the user-specific configuration.
Frequently Asked Questions
Actually just the answers to FAQs.
Transactions
Log File Warnings
Warnings in the log file are provided for informational and diagnostic purposes (e.g. needed to help with debugging). They do not necessarily indicate that corrective action needs to be taken. None of the warnings below require corrective action.
The mempool could not be synced at startup, typically as a result of improper shutdown (e.g. OOM). In this case the node will start with an empty mempool and request missing transactions.
Banning misbehaving peers is an important part of normal operation. BCH nodes often appear as misbehaving nodes.
The 'invalid chain' message above indicates that there is a fork where the competing chains differ in length by at least 6 blocks.
Forks emerge naturally as competing blocks from different miners arrive at different nodes at different times. However the network will eventually agree on the best chain.
Forks can also arise from Withholding attacks which generally generate forks (secretly produced without announcing them at first) that are much longer than those that arising as a result of normal competition amongst miners.
Background to the Rules
Background to the Rules
A. BSV Association (the ‘Association’ or ‘we’, ‘our’, or ‘us’) is a non-profit organisation based in Switzerland. Our goals are to support the operation of the Network and foster the growth of the Bitcoin Satoshi Vision (‘Bitcoin’, ‘Bitcoin SV’, or ‘BSV’) ecosystem. We aim to achieve this by protecting and supporting the vision of ‘Satoshi Nakamoto’ in the paper ‘
SPV Wallet
Open-source non-custodial hosted wallet for the BSV Blockchain
What is it?
Open Source Non-Custodial Hosted Wallet
Teranode
Teranode is the next-generation node software for the BSV Blockchain, designed to achieve massive scalability through a distributed microservices architecture. Unlike traditional monolithic node implementations, Teranode breaks down blockchain processing into specialized components that can scale horizontally across multiple servers.
The Teranode architecture enables the BSV network to process millions of transactions per second by parallelizing and distributing core blockchain functions including transaction validation, block assembly, mempool management, and state persistence. Key features include distributed processing across microservices, horizontal scalability to handle enterprise-level throughput, optimized resource utilization through specialized components, and support for the BSV network's unbounded scaling roadmap.
Teranode represents a fundamental reimagining of blockchain node infrastructure, moving from single-server limitations to a cloud-native distributed system capable of supporting global-scale applications. This architecture allows the BSV Blockchain to handle transaction volumes comparable to major payment networks while maintaining the security and decentralization properties of a public blockchain.
Who is it for?
Those who want to validate their own transactions rather than all network transactions
SPV Wallet can be used in place of the BSV Blockchain node software to validate transactions and make outbound payments.
Accepting payments in this way is better for compliance purposes because your server communicates directly with counterparties. This allows KYC and AML data to be validated prior to any payment negotiations, domain specific controls, and many configurable options to meet requirements in your jurisdiction.
Running SPV Wallet in place of a full node leads to significant cost savings. This saving is due to the disparity between relevant transactions for the exchange, and overall network transaction volume. The average transactions per second settled on BSV Blockchain has been trending up rapidly for the last few years and is expected to skyrocket as we go forward. This will inevitably drive up costs for full node operators, and raise the corresponding demand for SPV Wallet solutions.
For existing wallet providers, SPV Wallet is simply a demonstration of the validation functions and data models which allow for safe instant transactions. The payment protocols should be broadly compatible with what most wallet operators are already doing, providing a simple extension to existing Paymail standards.
AWS Deployment
Deployment guide to run your own SPV Wallet on AWS cloud platform
Storage
Database
A Postgres DB used to store user accounts, transactions, utxos, public keys, accounts, and metadata.
Cache
Webhooks
It is recommended to configure the webhook functionality to ensure that node operators are aware when alerts are published. The webhook is only fired if the ALERT_SYSTEM_ALERT_WEBHOOK_URL is set. When set, all alerts received will issue a POST request to this endpoint with the following payload:\
This format natively supports Slack webhooks, but any customizable operational procedure can be handled with this webhook.
Safe Mode
If a node believes it has detected a potential Withholding attack, the node will enter safe mode and the wallet functionality (e.g. getbalance) will be disabled as a protective measure. At this point a miner should stay alert and be prepared to take manual intervention.
Withholding attacks can be neutralised by calling the invalidateblock RPC on the block at the base of the attack chain. The local node will then consider the entire attack chain as no longer valid.
Safe mode will be triggered by the presence of a chain fork longer than that specified by the configuration parameter safemodeminforklength (defaults to 6). It is possible that in exceptional circumstances such a fork can be produced normally. i.e. by a node that is not under attack.
Once a node goes into safe mode, it will remain in that state until the main branch is longer than the attack chain by the number of block specified by the configurable parameter safemodeminblockdifference
Overlay Example
Open source implementation of an Overlay Service
Any dispute, controversy, or claim arising out of, or in relation to, the Rules, including regarding the existence, validity, invalidity, breach, or termination thereof, will be resolved by arbitration in accordance with the Swiss Rules of International Arbitration of the Swiss Arbitration Centre in force on the date on which the Notice of Arbitration is submitted in accordance with those rules (the ‘Swiss Rules’). In particular:
(a) the number of arbitrators will be one or three;
(b) when designating or appointing an arbitrator, the parties, the arbitrators, and the Arbitration Court of the Swiss Arbitration Centre, in view of securing the appointment of a qualified, independent and impartial arbitrator, are invited to consider the opportunity, as appropriate, of designating or appointing arbitrators of the P.R.I.M.E. Finance Panel of Experts and any of the specialised panels that P.R.I.M.E. Finance may form to deal with particular categories of blockchain or digital assets-related cases;
(c) the seat of the arbitration will be Zug, Switzerland;
(d) the arbitration proceedings will be conducted in English;
(e) the law applicable to the arbitration agreement will be the law of England and Wales; and
(f) the rules on expedited proceedings as set out in Article 42 of the Swiss Rules will apply where the amount in dispute does not exceed the amount specified for their application in the Swiss Rules or where the parties to the arbitration agree in writing that those rules do not apply.
Binding nature
The arbitration agreement in clause IV.1 is binding on each Node, irrespective of when that Node first undertakes or undertook a Relevant Activity.
Changes
This Part IV (Dispute Resolution Rules) (including the arbitration agreement in clause IV.1) is subject to change in accordance with clause II.5 of the Rules.
Any changes to this Part IV (Dispute Resolution Rules) will not result in the arbitration agreement in clause IV.1 ceasing to have binding effect.
Proof of Work
To maintain this chain, BSV uses a proof-of-work system. Nodes, which are essentially powerful computers, compete to solve complex mathematical problems. Solving these problems involves finding a hash value that meets certain criteria (e.g., begins with a specific number of zero bits). The first node to find a valid solution broadcasts its block to the network.
Block Creation and Verification
When a node finds a valid proof-of-work, it broadcasts the block to all other nodes. These nodes verify the block to ensure all transactions are valid and not already spent. Once verified, the new block is added to the chain, and the nodes begin working on the next block, using the hash of the previous block as a reference.
Chain of Proof
The longest chain of blocks represents the sequence of events witnessed by the network. This chain is considered the correct one because it has the most proof-of-work effort invested in it. If nodes control the majority of CPU power and act honestly, they will create the longest chain and outpace any attackers trying to alter past transactions.
Immutability and Security
Once a block is added to the blockchain, altering it would require redoing the proof-of-work for that block and all subsequent blocks, which is computationally infeasible if the network’s honest nodes control the majority of the hash power. This ensures the immutability and security of the transaction history.
Decentralized Consensus
The network reaches consensus without a central authority. Each node operates independently, validating transactions and blocks. Nodes follow the longest chain rule, where they consider the longest valid chain as the true record of transactions.
This system ensures that transactions are timestamped and recorded in a secure, decentralized manner, allowing for an immutable and verifiable history of events on the BSV blockchain. The reliance on proof-of-work and the decentralized nature of the network are key factors that enable BSV to function effectively as a timestamp server.
Chain of Headers Using Hashes
In Bitcoin, every block in the blockchain is linked to its predecessor through a series of hash pointers in what is known as the 'chain of headers'. Each block header contains its own hash along with the hash of the previous block's header. This structure forms a secure, verifiable chain where each subsequent block reinforces the security of the previous block. Altering any single block would require recomputation of every hash that follows, a task computationally impractical, thus ensuring the integrity of the blockchain.
Merkle Trees: Verifying Transaction Inclusion
One of the core components of Bitcoin’s architecture is the use of Merkle trees as referenced in the Bitcoin whitepaper under sections 7 & 8. This efficient data structure allows us to quickly verify the inclusion of transactions in a block. Each transaction within a block has its hash, and these hashes are paired, hashed, paired again, and re-hashed until a single hash remains: the Merkle Root, which is stored in the block header. This process allows for a quick and secure verification of whether a specific transaction is included in the block without needing to download every transaction.
Practical Applications: On-Chain Use Cases and Tamper Evidence
The real-world application of hashing within applications built upon the Bitcoin SV blockchain is vast, particularly when proving the integrity and authenticity of data. For instance, in legal, financial, or real estate transactions, proving the non-tampered nature of a document or a series of transactions can be critical. Here, Bitcoin's blockchain serves as a tamper-evident ledger. Once data has been recorded in a block and absorbed into the blockchain through the chaining of hashes and the Merkle Root, it becomes immutable. This immutability is a powerful tool for proving that a document or transaction has not been altered post its original timestamping on the blockchain.
If there needs to be an added level of privacy, while also insuring that there is an immutable record, the data itself can also be hashed prior to being recorded on chain. This allows anyone to check that the hash of the data matches without having to reveal what that data is to the world.
De facto, Bitcoin script is defined by the code run by the nodes building the Blockchain. Nodes collectively agree on the opcode set that is available for use, and how to process them. Throughout the history of Bitcoin there have been numerous changes to the way script is processed including the addition of new opcodes and disablement or removal of opcodes from the set.
The nodes checking Bitcoin script, process transaction inputs in a script evaluation engine. The engine is comprised of two stacks which are:
The main stack The alt stack In addition, the system also uses a subscript management system to track the depth of nested If-Loops
The main and alt stacks hold byte vectors which can be used by Bitcoin opcodes to process script outcomes. When used as numbers, byte vectors are interpreted as little-endian variable-length integers with the most significant bit determining the sign of the integer. Thus 0x81 represents -1. 0x80 is another representation of zero (so called negative 0). Positive 0 can be represented by a null-length vector or a string of hexadecimal zeros of any length. Byte vectors are interpreted as Booleans where False is represented by any representation of zero and True is represented by any representation of non-zero.
Before the Genesis upgrade, byte vectors on the stack are not allowed to be more than 520 bytes long, however in the unbounded Bitcoin protocol the amount of data being pushed onto the stack is only limited to the economic limits imposed by the miners. As services such as mAPI are rolled out further, users will be presented with further choice in how they use the network.
While pushdata opcodes are limited to pushing 4.3GB onto the stack it is theoretically possible to concatenate multiple objects on the stack to form larger singular data items for processing.
Before Genesis, Opcodes which take integers and bools off the stack require that they be no more than 4 bytes long, but addition and subtraction can overflow and result in a 5 byte integer being put on the stack. After the Genesis upgrade in early 2020, nodes are now free to mine transactions with data items of any size possible within protocol rules. These will be usable with mathematical functions within script. Over time, network node operators will collectively agree on appropriate data limits.
When a node finds a proof-of-work, it broadcasts the block to all nodes.
Nodes accept the block only if all transactions in it are valid and not already spent.
Nodes express their acceptance of the block by working on creating the next block in the chain, using the hash of the accepted block as the previous hash.
Unpacking the above, nodes are network entities that:
Are actively competing to add new blocks to the chain, and can only call themselves a node if they have been successful in doing so.
Process transactions by validating them and timestamping them into blocks. Importantly, this means they are not responsible for storing and serving transactions.
They enforce the network consensus rules and their own local policies while performing their required actions.
Nodes sit at the centre of the network and out of economic necessity are densely connected to each other forming a small-world network.
Users and/or services interact with the node network by submitting transaction to it for timestamping and by receiving the necessary block information to derive Merkle paths for Simplified Payment Verification (SPV)
Bitcoin: A Peer-to-Peer Electronic Cash System
’ published on 31 October 2008 (the ‘
Bitcoin White Paper
’), ensuring the Bitcoin Protocol remains ‘set in stone’, offering educational resources, research, and information, as well as by establishing a regulation-friendly ecosystem that encourages honest behaviour, nurtures digital currency, and facilitates blockchain innovation.
B. In the Bitcoin White Paper, the public was offered the opportunity to obtain up to 20,999,950 electronic coins in the aggregate if they abided by certain rules, including those set out in the Bitcoin White Paper (the ‘Unilateral Contract’).
C. Participants in the Bitcoin SV ecosystem support adherence to the Bitcoin Protocol and the terms of the Unilateral Contract and seek to maintain the vision in the Bitcoin White Paper.
D. While the Association provides stewardship of the Network, it is the responsibility of those persons who conduct Network Activities from time to time, whether individually or collectively (each a ‘Node’), to promote and maintain honest and lawful behaviour in line with the Bitcoin White Paper’s vision. ‘Network Activities’ means collecting, validating, or accepting a block, collecting transactions into a block, attempting to find a proof-of-work for a block, or broadcasting a block.
E. To achieve the Bitcoin White Paper’s vision, a common framework with clear standards and practices for Nodes is essential. This framework, embodied in the Rules, enables legal recourse between Nodes if a Node has breached the Rules. The Rules also enable the Association to take legal and technical actions, such as sending informational messages alerting Nodes to breaches of the Rules, so as to support the ecosystem in counteracting unlawful and dishonest behaviour on the Network. Our goal is to exercise all of our rights, powers, and discretions under the Rules in a way that promotes the stability of the Bitcoin Protocol over time.
F. We have therefore published the Rules, which build upon and supersede the Unilateral Contract, to offer the users of the Network increased legal certainty, confidence, and security and to protect the long-term growth and success of the Network. By conducting any Relevant Activities (including any Network Activities), a Node agrees to be bound by the Rules.
G. We also offer licences for using the Node Software (the ‘Node Software Licence’), the full terms of which may be found here. The Association recognises the vital role of software, especially secure open-source types, in optimising the Network’s functionality and Node compliance with the Rules, and supports innovative software development by Nodes, both independently and in collaboration. If a Node uses the Node Software or takes advantage of the Node Software Licence, it has also agreed to be bound by the Rules.
Previous attempts have been made to put forward SPV components, but never a functional wallet which is compatible with the existing ecosystem.
The SPV Wallet code is all open source - available to lift and modify for your own purposes, or transcribe into your preferred programming language. These functions are being built into open source libraries which we encourage you to incorporate into your own systems.
Whether you are active in the supply chain, healthcare, finance, or public sector areas, you may need to add wallet capabilities to your application.
By installing your own SPV Wallet instance you can use it plug-and-play for your application. That way you will be able to leverage the benefits of other BSV infrastructure components accessible through SPV Wallet and be aligned with the latest industry and BSV standards, improving the robustness and security of your business.
The cache is used for handling spikes in usage of the application. The idea being all requests can be queued and responses made on a FIFO basis.
(defaults to 72 blocks).
Safe mode can be disabled (RPC functionality restored) by putting the disablesafemode configuration parameter to 1 and restarting the node. It is recommended that this is NOT done, except in extreme circumstances. If this option is set, the node becomes vulnerable to Withholding attacks.
The installation process described here should be treated as a foundation for configuring the environment to suit your specific business needs. While we recommend using observability tools such as AWS Cloud Watch, Kibana, or Prometheus, especially in a production environment, please note that these tools are not included in this installation. The configuration of these tools is left up to you.
Reference Implementation for Simplified Payment Verification
Maintained by the BSV Association
100x Cheaper to run than a node
SPV Wallet is an open-source, non-custodial hosted wallet that seamlessly integrates with the existing BSV Blockchain ecosystem. It serves as a reference implementation for Simplified Payment Verification, ensuring a secure, efficient, and user-friendly experience.
Developed and maintained by the BSV Association, SPV Wallet is designed to be cost-effective and accessible. It is 100x cheaper to run than a full node, making it an ideal solution for businesses who want to participate in the BSV network without being miners themselves.
In the following sections, we will delve into the technical details of SPV, explain how it works, and provide step-by-step instructions for setting up and using the wallet. Join us on this journey as we explore the future of Bitcoin SV with SPV Wallet, and discover a new way to manage your digital assets securely and efficiently.
Benefits
Secure
Scalable
Cost Savings
Legal
"LiteClient" has been replaced by "SPV Wallet"
Transactions are verified instantly using SPV, network approval is obtained within 5 seconds, and proof of inclusion obtained as soon as they're mined.
The non-custodial model allows private keys to remain broadly distributed, reducing the incentive to attack, protecting user funds.
Address based payments require recipients to filter through all transactions to find relevant ones. This requires global indexing which has proven difficult to scale.
The SPV approach circumvents this entirely by enabling counterparties to communicate directly with no external factors limiting scalability.
Operational cost is proportional to use rather than to overall network transaction volume. This is achieved by keeping block headers, ignoring external transactions, and using Merkle proofs.
In addition, the BSV Association will actively support the open source software through the upcoming network topology shift towards Overlay Networks and Teranode. This will externalize maintenance costs for businesses using the open source software.
With direct transmission between counterparties, you get SSL certificates, IP addresses, PKI signatures, and payment metadata on your terms. Regulatory compliance is easy when considering KYC, AML, or Travel Rule requirements, all without compromising user privacy
The term was often misunderstood since there are multiple components to a complete system and it wasn't clear whether one component was the LiteClient or whether the whole system was. There are multiple clients and servers in this collection of tools which forms the SPV Wallet.
1. Identify the Leaf Node: Start with the hash of the transaction (txid) you are interested in. This is your leaf node.
2. Sibling Hash: Find the hash of the sibling node. If your leaf node is the left child, the sibling is the right child, and vice versa.
3. Parent Hash: Concatenate the hash of your leaf node with the hash of its sibling. Then, hash this concatenated value to get the hash of the parent node.
4. Repeat Up the Tree: Move up the tree by repeating steps 2 and 3. For each parent node, find its sibling, concatenate their hashes, and hash the result to get the next parent node.
5. Reach the Root: Continue this process until you reach the top of the tree, which is the root hash.
1. Efficient Verification: Merkle Trees allow efficient and secure verification of the integrity of the data. With a Merkle Tree, you only need to check a small number of hashes (the Merkle path) to verify that a specific transaction is included in the set. This is much more efficient than checking all txids in a list.
2. Partial Validation: Merkle Trees enable partial validation, meaning you can verify individual transactions without having to download the entire set of transactions. This is particularly useful in distributed systems like blockchain, where nodes can validate transactions without needing the entire blockchain.
3. Scalability: Merkle Trees scale well with the number of transactions. As the number of transactions grows, the depth of the tree increases logarithmically, keeping the number of operations needed for verification manageable.
4. Fault Tolerance: Merkle Trees provide a way to identify and isolate data corruption or tampering. If a hash in the tree does not match, it indicates the presence of a corrupted or tampered transaction, and the tree structure helps pinpoint the exact location of the issue.
5. Efficient Storage and Bandwidth: In systems where data needs to be transmitted over a network, using Merkle Trees can reduce the amount of data that needs to be sent. Only the relevant Merkle paths are needed for verification rather than the entire list of transactions.
{
"alert_type": <uint32>,
"raw": <raw hex string of the alert>,
"sequence": <uint32>,
"text": <human readable alert message string>
}
GKE
The following directions will walk you through creating a Bitcoin SV node within GKE (Google Kubernetes Engine).
If you wish to run another version of bitcoind, just change the image reference in bitcoin-deployment.yml.
Steps:
1 - Add a new blank disk on GCE called bitcoin-data that is 200GB. You can always expand it later.
2 - Save the following code snippets and place them in a new directory kube.
3 - Change the rpcuser and rpcpass values in bitcoin-secrets.yml. They are base64 encoded. To base64 a string, just run echo -n SOMESTRING | base64.
4 - Run kubectl create -f /path/to/kube
5 - Profit!
The BSV Association has been advocating for non-mining entities (exchanges and other applications) to remove their reliance on the SV Node software for daily operations because of the constantly increasing traffic on the BSV network.
The BSV Association strongly believes in the scaling roadmap laid out in the Bitcoin Whitepaper, which specifies that non-mining entities should use Simplified Payment Verification (SPV) to transact on the BSV network. We strongly encourage any non-mining entities that currently operate the node software for their daily operations to reach out to us as the BSV Association to learn about the SPV Wallet reference implementation to replace their reliance on the mining node software.
For non-mining businesses that insist on continuing to run the node software, we strongly encourage installation and connection of the Alert System to remain in sync with the valid longest chain.
For non-mining businesses that do not want to run the Alert System, we recommend modifying the following configuration in your bitcoin.conf file:
This ensures that your peer remains in sync with any validly processed DAR Alert Messages.
Once you have the bitcoind service running in the background, you can show running containers:
Or view the logs of a service:
To stop and restart a running container:
The best method to configure the server is to pass arguments to the bitcoind command. For example, to run Bitcoin SV on the testnet:
Alternatively, you can edit the bitcoin.conf file which is generated in your data directory (see below).
By default, Docker will create ephemeral containers. That is, the blockchain data will not be persisted, and you will need to sync the blockchain from scratch each time you launch a container.
To keep your blockchain data between container restarts or upgrades, simply add the -v option to create a data volume:
Alternatively, you can map the data volume to a location on your host:
By default, Docker runs all containers on a private bridge network. This means that you are unable to access the RPC port (8332) necessary to run bitcoin-cli commands.
There are several methods to run bitcoin-cli against a running bitcoind container. The easiest is to simply let your bitcoin-cli container share networking with your bitcoind container:
If you plan on exposing the RPC port to multiple containers (for example, if you are developing an application which communicates with the RPC port directly), you probably want to consider creating a user-defined network. You can then use this network for both your bitcoind and bitclin-cli containers, passing -rpcconnect to specify the hostname of your bitcoind container:
Occasionally different nodes will have different best chaintips and these differing blocks will have the same parent block. The consensus mechanism will take care that the longer best chain will prevail.
The “standard” version of a block header is 02000000 but most miners use ASICBoost which uses extra bytes in the version field as a nonce.
Failed to open mempool file from disk.
Continuing with empty mempool and transaction database
Messages regarding misbehaving peers...
Found invalid chain at least ~6 blocks longer than our best chain
If we don't care to track tokens beyond their first spend we could build some simple logic into an overlay which defines a the token as "any utxo which has this specific txid". That way any transaction will be accepted by the overlay so long as it is spending one of a specific set of outputs from a single transaction. You could imagine the use case is a redeemable voucher for $5 off from a local store as part of some promotion.
Say it yields the txid 76730e3d92afcf6a28f8a43bb2c6783685b18170a8da31168364c7b73c9893f3 then we can set the overlay to accept transactions only if one or more inputs contain that txid.
This limits us to either knowing the desired owners of each token at the time on minting, setting the public key hash accordingly; or using a server side private key which pre-signs the utxos with sighash none & anyone can pay before delivering them to a particular owner. This allows them to pass this information around as they see fit, eventually constructing a transaction which spends the utxo using that existing signature, simply adding an arbitrary output when needed.
You can see from this simple example that the meaning of the token is defined by the issuer, and is only redeemable with them.
Multi Use
Creating tokens which can be transferred multiple times while retaining their meaning involves tracing their outputs from one to another.
This can be handled again by a simple overlay which accepts minting transactions as well as transfer transactions and burn transactions.
How you consider the tokens to exist and transfer can be in a push data denomination, or an ordinals approach.
Push Data approach
The idea here is that you mint tokens by pushing a blob of data to denominate the value the token represents while not really caring how many satoshis are associated. In other words 1 satoshi is sufficient for any denomination.
For example a JSON push data might look like:
This would be pushed to the script as a blob of data which is then dropped off the stack prior to executing a regular locking script function.
Thereafter, these tokens are spendable only within the context of the token's issuing overlay. In other words, each spend needs to be send to that overlay such that the new token outputs can be noted for eventual redemption / burning at the end of the token lifecycle.
Transfer transactions would like something like:
inputs
outputs
{ "sometoken": 1000 } 1 satoshi
{ "sometoken": 600 } 1 satoshi
{ "memecoin": 234 } 1 satoshi
{ "sometoken": 300 } 1 satoshi
fundingUtxo
{ "memecoin": 234 } 1 satoshi
The simple rule being "to accept an inbound transaction it must have equal inputs and outputs of each token type.
From the minting transaction onward the issuer of the tokens keeps a working UTXO set of all their tokens, updating them as new transactions come in. This allows them to enforce rules as they deem appropriate for their particular use case.
Ordinal Approach
This would involve using the satoshis themselves to represent specific denominations and using the order of satoshis in the inputs and outputs to define where the tokens were being transfered, rather than the push data.
A transfer would then look like:
inputs
outputs
"sometoken" "1:1" 10 satoshis
5 satoshis
"memecoin" "3:1" 3 satoshis
8 satoshis
In this case, the 0th output would now contain 5 sometokens, and the 1st output would contain 5 sometokens and 9 memecoins. The push data in the inputs refers to token type and token to satoshi ratio.
Thereafter there would be no need for push data, just satoshi values, the tokens would transfer using the order of satoshis in subsequent transactions, thus offering a higher degree of privacy.
Offline Transactions
Fundamentally the benefit of tokens over account based payment systems is that each transfer is independent of all other transfers. This means you can do offline payments, chain a bunch of payments together, and then broadcast everything when you next connect to arrive at a valid confirmed state. Many people can all do this simultaneously, so there is no upper bound to the number of transactions per second which can be facilitated in this way. Payments can occur entirely P2P and settlement can be asynchronous without any underlying issue.
Bad actors cannot fake their tokens since they come with Merkle paths, so fraud is significantly more difficult. Given the time to settle is 80ms or so once connected, there's no incentive to attempt it - you don't know whether the receiving party is connected or not.
Data Integrity
BSV Blockchain provides a globally distributed timestamp server backed by proof of work. What this means is that every block added to the chain is linked to a previous block such that all history of transactions remains immutable. The security of this model is that the chain of hashes is broadly distributed, ideally to all users of the system. This constitutes a very small amount of data - 80 bytes every 10 minutes - while incorporating proof of inclusion for an unbounded number of transactions.
Implementation
Broadly speaking the idea is to contain a proof that some data existed in a transaction which is submitted for inclusion within the blockchain. When a valid block is found, the transaction is in effect timestamped as having existed at that point in time at that specific block height. We can then use the transaction itself, a Merkle path, and the block header to prove it mathematically. This allows us to provide proof that the data within the transaction has not changed at all since its inclusion.
The key primitive which allows this is something called a Cryptographic Hash Function, specifically in BSV we use sha256. If we want to prove data integrity privately, we can publish a hash of the data rather than the data itself.
What this requires is a server to host the data, and a client which knows how to run the proof. The data can be stored like so:
The exact format in terms of the hash algo used, where the push data is within the output, whether it's signed, can all be decided by the implementer based on their needs.
What you can then do as a consumer of the data to check integrity is make a request to the server holding this information. You retrieve the data, which you then hash and check against the transaction data to verify inclusion. Then you run transaction verification:
WhatsOnChain provides headers in the example code above - but in an ideal world you would be checking against your own Block Headers Service. We provide free open source software which will get and maintain an independently validated chain of headers you can reference to validate data independently. This is the one thing which is actually important to distribute broadly.
{
"data": "Enemy at the gate",
"tx": "0100beef01fe77eb0c000e02fdd8140017...",
"out": 0, // output index in which the hash of the data appears within the transaction
}
import { Transaction, WhatsOnChain } from '@bsv/sdk'
// some id related to the content you want
const id = '5ca05a2be61fccf24465525c4692ce92c2f67c43d5cbdd4cbc233e3ed29f4822'
// request from a data integrity overlay
const response = await (await fetch(`https://data-integrity-service.com/${id}`)).json()
// parse as a transaction using the SDK
const tx = Transaction.fromHexBEEF(response.tx)
const data = response.data
const hash = sha256(response.data)
// check if the data's hash appears in the transaction
const included = tx.outputs[response.out].lockingScript.toHex()
.includes(hash)
// Make sure the tx is really part of the blockchain.
const valid = tx.verify(new WhatsOnChain())
if (valid && included) {
console.log(data, 'valid data timestamped in block: ', tx.merklePath.blockHeight)
} else {
console.error('corrupt data')
}
Developers are invited to participate in validating Teranode by running their own node on Teratestnet, a dedicated test network for the next-generation node software. The BSV Association has released the Teranode source code publicly and encourages community participation in testing and validation.
Running a Teratestnet node doesn't require specialized hardware—it can be done on a basic laptop using Docker. The setup process is streamlined through an automated bash script that handles network configuration, RPC credentials, and optional CPU mining setup.
#General-dev or Questions channel on the BSV Discord: https://discord.com/invite/bsv
Alpha Release - please be aware these components are subject to change as they are currently undergoing internal review prior to any official release.
Overview of GitHub repositories
The main BSV GitHub is available here, showcasing all public repositories, enabling developers to contribute directly or use as the foundation for their own needs.
This page highlights the main repositories currently available on GitHub:
SDKs
The BSV Blockchain Libraries Project aims to structure and maintain a middleware layer of the BSV Blockchain technology stack. By facilitating the development and maintenance of core libraries, it serves as an essential toolkit for developers looking to build on the BSV Blockchain.
Three core libraries have been developed and made available:
GO SDK:
Script templates:
TypeScript SDK:
More information available
SPV Wallet
The SPV Wallet is a comprehensive non-custodial wallet for BSV, enabling Simplified Payment Verification (as described in the Bitcoin White Paper section 8).
The main repository is available under this link: .
Add-ons
In addition, the following repositories are related to SPV Wallets:
Administrative console:
TypeScript client:
GO client:
Web-Frontend:
More in-depth information and guidance about SPV Wallets is available
Block Headers Service
The Block Headers Service is a Go application used to collect and return information about blockchain headers.
ARC
ARC is a multi-layer transaction processor for BSV Blockchain that keeps track of the lifecycle of a transaction as it is processed by the network.
The main repository is available here:
Full details on ARC are not yet available in this BSV Skills Center, but can be found here:
SV Node
SV Node is the main node software used within BSV Blockchain. It is based on the original implementation of the Bitcoin protocol implemented as a monolith. The main repository is available here:
For more details, see and the .
There is ongoing work for an improved and scalable microservice implementation of the node software (Teranode) to support a much larger network throughput of transaction processing. For more information, visit
Alert System
The Alert System must be run together with the SVNode software, to ensure that a node is able to receive alerts.
The main repository is available here:
Linked Keys
The system known as "type-42," based on the BRC-42 technical standard introduces a sophisticated method of key derivation that enhances privacy and enables what are known as "private signatures." This document aims to elucidate the principles of type-42 derivation, demonstrate its role in enabling private signatures, and explore its broader implications within the BSV ecosystem.
Understanding Key Derivation
Before delving into the specifics of type-42, it is essential to understand the concept of key derivation in cryptographic systems. Key derivation is a process that generates one or more keys from a single master key, which can then be used for various cryptographic purposes, such as encryption, decryption, and digital signing. Traditional key derivation methods like BIP32 offer limited flexibility and privacy because they restrict the number of derivable keys and allow anyone to see all the derived children, even those computed by others.
The Type-42 Key Derivation Method
Type-42 improves upon traditional approaches by allowing two parties to independently generate a series of secret keys for each other using shared information that remains confidential between them. It improves upon BIP32 because instead of having one single public key derivation universe the entire world can see, each set of two parties who are communicating with one another share their own unique, private key derivation universe only the two of them can access. This method utilizes the following components and steps:
Identity Keys: Each party maintains a master private key and a master public key. The whole world can know the master public key.
Shared Secret Computation: When two parties wish to interact, sign or validate messages, they first compute a shared secret. This is achieved by one party using their private key and the other party's public key in elliptic curve point multiplication.
Key Generation Using Invoice Numbers: To generate a unique key for a payment, message or any other purpose, the parties agree upon a specific invoice number as an identifier. An HMAC (Hash-based Message Authentication Code) is computed over this invoice number using the shared secret as the key, ensuring that each key is unique and known only to the involved parties. One party could generate the invoice number and send it to the other. Publishing the invoice number doesn't compromise security because of the HMAC.
Enabling Private Signatures with Type-42
Private signatures are a crucial application of type-42 derivation. In traditional digital signature schemes, anyone with access to the signer's public key can verify the signature. However, with Type-42:
Enhanced Privacy: The signature can only be verified by someone who knows the specific shared secret used to derive the keys involved in the signature. This means that outside parties cannot verify the signature or link it back to the signer without access to the shared secret, enhancing the privacy of the exchange.
Security Against Replay Attacks: Since each transaction uses a unique key derived from a different invoice number, the risk of replay attacks (where a valid data transmission is maliciously or fraudulently repeated) is minimized. This is especially true when rolling or time-based invoice numbering schemes are used.
Auditable by Design: For situations requiring transparency (e.g., audits), the shared secrets or the HMAC outputs can be disclosed to specific entities, like tax agencies, without compromising the overall security of the system, or of unrelated transactions.
Broader Applications
Beyond private signatures, type-42 key derivation can be applied in various other contexts within BSV transactions. These include secure message exchanges, private invoicing systems, and more flexible wallet architectures that support a multitude of applications and services without compromising security or privacy.
Type-42 not only facilitates more secure and private digital signatures but also heralds a new era of cryptographic flexibility and interoperability in digital asset transactions. You can check out a tutorial leveraging the new TypeScript SDK's type-42 features .
SPV
Simplified Payment Verification (SPV) is a method in Bitcoin that allows receivers in a peer-to-peer or P2P transaction to rapidly mitigate the possibility that the transaction's inputs have already been spent without running a node.
This technique leverages the properties of the blockchain to ensure that a transaction has been included in the blockchain without the need to download and verify the entire blockchain history.
Concept of SPV
Definition: SPV enables users to confirm that a transaction has been included in a block and thus is part of the blockchain without needing to validate the entire blockchain. This is accomplished by using the longest chain of block headers and the specific Merkle branch related to the transaction being verified to perform a Merkle proof and match the result against the Merkle root of the relevant block header.
Verification Steps
Checks made on receipt of a transaction from a counterparty:
Script evaluation of each unlocking script results in TRUE.
The sum of the satoshis-in must be greater than the sum of the satoshis-out.
Each input must be associated with a Merkle path to a block.
How SPV Works
Block Headers: The receiver keeps a copy of the block headers of the longest proof-of-work chain. Block headers are significantly smaller in size compared to full blocks, making it feasible to store and verify them without needing much storage.
Merkle Tree: Transactions in a block are hashed into a Merkle tree, with only the root hash included in the block header.
Merkle Proof: To verify a transaction, the user obtains the Merkle branch linking the transaction to the block's Merkle root. This branch proves that the transaction is part of a block.
Example of SPV in Use
Imagine Alice wants to verify a payment she received from Bob. Instead of downloading the entire blockchain, Alice does the following:
Step 1: Alice's wallet queries the network for the block headers of the longest chain.
Step 2: Once Alice has the latest block headers, she calculates the Merkle proof of the received transaction using the received Merkle branch that she got from Bob.
Step 3: Once she has the Merkle proof, she compares it with the Merkle roots of block headers until she finds a match confirming the transaction has been timestamped into the blockchain or no match confirming it hasn't.
Benefits of SPV
Efficiency: SPV significantly reduces the amount of data that needs to be downloaded and processed, making it suitable for lightweight clients, such as mobile wallets.
Security: As long as the majority of the network is honest, SPV provides a reliable way to verify transactions.
Scalability: SPV supports the scalability of the Bitcoin network by enabling more users to participate in the network without running full nodes.
Limitation of SPV
No check if inputs have already been spent: SPV checks if the transaction the input is coming from has been timestamped into a block but it does not check if the output being used from that transaction has already been spent
Protecting Against SPV Vulnerabilities
Performing an additional double-spend check: One strategy to mitigate the risk of accepting fraudulent transactions is to perform a double-spend check by submitting the transaction to the network and waiting a minute to see if it gets accepted or rejected.
Limiting SPV use to small-value transactions: SPV is aimed at small-value transactions and should not be used for high-value transactions; although, there are already laws in place that require additional checks for high-value transactions such as when purchasing property or a vehicle.
AWS Volumes Setup
The bitcoin-data folder will contain the logs, blocks, UTXO set (stored in chainstate) and various other files the SV Node needs to function. For mainnet this folder will get very big, around 350GB for the UTXO set and 12TB for the blocks as of January 2024. The UTXO set is used for lookups to validate transactions and should be stored on a high-performant SSD. Depending on your use case, the blocks can be stored on slower, cheaper HDD storage.
If setting up the node in AWS, the recommendation is to use an instance type with strong single threaded performance like r7i and mount 1 or more EBS volumes of sc1 type for the bitcoin-data/blocks folder and use an EBS mounted io2 for the bitcoin-data folder including the chainstate.
For the blocks mount, it is recommended to use LVM to get around the AWS limitation of 16TB per volume, this will be needed as the blocks folder will continue to grow over time.
For io2 be mindful of the pricing: a 500GB disk with 3000 IOPS is $260 per month, a 500GB disk with 64000 IOPS is $3600 per month. 3000 IOPS should suffice, the main advantage io2 will bring is improved latency.
Installation
These commands assume the larger, slower storage is at /dev/nvme1n1 and the fast storage is at /dev/nvme2n1
Step 1: Install LVM2
Step 2: Prepare Physical Volume
Create LVM physical volumes the slower storage:
Step 3: Create a Volume Group
Create a volume group including the relevant devices:
Step 4: Format and Mount the Logical Volume
Format the cached logical volume and mount it:
Step 5: Format and Mount the SSD volume
Format the SSD volume and mount it:
Step 6: Create the symlinks
Step 7: Automount on Startup
Edit /etc/fstab to automount the logical volume on startup:
Get the UUID:
Add to /etc/fstab (replace <your-UUID> with the actual UUIDs):
Step 9: Testing the Configuration
Reboot your system and test the configuration:
After rebooting, verify the setup:
Alert System
Alert System
Version 1.1 reintroduces the Alert System. The Alert System, originally implemented in the v0.3.10 Bitcoin release, enables the BSV Association to send signed messages to the network. Messages can be of an informational or directive nature. This release also contains native support for Digital Asset Recovery alerts. Alongside the release of the Alert System, the BSV Association has released the Network Access Rules of the BSV network. The Network Access Rules specify the terms and conditions by which nodes (miners) in the BSV network operate. As stated in the Network Access Rules, it is expected that all nodes in the network process validly signed Alert Messages broadcast to the network. The Network Access Rules can be read in their entirety here: bsvblockchain.org/network-access-rules
The Alert System connects to other nodes using the libp2p protocol, the same peer to peer protocol that will be used in Teranode, and is currently used in IPFS. Libp2p is a modular system of protocols, specifications, and libraries that enable the development of peer-to-peer network applications. The Alert System uses a distributed publish/subscribe (pubsub) mechanism for communication. Alert Generator – the alert publisher – sends an alert to a predefined topic. To receive a published alert, all the Alert System nodes – the alert receivers –subscribe to that topic. The following topics are used for communication:\
Network
Topic
Protocol ID
Alert Messages
Read more about the type of alert messages being sent in
How to run the Alert System
Instruction and installation guide available in
Recommendation for non-mining entities
The BSV Association has been advocating for non-mining entities (exchanges and other applications) to remove their reliance on the SV Node software for daily operations because of the constantly increasing traffic on the BSV network.
The BSV Association strongly believes in the scaling roadmap laid out in the Bitcoin Whitepaper, which specifies that non-mining entities should use Simplified Payment Verification (SPV) to transact on the BSV network. We strongly encourage any non-mining entities that currently operate the node software for their daily operations to reach out to us as the BSV Association to learn about the SPV Wallet reference implementation to replace their reliance on the mining node software.
For non-mining businesses that insist on continuing to run the node software, we strongly encourage installation and connection of the Alert System to remain in sync with the valid longest chain.
For non-mining businesses that do not want to run the Alert System, we recommend modifying the following configuration in your bitcoin.conf file:
This ensures that your peer remains in sync with any validly processed DAR Alert Messages.
STN
Getting Started with Bitcoin STN
This guide will help you in setting up a BitcoinSV node which connects to the Scaling Test Network.
What is STN?
The STN is a public test network targeted at testing scaling. Block sizes are typically bigger than those on mainnet, but transaction volumes are generally much lower. It is not uncommon for performance/capacity tests to be run in STN, in which case transactions per second can rise dramatically.
New blocks/coins are generated using CPU mining. The STN blockchain may also be “reset” for a new node releases. I.e. the blockchain is wound back to a previous height to minimise start-up times for new nodes.
System requirements for running a STN node:
More information about STN can be found on
QuickStart Instructions
Step 1:
Install SV Node according to the installation guide:
Step 2:
Configure bitcoind to connect to the STN and not Mainnet, as well as setting mandatory parameters. Make the following changes to your bitcoin.conf
Step 3:
If you wish to add any other custom configurations to your Bitcoin SV node you can appended them to the bitcoin.conf file with the editor of your choice. If you are running a node for development and not archival purposes it is recommended you operate in prune mode to prevent excessive disk space usage. Make the following change to your bitcoin.conf.
Step 4:
Start the bitcoind process. If you have been following the installation guide you can use systemd
If this is the first time you have started the node, it may take several hours or even days as the node downloads blocks and checks that they have not been tampered with. In this case, it may make sense to run the node in foreground to see status messages.
If this is not the first time you have run the node, it should start up quickly and it may make sense to run the node in the background.
Step 5:
Check the status of the node and the bitcoind process. Type the following at the command line:
This should generate an output similar to
Funding
If you wish to perform worthwhile testing in the STN you need to obtain unspent coins. Unspent coins may be obtained from the STN team by contacting on Telegram. Alternatively it is possible to mine coins as the difficulty in STN is low and mining should only take a few minutes using a laptop.
Initial Block Download
A full initial Block Download can take a long time depending on your setup. For reference, a full initial block download on an AWS r7i.8xlarge instance with 256GB RAM, configured with Installation docs and the AWS Volumes Setup takes around 6 days as of Feb 2024. After the IBD you can downgrade the instance to r7i.4xlarge with 128GB RAM, depending on network load and what the node will be used for.
Unable to complete Initial Block Download
See github.com/bitcoin-sv/bitcoin-sv/wiki/Block-download-issues
Most issues related to stuck blocks and IBD (Initial Block Downloads) are the result of insufficiently powerful system, i.e. not enough available disk space or memory or configuration issues.
Configuration
Check that excessiveblocksize is up-to-date (current recommendation is 10GB = 10000000000). If a block is in excess of the excessiveblocksize, the node will regard the block as invalid and it will not be added to the blockchain.
I.e. Blocks arriving over the network larger than the specified size with be rejected and the blockchain will stall. An IBD (Initial Block Download) will not progress passed this block.
The following log message is emitted under this condition:
Note that this is a generic log entry for oversized messages.
Inadequate Network Performance
The block has a hard-coded timeout for block downloads (10 mins). If a block cannot be downloaded in that time, the download times out and fails.
A 4GB block requires both the source server and the network to sustain at least 56MB per second per connection. On rare occasions a new block may not found for 30 minutes or more. In that case, the size of the block will be roughly 3x the size of a standard block. If 4GB blocks become the norm, the source server and network may need to sustain at least 168MB per second per connection. If your system does not meet that requirement, your node may timeout during IBD.
The parameter blockdownloadtimeoutbasepercent can be used to extend the downloading time. The parameter specifies the new timeout as a percentage of 10 minutes.
Docker Issues
Docker container memory limits have been responsible for slow IBD. If a large block arrives, the limit may be reached and the process killed.
Insufficient Disk Space
On some systems, during IBD the thread downloading the blocks may race ahead of validation, and as a result the amount of blocks on disk may exceed the prune setting if there is one.
Insufficient Memory
Under some circumstances the processing of a single incoming block may produce a short-lived memory usage spike (up to 3x the size of the block).
If your node crashes and does not produce a core dump (even though configured to do so), check /var/log/syslog to see if the process ran out of memory and was terminated by the OS.
Using the loadblock to resolve download issues
If you have access to another working node and your download fails at a specific block height, it may be a good idea to copy the blkXXXXX.dat file for the specific block across to you local block repository and use the loadblock configuration option to get the node to load the version of the block stored locally on disk rather than perform a download over the network. Make sure the originating node is using the same preferredblockfilesize value.
Note that you need to ensure that you trust the source of your blkXXXXX.dat files. See bitcoind help for more information.
Make sure you're in the same region you chose in Step 3.
Step 3
Click your top level stack, the one without the NESTED badge.
Step 4
Click the Update button at the top right.
Step 5
Choose the Replace current template option
Step 6
Ensure Template source is set to Amazon S3 URL
Step 7
Use the following URL as the template URL:
Step 8
Click Next through the form until you reach the summary page
Wait until
Check the checkboxes right above buttons at the bottom of the page
Click "Submit" - which will trigger the update.
Step 9
Wait until status of the stack will reach the value UPDATE_COMPLETE
Step 1
Make sure you have AWS CLI installed and authenticated
Step 2
Replace variables described below with chosen options in the following command and run it to update the stack.
Where:
${Stack_Name} - is the stack name chosen during installation process
Block Headers Service
Block Headers Service runs as part of the SPV Wallet, you do not need to deploy it separately. If you want to run it without the rest of the stack, deployment instructions can be found in the README of the repository in Github.
Integration of Block Headers Service
One significant step in the evolution of the SPV Wallet is the integration of Block Headers Service. Block Headers Service listens to block announcements from mining nodes on the p2p network, requests the block headers, and validates them on receipt to ensure they're part of the longest chain of work. It independently maintains a full history of all block headers, and exposes them via a secure web API. SPV Wallets can use this API to validate the inclusion of a transaction within a particular block.
This is a critical component of SPV functionality, as it allows confirmation of transactions without downloading the entire blockchain.
Block Headers Service keeps track of all block headers, so that we can check Merkle Roots during SPV.
Make a POST request to your Block Headers Service /api/v1/chain/merkleroot/verify
You get both individual results for each input, and an overall confirmationState which you can use assuming you're validating one transaction with many inputs.
Web App & API
Example application
Example Application integrated with SPV Wallet
The frontend web wallet application allows users to register, make transactions, and see their balance. This is what we'd expect you to replace with your own application front end, but is included in the deployment to provide a working demo for basic payment functionality.
SPV Wallet - Web App
Front End
Back End
The backend API is coupled with the web wallet, and demonstrates use of the Wallet Client library.
Clients
The client libraries themselves are available separately such that integrating with your own front end should be straightforward.
Golang
JavaScript
Professionals
The following does not constitute legal advice. All relevant issues cannot be considered. The assumption is that, where appropriate, miners will consult with their legal advisers and any other adviser they deem appropriate.
What legal frameworks and precedents support the implementation of the Network Access Rules (NAR) on a blockchain network?
Advice has been taken and every effort made to ensure that the implementation of the NAR is supported by traditional English law contract principles, such as those underlying contracts intended to have multilateral effect. NAR concerns an expanding universe of participants where engagement in relevant activities (including network activities) confirms acceptance. The NAR structure and language draws significantly on established precedents in this regard from the derivatives and other global financial markets.
Testnet
Getting Started with Bitcoin testnet
This guide will help you in setting up a BitcoinSV node which connects to the testnet.
What is testnet?
Transactions
Transaction Relay
Nodes are obliged to relay the transactions they receive to all other nodes that have outgoing connections to. This aims to ensure all nodes on the network are aware of all transactions submitted to the network, regardless of the mining fee they carry.
Delete
You can delete resources by deleting the CloudFormation stack.
All data within SPV Wallet will be deleted.
Manual delete is required for log groups.
Step 1
Open
Step 2
Make sure you're in the same region you chose in of installation
DDOS Mitigation
Operating an SV Node within the BSV Blockchain requires a proactive approach to security, particularly in safeguarding against Distributed Denial of Service (DDoS) attacks. These attacks aim to disrupt service by overwhelming the node with traffic, posing a significant risk to network stability and data integrity. Effective port management is a cornerstone of node security, emphasizing the importance of limiting open ports to those essential for operations. Special consideration should be given to port 8333, the default for peer-to-peer (P2P) communications, which, while not a frequent target, is vulnerable to DDoS attacks due to its critical role in network connectivity.
This guide offers targeted strategies and configurations to fortify SV Nodes against DDoS threats, focusing on optimizing maxconnections and maxconnectionsfromaddr settings, alongside deploying UFW rules to rate limit incoming traffic on port 8333. Implementing these measures enhances the resilience of the node, ensuring the BSV Blockchain network remains robust and reliable against external disruptions.
nLocktime, and nSequence of each input are set to the expected values.
Verification: By linking the transaction to a specific place in the blockchain, the receiver can be sure that the network has accepted the input of the transaction.
How does the BSV Association (BSVA) plan to address potential legal challenges or disputes related to the Network Access Rules?
The Network Access Rules include arbitration as a preferred mechanism for dispute resolution.
What is the process for resolving legal disputes concerning digital assets to be frozen or reassigned, or digital assets which have already been frozen or reassigned?
BSVA may issue a directive requiring miners to freeze or reassign digital assets provided this does not contradict the various restrictions on the BSVA’s power to do so in the NAR. An example of where the BSVA is likely to do so is where it is served with a court order or arbitral decision which it is binding on it and enforceable in Switzerland or England & Wales. BSVA itself does not resolve any underlying disputes concerning digital assets on the BSV network. Where it chooses to act, its role is akin to that of an enforcing body.
If a miner does not agree with freezing or reassignment of specific digital assets by BSVA, it is free to request that BSVA review the case. Miners are also empowered to commence arbitration under NAR should they consider that their rights under NAR have been violated. Arbitration is frequently used in contractual disputes, and is particularly useful in the context of debates involving specialist subjects such as digital assets.
Can the Alert System be considered a form of digital asset regulation, and if so, how does it comply with existing regulatory standards?
No. The Alert System operates as a contractual mechanism aimed at enforcing the NAR and ensuring network integrity within the BSV network. Compliance with broader regulatory standards is, however, supported by a broader undertaking in the NAR that requires adherence with all applicable laws.
What legal regimes govern the implementation of the Network Access Rules on a global blockchain network?
The interpretation of the Network Access Rules (NAR) is governed by English law. Miners also commit to comply with all other applicable laws as defined in the NAR. The enforceability of orders and decisions made or recognised by English or Swiss courts is also expressly contemplated.
Are there any legal protections in place for individuals or entities affected by asset freezes or recoveries?
The Network Access Rules (NAR) provide a limitation of liability clause that offers legal protections to individuals or entities complying with directives in good faith.
By what legal standards are the actions and responsibilities of alert key holders and the BSV Association to be judged?
The actions and responsibilities of alert key holders and the BSVA are aligned with legal standards, ensuring that directives are issued in a manner that is reasonably determined in good faith. The BSVA, as the entity ultimately responsible for how Alert System is used on the BSV network is also bound by the NAR and Swiss law.
How does the BSV Association ensure transparency and accountability in its regulatory role on the BSV network?
The BSVA fosters transparency and accountability by making the Network Access Rules (NAR) publicly available, following due process for issuing directives and regularly making relevant information available to nodes and other interested parties. These due processes mirror the transparency expected in multilateral contexts.
Are there any legal obligations for network nodes in different jurisdictions regarding compliance with the Network Access Rules?
Nodes are obligated to comply with the NAR and with applicable laws in their jurisdictions. This obligation reflects a recognition of the varied legal landscapes in which nodes operate and the need for the NAR to be adaptable to different legal systems. There may be instances where assets are known to be transferred in or out of sanctioned jurisdictions. Specific legal advice may be sought by the BSVA for how to direct actions in countries that have and have not ratified the sanctions.
However, here again, the facts will always be important, and guidance as to all relevant considerations cannot be given. The assumption is that, where appropriate, miners will consult with their legal advisers and any other adviser they deem appropriate.
Disclaimer
The content of this document is provided for informational purposes only and is not intended to modify or supersede the contractual rights or obligations of any party to the Network Access Rules. Parties are encouraged to carefully review the Network Access Rules to verify the accuracy of the information presented here. It is assumed that, where necessary, parties will seek guidance from their legal counsel and any other advisors they consider necessary.
Any statements here do not purport and should not be considered to be a guide to, advice on, or explanation of all relevant issues or considerations relating to the contractual relationship established by the NAR. The BSV Association assumes no responsibility for any use to which the BSV network is put by any miner or other third party.
Private and Public Key Derivation: The HMAC output is used to derive new child keys—both private and public—ensuring that both transactional privacy and security are maintained.
${AWS_Region} - is the region where the stack was installed
Step 3
Wait until status of the stack will reach the value UPDATE_COMPLETE, you can check it by issuing the following command:
Where:
${Stack_Name} - is the stack name chosen during installation process
${AWS_Region} - is the region where the stack was installed
Steps 5-8
Install AWS CLI
Authenticate AWS CLI
Testnet is a public test network used for general testing. It is typically used to test software before it is released onto mainnet. As testnet is public and unmanaged, software on testnet may not be 100% stable. Transactions per second and block difficulty are low.
Install SV Node according to the installation guide: SV Node
Step 2:
Configure bitcoind to connect to the testnet and not Mainnet, as well as setting mandatory parameters. Make the following changes to your bitcoin.conf
Step 3:
If you wish to add any other custom configurations to your Bitcoin SV node you can appended them to the bitcoin.conf file with the editor of your choice.
Step 4:
Start the bitcoind process. If you have been following the installation guide you can use systemd
If this is the first time you have started the node, it may take several hours or even days as the node downloads blocks and checks that they have not been tampered with. In this case, it may make sense to run the node in foreground to see status messages.
If this is not the first time you have run the node, it should start up quickly and it may make sense to run the node in the background.
Step 5:
Check the status of the node and the bitcoind process. Type the following at the command line:
This should generate an output similar to
Funding
If you wish to use testnet for testing, you will need to obtain unspent coins. A number of faucets are available:
Miners charge to include a transaction in a block that will be appended to the blockchain. The fees compensate the miner for his investment in hardware, software and personnel.
The minimum fee required to be included in a block varies from node to node and is set by the mandatory command line option minminingtxfee. This command line option replaces the early optional blockmintxfee.
Zero Fee Transactions
Their use of zero fee transactions is not recommended.
In the past, some miners have chosen to mine zero fee transactions, even though “there is nothing in it for them”. Other miners have chosen not to do so.
Zero fee transactions, if not mined, are evicted from the mempool after 14 days"
Zero fee transactions can occur in a number of ways:
broadcast directly onto the P2P network via a node with min fee set to 0
as a user transaction in agreement with a miner
as a consolidation transaction
as part of a Child Pays for Parent chain of transactions
Child Pays For Parent (CPFP)
If a transaction carries insufficient fees to be mined, a child transaction carrying sufficient fees can pay fees for both the parent and the child transaction so that both transactions will be mined.
Missing Transactions
If a node is low on memory, the node may evict a transaction from the mempool and replace it with a transaction with higher fees. Eviction means that transaction is lost and must be resubmitted to the node.
Eviction should generate an zmqpubdiscardedfrommempool notification.
If a transaction is evicted and MEMPOOL logging is enabled, a message like the following should be present
in the logfile of the node to which the transaction was sent (not always available).
The mempool limits can be adjusted using the maxmempool and maxmempoolsizedisk config options (not recommended)
CHECKSIG Limit
Transaction can be used to save arbitrary data to the blockchain; the data is placed in the script behing an OP_RETURN. The script for a data transaction looks like:
This works fine most of the time however during transaction validation, the script interpreter checks that the total number of OP_CHECKSIG, OP_CHECKSIGVERIFY, OP_CHECKMULTISIG, OP_CHECKMULTISIGVERIFY opcodes in the script, irrespective of whether they are behind a OP_RETURN, does not exceed the maxtxsigopscountspolicy limit. (There is no consensus limit)
The default value for maxtxsigopscountspolicy is INT32_MAX (over 4 billion) so if a transaction fails the CHECKSIG limit, the maxtxsigopscountspolicy has almost certainly been changed. The user should use the getsettings RPC to determine the value for this config option.
If a node has set a particularly low value for maxtxsigopscountspolicy and it rejecting a data transactions because of the check, it is possible switch off the counting of CHECKSIG opcodes after the OP_RETURN by including a OP_INVALIDOPCODE at the start of the data. i.e. the script for the data transaction would looks like
Mempools
If a transaction is submitted and successfully validated, it is stored in a mempool (in-memory pool of transactions) before hopefully being assembled into a block and added to the blockchain. The following mempools exist:
Primary mempool - contains validated transactions that are ready to be added to a block.
Secondary mempool - contains validated transactions that do not meet the fee requirements for adding to a block. These transactions may be promoted to the primary mempool if a child transaction is added to the node with sufficient fees to cover both itself and its parent transaction (CPFP).
Orphan mempool - contains transactions with at least one missing input transaction. It is assumed that the missing input transaction has not yet been submitted. The transaction is kept until the missing transaction arrives or the transaction is purged.
Non-final mempool - contains transactions that are not the "final version". I.e. an input sequence number is not 0xFFFFFFFF.
Transactions are purged from the mempools after they have been in the mempool for more that 14 days.
The mempools are logical collections only; all transactions are actually stored in the same physical collection.
Useful Diagnostics
The following have proved useful in previous investigations.
List Transactions in the Primary Mempool (getrawmempool rpc)
getrawmempool returns a list of transaction IDs in the mempool. Non final transactions are not included in the list.
List Non-Final Transaction (getrawnonfinalmempool rpc)
getrawnonfinalmempool returns the transaction ID list of transactions in the non-final mempool.
SV Node Configurations
Configuring your SV Node correctly can significantly enhance its resilience against DDoS attacks. Two critical settings, maxconnections and maxconnectionsfromaddr, play a vital role in controlling the number of connections a node can handle, thus limiting the impact of an attack.
The maxconnections parameter specifies the maximum number of connections your SV Node will accept. Setting this to a reasonable value ensures that your node does not get overwhelmed by excessive connections. For most use cases, setting maxconnections=50 offers a balance between accessibility and protection.
This maxconnectionsfromaddr parameter limits the number of connections that can be established from a single IP address. By default, setting maxconnectionsfromaddr=5 prevents a single source from occupying too many connections, thus mitigating the risk of DDoS attacks.
In case of persistent DDoS attempts or unusual network activity, reducing this limit further to maxconnectionsfromaddr=1 can provide additional protection, albeit at the risk of limiting legitimate connections from shared networks.
Pending Responses
To further enhance the security of your SV Node against DDoS attacks, adjusting advanced configuration settings related to memory usage and P2P request management is key. The settings maxpendingresponses_getheaders and maxpendingresponses_gethdrsen allow for control over the queue size for specific P2P requests, reducing the risk of memory exhaustion.
maxpendingresponses_getheaders limits the maximum allowed number of pending responses in the sending queue for received GETHEADERS P2P requests before the connection is closed.
maxpendingresponses_gethdrsen limits the maximum allowed number of pending responses in the sending queue for received GETHDRSEN P2P requests before the connection is closed.
Both settings are not applicable to whitelisted peers. We recommend the following values to ensure efficient memory use without limiting peer communications from honest nodes.
UFW (Uncomplicated Firewall)
UFW, or Uncomplicated Firewall, offers an intuitive way to manage netfilter firewall rules on Unix systems. It simplifies the process of configuring a firewall, making it accessible for users of all levels. Rate limiting connections to your SV Node can effectively mitigate DDoS attack impacts. UFW allows you to easily apply rate limiting to specific ports, which is particularly useful for nodes exposed to the internet.
To protect the SV Node, specifically the port commonly used by Bitcoin-based software (8333), you can use the ufw limit command. This command limits the number of incoming connections on port 8333/tcp, reducing the risk of DDoS attacks.
This command configures UFW to allow connections but limits the rate at which they can be made, helping to prevent your node from being overwhelmed by traffic.
After configuring the rule, ensure that UFW is enabled and that the rule is applied:
The status command should show that rate limiting is active on port 8333/tcp, indicating your SV Node is now better protected against DDoS attacks.
Click your top level stack, the one without the NESTED badge.
Step 4
Click the Delete button at the top right.
Step 5
Confirm that you want to delete the stack.
Step 6
Wait until status of the stack will reach the value DELETE_COMPLETE
Step 1
Make sure you have AWS CLI installed and authenticated
Step 2
Replace variables described below with previously chosen options in the following command and run it to delete the stack.
WARNING
Deleting the deployment will result in TOTAL LOSS OF FUNDS held by all accounts in the wallet. Although users should keep their 12 word mnemonics displayed at the time of account creation, in practice this is often skipped, and there is no way to even know which transactions belong to the user thereafter, nevermind regaining control of the funds.
Please ensure all funds are sent out of hosted wallets, and a record of all transactions has been exported prior to deletion of the deployment.
${Stack_Name} - is the stack name chosen during installation process
${AWS_Region} - is the region where the stack was installed
Step 3
Check the status of the stack (wait until following command will return error that stack dosn't exist)
WARNING
Deleting the deployment will result in TOTAL LOSS OF FUNDS held by all accounts in the wallet. Although users should keep their 12 word mnemonics displayed at the time of account creation, in practice this is often skipped, and there is no way to even know which transactions belong to the user thereafter, nevermind regaining control of the funds.
Please ensure all funds are sent out of hosted wallets, and a record of all transactions has been exported prior to deletion of the deployment.
In some rare cases, it can happen that deletion will end up with error. Often this is because AWS is trying to delete resources in wrong order. In such a case you need to check which resources deletion failed and delete them manually, then try again deleting whole stack (go back to )
Some may prefer to use a Java implementation - HeaderSV which has similar functionality. It lacks an endpoint for Merkle root validation, but could be adapted to work like Block Headers Service.
Welcome
[ ⌘ / Ctrl ] + [ K ] Ask a question about BSV Blockchain
The BSV Skills Center is a comprehensive collection of documents covering all aspects of BSV Blockchain system. Technology, philosophy, legal, and economic topics are included, along with practical guides for those who want to build on top of it.
This documentation is built with the AI search tool in mind, responses will cite pages from within this documentation repository to answer your questions.
Subject to clause III.6, the Association may in its absolute discretion issue a direction to a Node requiring it to take a Step or Steps (a ‘Directive’) where there is:
(a) an Enforcement Event;
(b) a Direct Decision Event; or
(c) an Indirect Decision Event.
In the Rules, the term ‘Directive Event’ refers to any of the events in clause III.1.1. These Directive Events are defined below.
Nodes’ obligation to follow Directives
Subject to clauses III.6 and III.2.2, each Node will promptly comply with the requirements of any Directive applicable to it following receipt of notice of the Directive and in any event no later than any time for compliance which is specified in the notice of the Directive.
Any Directive will take effect immediately upon notice to a Node or Nodes unless otherwise expressly stated in the notice of the Directive.
Enforcement Event
An ‘Enforcement Event’ occurs in respect of any one or more Nodes when the Association reasonably determines in good faith that one or both of the following has occurred:
(a) a breach by the relevant Node(s) of any of Part I of the Rules (Master Rules), clause II.1 (Affiliates), clause II.7 (Indemnity), or clause III.2 of these Rules; or
Direct Decision Event
A ‘Direct Decision Event’ occurs when the Association receives a Decision that the Association reasonably determines in good faith is a Direct Decision.
A ‘Direct Decision’ is a Decision that:
Indirect Decision Event
An ‘Indirect Decision Event’ occurs when the Association receives a Decision which the Association reasonably determines in good faith is an Indirect Decision.
An ‘Indirect Decision’ is a Decision that:
Restrictions on Directives
The Association may not issue a Directive where there has been no Directive Event.
A Directive may only require a Node or Nodes to do any or all of the following steps (each a ‘Step’):
Directive Event
Purpose
Information obligations
Each Node agrees that it will notify the Association promptly of any circumstances which are reasonably likely to give rise to a Directive Event.
Each Node agrees that, on demand by the Association, it will promptly provide the Association with any information the Association may reasonably request in connection with the Rules or any Enforcement Event.
Web3
What is Web3?
Shift from pure computer networks to semantic networks
Individual devices maintin their own state (could be cloud, local, or hybrid)
Direct e2e communication (P2P
micro-transactions for every interaction
Every device has its own filters/language which makes them part of a semantic network of other devices that filter/understand the same transaction types
UTXO model: every transaction is atomic, so TXs become native metadata to each interaction
Every device is unique yet can still be part of a network or community
communication is agnostic to the physical medium the transaction is communicated over
Syncing is optional because every Satoshi lives as a unique double-spend protected commodity token regardless of what it's transfer is capturing
Ticket Distributor example
Distributor creates tranches of tickets and combines the hash of each ticket with pubKey from a public-private EC-keypair.
This can be done by converting the key and the hash to big numbers, combining them (either by hashing, adding, multiplying, subtracting, or xoring) and multiplying the result by the generator point of the curve, G.
Each tranche only need to be 1 transaction and each output is associated with a ticket.
Tickets are unique
The distributor distributes the tickets to sellers by spending the ticket outputs to outputs each of the sellers control. They also give the sellers the ticket hashes, the basic ticket information, and the Merkle paths which the sellers can use to perform an SPV check. They could aslo include the ticket hashes in a separate output or in a pattern such as ticket with the ticket hash immediately following it: vout0 = combined, vout1 = ticket hash.
This could represent a transaction type. A version hash could also be included in the version field of the transaction to denote it being part of a particular event or tranche.
The sellers sell the tickets repeating the same process that was used to give them tickets with each sale.
In the example, the ticket distributor and the sellers are both overlay services because they're providing a service and tracking sales data (in this way, a merchant can be considered an overlay service). However, they communicate with each other and the event attendees in the same way: P2P.
It's the fact they all understand the ticket transaction that makes them part of the same semantic overlay network for that specific event. The sellers and the ticket distributor can consider themselves part of a more generalized event ticket overlay.
The benefits of doing things this way:
It maintains the properties of the blockchain by leveraging them through the use of Satoshis. No additional high-level overview tracking needs to be done. Once the TXs have been distributed, they can either get spent at the gate of the event, or they can be refunded back to the seller who can then either resell them or refund them back to the ticket distributor.
The process can be started by an event group by having the event group provide the necessary Satoshis for each of the tickets along with a payment (This can be the generating TX).
In addition, SIGHASH flags can be used to allow the tickets to be resold within the same transaction by allowing inputs and outputs to be adjusted:
Analogy: polymorphism
Nodes understand shapes
high-level overlays (like the ticket distributor and sellers) understand shapes such as circles or squares: The event in the example can be associated with the shape of a circle.
The nodes only see the circles and square as shapes
UTXO vs Account Based
Two methods of tracking ownership and transaction history
A UTXO-based system (Unspent Transaction Output) and an account-based system are two different methods of tracking ownership and transactions in blockchain networks.
UTXO-Based
Account-Based
Definition
A UTXO (Unspent Transaction Output) represents a discrete chunk of tokens that can be spent as an input in a new transaction. In BSV, these tokens are commodity tokens called Satoshis.
Each Satoshi is BSV
Each UTXO can only be spent as a whole, and any leftover amount from a transaction becomes a new UTXO.
Definition
In an account-based system, each user has an account with a balance.
Ethereum is a prominent example of an account-based system.
Structure
Transactions are collections of inputs and outputs. Inputs are references to previous UTXOs, and outputs create new UTXOs.
Each transaction consumes UTXOs as inputs and produces new UTXOs as outputs, forming a chain of ownership.
Importantly, each individual UTXO is itself a record of ownership that gets immutably recorded or timestamped to the BSV global public blockchain.
Structure
Transactions in account-based systems are instructions to transfer value from one account to another, updating the balances accordingly.
The state of the blockchain consists of a list of accounts and their balances.
Key Differences
Granularity
UTXO-based transactions deal with discrete units (UTXOs), making it easier to handle microtransactions and avoid partial updates.
Account-based transactions directly update account balances, simplifying some aspects of transaction processing but making microtransactions impossible in practice.
State Management
UTXO-based state is a set of unspent transaction outputs, which can be verified independently.
Account-based state is a set of account balances, requiring more complex synchronization and validation.
Double-Spending
UTXO-based double-spending is prevented by tracking the state of each UTXO.
Account-based double-spending is prevented by ensuring the system balances out after every transaction.
Deep Dive
Some low level explainers and examples to improve understanding.
Size Matters
Storage gets really expensive when you have billions of transactions to store - just ask any miner.
The total cumulative size of all blockheaders is currently ~68MB. When comparing this to storing the whole blockchain, the advantage becomes obvious. The total size of the BSV blockchain at time of writing is over 10TB.
Some blocks in the past have been 4GB in size. This is expected to increase dramatically in future.
In contrast, the block header will always and forever be 80 bytes exactly.
What's in a Block Header?
A block header is an 80 byte data structure which describes one block. As a hex string it looks like this:
The Previous Block Hash allows us to link the chain of blocks together all the way back to Genesis.
You might ask how do I know that the block header is valid if I don't have all the transactions? The easy way to detect fake block headers is to hash it, and if it doesn't have a bunch of zeros at the end then it is not legitimate. Creating a block header which hashes to a low number requires a boatload of ASIC machines iterating the nonce and hashing until a low output is found. Expensive to fake.
In MacOS Terminal we can copy paste the following to double sha256 the data and output the hash.
The result of which is below. See the bunch of zeros on the end? Seems legitimate.
Fake Block Header
Let's attempt to fake the Merkle Root to show how difficult it would be to get away with.
Again let's copy paste that into Terminal so that we can check the double sha256 block hash.
The result makes the forgery obvious, no zeros at the end.
If we fake this one block header and use some ASIC machines to hash it a bunch until we eventually get a low hash value, then we would need to do the same for every block header thereafter since they're all chained together. This quickly becomes infeasible.
Merkle Root
The Merkle Root is what we compare to the calculated value we get from our txid and Merkle Path. If it matches, then we have definitive proof that the transaction was indeed included within the block with that header.
Blocks
Block Downloads Fail
Generally issues that effect block downloads (e.g. getblock) are the same as those effecting IBD (Initial Block Download). See Initial Block Download for more details.
Block Hex Dump fails
The RPC-function getblock does not work for some big blocks. In some cases, getblock returns an incorrect content and hex-dump size.
The workaround is to use the REST interface. See .
Enable the REST interface by adding rest=1 in the config file, or -rest on the command line.
Pruning Overview
The first time a node is run, it downloads all the blocks in the BSV blockchain (which starts with the original BTC Genesis block). The Initial Block Download (IBD) can be time consuming and take a number of days, however the process cannot be cut short. Downloading and validating the blocks (which includes validating the transactions in the blocks) is the proof that the blockchain on disk was built up from the Genesis block using PoW, and is an unadulterated copy of the BSV blockchain.
The node disk storage requirements can be reduced by enabling pruning via the -prune configuration option. The node then attempts to keep storage below the specified value (in MB) by only keeping the newest blocks on disk. If manual pruning is enabled, the pruneblockchain RPC function can also be called to delete specific blocks.
The following points need to be considered:
The node will keep at least 288 blocks no matter what the pruning settings is.
txindex=1 on a pruned node is only possible in release 1.1.1+. If you attempt to request the details for a transaction that is in a block that has been pruned, then the node will simply return an error indicating that the transaction cannot be found.
Pruning is disabled by default.
If pruning is enabled, getdata and getblock RPC may fail as they may attempt to access a block that is no longer available. In that case, the error message looks like:
Arrival of New Blocks can make Node Unresponsive
The validation of a new arrived block is a high priority task since miners need to know if the new block is valid and whether they should continue to attempt to build on the current blockchain head or switch their resources to building on the new block. If the node mempools are in sync, then the node has already seen and validated the transactions in the new block and block validation can be very quick. If the node mempools are not in sync, which can happen if there is heavy traffic, the node will need to validate all the transactions it was not seen before. That can take some time (up to a minute). During that time the main SV node lock (cs_main) is held by block validation; without access to cs_main much of the other node functionality including the RPC interface is unavailable.
BCH and BTC Blocks
If a node connects to a non-BSV node, it may receive non-BSV blocks. That is not desirable but does not cause any fatal issues as the non-BSV blocks will not be successfully processed.
Diagnosis
Processing non-BSV blocks leaves characteristic messages in the log files. The following 'error' messages were the result of processing a BCH block on a BSV node.
and
To get information about connected nodes, type the following at the command line:
The node can be banned using the following command:
Prevention
SV nodes will refuse connections to non-BSV nodes based on the user agent in the version network message.
The banclieanua config option can be used to further filter node connections based on the user agent . For example:
Overlay Services
What makes them different from any other application infrastructure component?
Definition
An overlay in computer networking refers to a virtual network built on top of an existing physical network. It augments or extends the underlay, providing services like routing, peer-to-peer networking, or distributed computing. In BSV, overlays operate on the BSV Node Network, offering services like transaction lookups, token management, and open predicates.
Overlays a Glance
Global Listening is the typical historical way Blockchains have gathered transactions so that they can be indexed and read back by client applications.
Overlays encapsulate a different approach. They rely on to validate transactions they receive from clients, and allow users to read transaction data back without having to index all block data.\
Business Context
Current BSV applications often rely on reading timestamped immutable data from the blockchain, which is not feasible at high transaction volumes without Simplified Payment Verification (SPV) and the division of labor. Overlays distribute demand for immutable data across many services, enabling businesses to minimize waste and select services based on their needs and costs.
Features of an Overlay
Overlays ingest and validate transactions using SPV, maintain the valid chain of headers, submit valid transactions to the BSV Node Network, and maintain transaction propagation status. They also acquire and distribute Merkle paths for mined transactions, sync with peers, and optionally expose UTXO and transaction lookups.
Infrastructure Dependencies
Overlays depend on the BSV Node Network for new header announcements, a Merkle Service for calculating Merkle paths, and widespread use of SPV data structures within wallets and applications. They provide a cost-effective, scalable, and secure solution for businesses by ensuring data integrity and network resilience.
User Types
Overlays cater to various users including:
• Private Overlays: For specific individuals or businesses.
• Public Overlays: For developers without infrastructure, like .
• Ring Fenced Overlays: For financial institutions with jurisdictional restrictions.
• Open Protocol Overlays: For experimental applications by entrepreneurial developers.
Use-Cases
Overlays have diverse use-cases across industries such as:
• Event and Airline Ticketing
• Cloud Storage and eCommerce
• Central Banks for Digital Currencies
• Token Protocols: Specific transaction types for tokens like STAS and Tokenized.
• Wallet Providers: For providers like Handcash, Centbee, and RockWallet.
• Fungible Tokens (FTs): For CBDCs, PIDMs, stable coins, etc.
• Non-Fungible Tokens (NFTs): For hotel keys, allocated gold, etc.
• Open Predicates (OPs): For computation markets.
• Data Predicates (DPs): For storage markets.
• Backup Services: For transaction and metadata recovery.
• Explorers: For development, receipts, or status checks.
Technical Components
Web API
Exposes endpoints for submitting transactions and looking up transactions by ID.
Store
Maintains transactions, UTXOs, headers, Merkle paths, and metadata.
Validator
Runs SPV and additional business logic.
Listener
Monitors headers, alerts, and transaction rejections.
Synchronizer
Syncs state with other overlay nodes.
Path Confirmer
Requests Merkle proofs for unconfirmed transactions.
Architecture
What we have today looks something like this:
Future Outlook
The future of overlay networks includes advancements in scalability, security, and regulatory compliance, positioning BSV as a leading platform for various industries.
Technical Changes
We expect there to be a scaled Merkle Service which will replace ARC's microservice BlockTx as the component which calculates Merkle paths. This change is anticipated because Teranode blocks can get siginificantly bigger, and BlockTx is not built for anything larger than 4GB blocks. Teranode announces subtrees while constructing its own block, so the work can start early and propagation can be executed on block discovery without there being a massive spike in computational effort at that moment only to be left unused until a new block is found. The work is instead distributed over the duration of the block assembly process. More on that as alpha versions are released.
Developers Guide
All the technical details of each component and how all the repos work together to form a wallet.
These diagram show how SPV Wallet Toolbox is built. It is a set of tools which can be used to create a wallet, send and receive transactions, create and manage paymails and more. It is built to be used as a standalone app or as a module in bigger system.
Users
What is the function of the BSV Association (BSVA)?
The BSV Association (BSVA) serves as the principal steward of the BSV network, entrusted with multiple critical functions. Here’s an overview of its key functions:
Stewardship: The BSVA’s primary function is to steward the BSV network. This involves communicating essential information and updates to miners and other network participants, primarily through the Alert System. This system is crucial for disseminating important security updates, alerts, and guidance to maintain the network's integrity and efficiency.
Sighash Flags
A SIGHASH is used to indicate which part of the transaction is signed by the . The mechanism provides a flexibility in constructing transactions. There are in total 6 different flag combinations that can be added to a digital signature in a transaction. Note that different inputs can use different SIGHASH flags enabling complex compositions of spending conditions.
NOTE: Currently all BitcoinSV transactions require an additional SIGHASH flag called SIGHASH_FORKID which is 0x40
Genesis Settings
The Genesis upgrade removes the default setting for the maximum block size and defines this as a “mandatory consensus parameter”. The upgrade also defines a new setting, the maximum script memory usage mandatory consensus parameter. The values for these parameters must be manually configured in the software by the system administrator. This page provides information on these parameters and recommendations on how to choose the required values.
The recommended method of choosing these parameters is to survey the major Bitcoin SV Miners and choose the same, or larger. It is expected that Miners will begin to publish these settings in their MinerID coinbase documents in the near future. However, in the meantime we will regularly update this page with known settings of various Miners manually.
We urge you to take note of the for running an instance of Bitcoin SV.
System Requirements
Below are the recommended system requirements based on our internal testing and scaling progress, made with bitcoind node software. Bitcoin SV will continue to scale on the road to, and beyond genesis. This will also mean these requirements should be expected to change as time goes on.
Running the Alert System
The following instructions describe running the Bitcoin SV Alert System using tools available in most mainstream Linux distributions. The assumption has been made that you are using a Bourne-like shell such as bash.
Infrastructure Considerations
Hosting an Alert System that uses a P2P IPFS layer on some infrastructure providers like Hetzner could lead to problems due to their abuse detection mechanisms. The IPFS layer involves port scanning to find peers, which Hetzner might mistake for malicious activity. This can trigger Hetzner's automated systems to block or restrict your account.
Contribute
Getting into the code for developing your own products and services.
Anyone interested in developing their own wallet can use this as a starting point. This is not only relevant for developers, but also for governments, enterprises and exchanges. The alignment of your software with this reference implementation will enable adoption of the latest industry standards, adapting to new BSV infrastructure as the network scales.
In order to develop your own applications based on this reference SPV Wallet implementation you'll need to fork the repositories individually.
Component
Repository
Configuration
All configuration options can be passed as argument -key=value or defined in the bitcoin.conf. The location of the config file can be defined with -conf=/path/to/bitcoin.conf.
General Options
Go Client
Table of contents
Tranches provide a way for distribution attributes to be included such as early-bird pricing
Event attendees can then spend their ticket at the gate using the same process
For example, SIGHASH_NONE/ANYONE_CAN_PAY where the seller signs their input but none of the outputs so the event attendee can change the output and sign the change.
It doesn't matter who spends the ticket to attend the concert as long as they have the Merkle path from the seller for the gate to check
Each event can be analogized as a colour; e.g., the event in the example above can be associated with the colour red.
So:
The nodes, ticket distributor, sellers, and event attendees all understand shapes
The ticket distributor, sellers, and event attendees also understand circles
The ticket distributor, sellers, and event attendees also understand red circles
The ticket distributor and sellers understand blue circles (another event) but the event attendee that bought tickets for the red circle event and not the blue circle event, does not understand blue circles.
The event company working the gate understands red circles, but not blue circles, so if an attendee for the blue circle event tried to attend the red circle event, they would not be able to get in because the gate company would not understand the output (via SPV and validation checks)
This is how polymorphism works: a general type (base transactions) are understood by everyone, but more specific types are only understood by certain classes or entities, yet fundamentally, every entity is interoperable because the general type they understand is the same, any specificity is overlayed on to the general type making it more specific.
Educational Support and Software Development: The BSVA also focuses on providing educational resources and supporting software development initiatives. This function is vital in equipping the BSV community with the necessary knowledge and tools to optimise network participation and foster technological innovation within the blockchain space.
Enforcement of Network Access Rules (NAR): As a party to the NAR, the BSVA has well-defined duties and obligations towards network miners and nodes, as set out in NAR. The association ensures that these rules are adhered to, and it can be held accountable for any breaches or overreaching actions. This enforcement is key to maintaining a fair, secure, and orderly network.
Compliance with Legal Directives: A significant part of the BSVA’s role involves enforcing legal directives, particularly regarding the freezing or reassignment of unspent transaction outputs (UTXOs). Utilising the Alert System, the BSVA facilitates network compliance with relevant court orders, thereby aligning the BSV network with relevant legal standards and regulatory requirements.
In essence, the BSVA's role is to ensure that the BSV network operates within a secure, legal, and efficient framework, balancing the needs of network participants with the overarching goal of maintaining a stable and trustworthy blockchain environment.
What are the Network Access Rules, and how do they impact the BSV blockchain?
The Network Access Rules (NAR) on the BSV blockchain is a multilateral contract between and among the BSVA (the steward of the network) and the nodes. The NAR overseen by the BSVA, are a set of guidelines that dictate how participants operate honestly within the network. The network rules are built off the six steps to run the network covered in section 5 of the Bitcoin White Paper. Adhering to these six steps and the NAR that have been built upon them will be crucial for maintaining a secure and orderly system, thereby impacting network reliability and user trust in the BSV blockchain.
How does the Alert System work, and what is its role in BSV blockchain security?
The Alert System serves as a critical security feature within the BSV blockchain, playing an important role in maintaining blockchain security and ensuring the network's robust operation. It operates by allowing the BSVA to issue warnings, directives, and important network updates when necessary to address various situations.
The Alert System's primary function is to provide technical means for remedying breaches of the NAR by nodes. It achieves this by re-introducing the Alert Key Mechanism to the BSV network. In essence, the BSVA utilises this mechanism to send directives and messages to all network nodes, requesting them to take specific actions as outlined in the NAR. These NAR represent the agreed-upon terms and conditions that nodes have accepted when joining the BSV blockchain and engaging in relevant activities (including network activities).
The messages sent through the Alert System can take various forms. Some messages are purely informative, providing updates on upcoming software changes or other important developments. Others are issued as directives in predefined situations, as explicitly defined in the NAR. These situations may include responding to threats such as double-spend attacks on the BSV network.
Additionally, the Alert System facilitates actions related to the freezing, releasing, and confiscating of unspent transaction outputs (UTXOs). These actions are enabled to help ensure compliance with court orders and legal requirements, further enhancing the BSV network's security and integrity.
What is the concept of freezing and unfreezing assets on a blockchain and why is it necessary?
Freezing assets on a blockchain involves temporarily disabling transactions for specific digital assets to comply with legal directives. Unfreezing assets restores their transaction capabilities. This mechanism is a necessary part of the enforcement processes that have been adopted to effect compliance with legal directives.
What distinguishes the BSV blockchain's approach to governance from other blockchain networks?
The BSV blockchain, under the stewardship of the BSVA, adopts a structured approach to governance with clearly defined rules and processes.
As stewards of the Bitcoin Protocol, the BSVA undertakes responsibility to act in the best interest of the BSV network, setting the core design of the Bitcoin Protocol in stone such that users can build upon the network with confidence. In addition to aiding network and protocol stability, the BSVA are also the issuers of the NAR which create an enforceable multilateral agreement that miners commit to by performing their network activities. The NAR specify the conditions under directives can be disseminated through the Alert System, specifying steps which miners must take to stay compliant with the NAR.
This approach is in contrast with other blockchain developer groups that are less likely to assume a similar level of responsibility. Instead, we see fewer proactive steps towards accepting such responsibility and an absence of any strong interest in creating a fixed and clearly defined protocol.
Under the stewardship model, and the role of the BSVA and the NAR, a regulatory-compliant framework is created for BSV, supporting the enforceability and respect of applicable laws and regulations – a commitment sorely absent in blockchain to date.
A key aspect of BSV Blockchain is that the underlying protocol remains "set in stone", and is unalterable by the BSV Association or anyone else. The BSVA is committed to this stability, in stark contrast to other blockchain networks.
How do the Network Access Rules facilitate the growth and wider adoption of the BSV blockchain?
The development of the NAR is critical for the BSV blockchain's widespread adoption, particularly for real-world applications that require robust governance mechanisms such as rollback and asset recovery. These rules provide the necessary clarity and reliability that enterprises and large-scale users demand.
Are there any potential risks or challenges associated with the implementation of the Network Access Rules?
Implementing the NAR involves balancing the need for a secure and orderly public blockchain while ensuring the rules are fair and not overly restrictive. The most significant challenges are anticipated to be the complexity of multijurisdictional enforcement orders between states sanctioned by some and not by others.
How can individuals and businesses benefit from the enhanced security provided by the Alert System?
The enhanced security from the Alert System means individuals and businesses can operate on the BSV blockchain with increased confidence, knowing that there are measures in place to protect against fraud, unauthorised transactions, and other security threats.
What role does the community play in overseeing and influencing the Network Access Rules?
While the BSVA is responsible for the final structure of the NAR, community feedback, use cases, and insights are valuable and appreciated. They can help inform the BSVA of the BSV network’s practical needs and user experiences, contributing to the refinement of the current rules. The BSVA reserves its right to amend the NAR but with the intention not to change any of the fundamentals in the Bitcoin Protocol.
Disclaimer
The content of this document is provided for informational purposes only and is not intended to modify or supersede the contractual rights or obligations of any party to the Network Access Rules. Parties are encouraged to carefully review the Network Access Rules to verify the accuracy of the information presented here. It is assumed that, where necessary, parties will seek guidance from their legal counsel and any other advisors they consider necessary.
Any statements here do not purport and should not be considered to be a guide to, advice on, or explanation of all relevant issues or considerations relating to the contractual relationship established by the NAR. The BSV Association assumes no responsibility for any use to which the BSV network is put by any miner or other third party.
(b) any representation or warranty in the Rules given by the relevant Node(s) is false or misleading when made, repeated, or deemed to have been made or repeated.
(a) has the force of law, has been recognised, or is enforceable in England and Wales or Switzerland;
(b) has as one of its subjects the Association or its Affiliates or their respective property or activities; and
(c) relates to or concerns the Network, the Network Database, the conduct of any Relevant Activity by any Node(s), or the ownership, possession, transfer, content, or control of BSV.
(a) has the force of law, has been recognised, or is enforceable in England and Wales or Switzerland;
(b) is not a Decision which has as one of its subjects the Association or its Affiliates or their respective property or activities; and
(c) relates to or concerns the Network, the Network Database, the conduct of any Relevant Activity by any Node(s), or the ownership, possession, transfer, content, or control of BSV.
(a) freeze specified coins in unspent transaction outputs;
(b) blacklist or whitelist specific IP addresses as peer connections in the Node Software;
(c) reassign frozen coins; or
(d) invalidate specified blocks.
A Node is only required to take an action that the Association has reasonably determined in good faith is necessary to achieve one or more of the following purposes (each a ‘Purpose’):
Nothing in this clause III.7 requires a Node to disclose information where the disclosure by that Node would breach Applicable Laws.
Enforcement Event
To ensure compliance with the Rules.
Direct Decision
To give effect to or enforce the Direct Decision or avoid the Association breaching or potentially breaching the Direct Decision.
Indirect Decision
To give effect to or enforce the Indirect Decision insofar as it concerns ownership, possession, transfer, content, or control of BSV.
BitcoinSV uses a UTXO-based system.
Verification
Verification involves checking the validity of UTXOs used as inputs, ensuring they haven't been spent before (preventing double-spending).
A UTXO can only be spent once. All active nodes (nodes that have successfully added a block to the blockchain recently) must agree on which UTXOs are unspent at any given time.
Verification
Verification involves checking the account balances to ensure sufficient funds for a transaction and then updating the balances accordingly.
Transactions are ordered, and the state is updated sequentially, which can create bottlenecks in high transaction throughput scenarios.
As a result, the cost or fee associated with each transaction increases as the network's transaction throughput increases inherently limiting scalability.
Privacy
Activity can be private by using and creating many small UTXOs in each transaction, though ownership and transactional activity can always be traced and proven when needed due to the public nature of the blockchain.
It is harder to trace the balance of a single individual or entity because Satoshis can be spread across many UTXOs and each UTXO must be known.
Privacy
It is easier to track the balance of a user, as all transactions affect account balances directly.
Privacy is impossible to achieve in practice because balances and transaction histories are tied to account addresses.
Scalability
UTXO-based systems are inherently scalable because transactions can be processed in parallel, as they are independent of each other.
UTXOs allow for easier implementation of lightweight clients (Simplified Payment Verification or SPV), which do not need to store the entire blockchain.
Scalability
Account-based systems can face scalability issues due to the need for sequential processing and global state updates.
It is challenging to shard or parallelize transaction processing effectively without compromising the system's consistency.
In fact, the P vs NP problem associated with scaling an account-based system such as Ethereum is so difficult that solving it comes with a reward of one million dollars. It is one of the 7 Millenium Problems.
Flexibility
The UTXO model is flexible in allowing complex scripts (conditions) to be attached to each UTXO.
These scripts act as locking and unlocking mechanisms allowing a multitude of conditions, functions, and data to be included.
Flexibility
In addition to being unscalable in practice, account-based systems are also much less flexible in terms of their scripting capabilities because the entirety of the network state and the relevant accounts must be considered with each transaction.
In some rare cases, it can happen that deletion will end up with error. Often this is because AWS is trying to delete resources in wrong order. In such a case you need to check which resources deletion failed and delete them manually, then try again deleting whole stack (go back to Step 1)
The headers are all linked, each pointing to the previous header.
Getting from a txid to a Merkle root.
Merkle Root
There is no recommended value for prune. Node operator should assume that blocks may exceed 4GB in size when choosing a value for prune. The possible settings for pruning are:
To handle high volume of work or has txindex enabled, or a mining operation.
Processor
4 Core, 8 thread CPU
8 Core, 16 thread CPU
>= 10 core 20 thread
Ram
16GB of Ram + 10GB Swap
64GB Ram + 64GB Swap
Ideally, increase ram and reduce swap, while maintaining 128GB total memory available.
64GB Ram + 64GB Swap
Ideally, increase ram and reduce swap, while maintaining 128GB total memory available.
Internet
10+ Mbit (up and down)
100Mbit+ (up and down)
1Gbit+ (up and down)
Disk Space (Pruned)
10GB Magnetic Disk
500GB Solid State (SSD)
1TB Solid State (SSD) when pruned *
Disk Space (Unpruned)
20GB Magnetic Disk
16TB Solid State (SSD)
32TB Solid State (SSD)
* In release 1.0.14+, the prune config settings can be used to fine tune.
We have seen the above configuration in both mining and listener environments handle sequential 2GB block sizes and blocks with transaction counts exceeding 1 million transactions on the STN (using the additional recommendations below). This may vary as your individual demand scales up with your specific environment, application or use case.
For Production (MainNet), the estimated growth of the network in the next 12 months is 6TB (~500GB per month). This is based on the 2022 average block size.
For The Scalability Test Network (STN), the STN size was ~4.5TB, as of February 2023. The network growths by 1.1TB every month. The aim is not to reset the STN network frequently.
If you are a Miner, it is also advisable you spend time ensuring your nodes have the highest possible connectivity with other miners.
Additional Recommendations
With the increasing adoption of Bitcoin SV the transaction volume continues to rise. With the explosive use of data transactions (op_returns), it is possible your Bitcoin SV node will not be able to handle the volume of traffic reaching your mempool or be inundated with computationally heavy requests. As a result, the node will drop transactions to allow higher fee-paying ones in, increasing computation at a later point, or worse, cease to function.
Whilst this is not how Bitcoin SV is intended to work, it is what we have to deal with for the short term while the SV Node teams focus on higher priority tasks which have a greater impact on scaling.
A solution is, to increase these following values from their defaults is to allow the node to remain efficient under high load situations. These situations include reorgs, which require the node to go back and reconsider transactions or blocks it has most probably already seen. A reorg can be the reason your node spikes from 1-2GB ram use to 3GB or more, if this is too much, your operating system may choose to end the process (stop bitcoind), or your node will crash with an “Out of Memory” error code.
Since reorgs and orphans are a part of the Bitcoin SV ecosystem and should be expected and not feared it would be wise to best prepare your environment for such situations. The default impaired settings and concepts inherited in bitcoind are too small for the volumes we see during operations on the STN or during a stress test on mainnet.
With this in mind, we suggest increasing a few default settings on your bitcoind node.
First of all, your mempool size allowance should be set to 10GB (25GB STN) or more. This tells the node how much memory it should assign to storing unconfirmed transactions. This is done by adding the following to your bitcoin.conf file.
This restrictive memory limitation (300MB by default pre-genesis) is a consequence of the fee priority processing, inherited from BTC in order to maintain functioning tiny block sizes. In Bitcoin SV we don’t need this to be so little. The current overhead for storing transactions is in the realm of 5 times the real transaction size, for small transactions. This decreases dramatically for larger transactions. The SV Node team are actively working to remove all fee prioritisation code and hasten mempool processing to bring much-needed improvements to transaction propagation, acceptance and memory allocation. The net result will be a much faster and less memory extensive mempool.
In addition to increasing the mempool allowance, we also suggest increasing the signature and script cache. This tells the node how many accepted transactions in megabytes we can keep in our cache (RAM) improving performance by reducing expensive calls to recalculate signatures and scripts on the fly. We suggest setting these to 250MB or more to improve performance. This is done by adding the following to your bitcoin.conf file.
Please be aware that setting all three of the mentioned settings will add an additional memory requirement of 10.5GB on your node just for this aspect of bitcoind’s operation.
Lastly, we suggest adding maxorphantx to your bitcoin.conf as well. This value specifies how many orphan transactions can be kept in memory. This helps if your node is receiving a child transaction whose parent has not been confirmed in the blockchain. This means that the node will remember the child until it sees the parent or it exceeds its expiration time of 20 minutes. This is done by adding the following to your bitcoin.conf file.
The result of this, assuming 400byte average transaction sizes, is only a 4MB memory increase. If you have the ram/swap available, you can increase this number considerably (remembering transactions post genesis could be very large) avoiding any dropped orphans which may have parents your node has not seen yet.
Development
(regtest & testnet only)
ProductionMINIMUM
Production RECOMMENDED
(STN Minimum)
Summary
To only follow the most PoW chain and handle small volumes of other tasks (RPC requests as an example)
To handle a medium volume of workload while maintaining real-time sync with the current chain tip
This is GO library used to communicate with SPV Wallet.
It allows us to create an admin or normal user client and then call methods to work with transactions, xpubs, paymails and access keys.
Installation
User / Wallet / Account creation
To create a new user (by some people also understand as creation of wallet or account), you need to register a new xPub.
You can found example of how to do that here.
Authentication
To authenticate within the SPV Wallet, you need to use HD key pair either for admin or normal user.
Detailed instruction on how to authenticate the client can be found here.
Examples
We have prepared some examples for you to get started with the library.
All of them are available on the SPV Wallet Client GitHub repository, in the examples/ directory.
-prune=<n>
0 = disable pruning blocks,
1 = allow manual pruning via RPC
n = automatically prune block files to stay under the specified target size in MB
**'ERROR: GetDiskBlockStreamReader(CDiskBlockPos&): OpenBlockFile failed for
CBlockDiskPos(nFile=-1, nPos=0)'
**This error message is generated when an RPC is attempting to retrieve a pruned block
(i.e. not available to the node).
# Run in the background as a daemon and accept commands
daemon=1
# Location of data directory
datadir=<dir>
# Accept command line and JSON-RPC commands
server=1
# Size of block data files on disk (default is 128MB)
preferredblockfilesize=<size>
# Do not define any of these options to use mainnet
# Use the test chain
testnet=1
# Use the Scaling Test Network
stn=1
# Enter regression test mode, which uses a special chain in which blocks
# can be solved instantly. This is intended for regression testing
# tools and app development.
regtest=1
# Accept public REST requests (default: 0)
rest=1
# Bind to given address to listen for JSON-RPC connections. Use
# [host]:port notation for IPv6. This option can be specified
# multiple times (default: bind to all interfaces)
rpcbind=<addr>
# Username for JSON-RPC connections
rpcuser=<user>
# Password for JSON-RPC connections
rpcpassword=<pw>
# Listen for JSON-RPC connections on <port> (default: 8332 or testnet: 18332)
rpcport=<port>
# Allow JSON-RPC connections from specified source. Valid for <ip> are a
# single IP (e.g. 1.2.3.4), a network/netmask (e.g.
# 1.2.3.4/255.255.255.0) or a network/CIDR (e.g. 1.2.3.4/24). This
# option can be specified multiple times
rpcallowip=<ip>
# Set the number of threads to service RPC calls (default: 4)
rpcthreads=<n>
# Set the depth of the work queue to service RPC calls (default: 16)
rpcworkqueue=<n>
# Timeout during HTTP requests (default: 30)
rpcservertimeout=<n>
# Accept connections from outside
# default: 1 if no -proxy or -connect/-noconnect
listen=1
# Maintain at most <n> outbound connections to peers (default: 125)
maxconnections=20
# Maximum number of inbound connections from a single address.
# Not applicable to whitelisted peers.
# A value of 0 = unrestricted (default: 0)
maxconnectionsfromaddr=5
# Add node(s) to connect to and attempt to keep the connection open
# Can be specified multiple times
addnode=<ip>
# Whitelist peers connecting from the given IP address (e.g. 1.2.3.4) or
# CIDR notated network (e.g. 1.2.3.0/24). Can be specified multiple
# times. Whitelisted peers cannot be DoS banned and their
# transactions are always relayed, even if they are already in the
# mempool, useful e.g. for a gateway
whitelist=<IP address or network>
# Bind to given address and whitelist peers connecting to it. Use
# [host]:port notation for IPv6
whitebind=<addr>
# Connect only to the specified node(s); -noconnect or -connect=0 alone to
# disable automatic connections. Can be specified multiple times
connect=<ip>
# Set the maximum block size in bytes we will accept from any source. This
# is the effective block size hard limit and it is a required
# parameter (0 = unlimited). The value may be given in bytes or
# with unit (B, kB, MB, GB).
excessiveblocksize=10GB
# Set maximum stack memory usage in bytes used for script verification
# we're willing to accept from any source (0 = unlimited) after
# Genesis is activated (consensus level). This is a required
# parameter. The value may be given in bytes or with unit (B, kB,
# MB, GB).
maxstackmemoryusageconsensus=100MB
# Set lowest fee rate (in BSV/kB) for transactions to be included in block
# creation. This is a mandatory setting
# 0.00000001 == 1 sat per KB
minminingtxfee=0.00000001
# Set maximum block size in bytes we will mine. Size of the mined block
# will never exceed the maximum block size we will accept
# (-excessiveblocksize). The value may be given in bytes or with
# unit (B, kB, MB, GB). If not specified, the following defaults
# are used: Mainnet: 32 MB before 2019-07-24 14:00:00 and 128 MB
# after, Testnet: 32 MB before 2019-07-24 14:00:00 and 128 MB
# after.
blockmaxsize=4GB
# Reduce storage requirements by enabling pruning (deleting) of old
# blocks. This allows the pruneblockchain RPC to be called to
# delete specific blocks, and enables automatic pruning of old
# blocks if a target size in MiB is provided. This mode is
# incompatible with -txindex and -rescan. Warning: Reverting this
# setting requires re-downloading the entire blockchain. (default:
# 0 = disable pruning blocks, 1 = allow manual pruning via RPC,
# >550 = automatically prune block files to stay under the
# specified target size in MiB, but still keep the last 288 blocks
# to speed up a potential reorg even if this results in the pruning
# target being exceeded)Note: Currently achievable prune target is
# ~100GB (mainnet). Setting the target size too low will not affect
# pruning function, but will not guarantee block files size staying
# under the threshold at all times.
prune=<n>
# Enable publish hash block
zmqpubhashblock=<address>
# Enable publish hash transaction
zmqpubhashtx=<address>
# Enable publish raw block
zmqpubrawblock=<address>
# Enable publish raw transaction
zmqpubrawtx=<address>
# Enable publish invalid transaction invalidtxsink=ZMQ should be specified
zmqpubinvalidtx=<address>
# Enable publish removal of transaction (txid and the reason in json
# format)
zmqpubremovedfrommempool=<address>
# Enable publish removal of transaction (txid and the reason in json
# format)
zmqpubremovedfrommempoolblock=<address>
# Enable publish hash transaction
zmqpubhashtx2=<address>
# Enable publish raw transaction
zmqpubrawtx2=<address>
# Enable publish hash block
zmqpubhashblock2=<address>
# Enable publish raw block
zmqpubrawblock2=<address>
# Output debugging information (default: 0, supplying <category> is
# optional). If <category> is not supplied or if <category> = 1,
# output all debugging information.<category> can be: mempool,
# http, bench, zmq, db, rpc, addrman, selectcoins, reindex,
# cmpctblock, rand, prune, proxy, mempoolrej, libevent, coindb,
# leveldb, txnprop, txnsrc, journal, txnval, netconn, netmsg,
# netmsgverb, netmsgall, net, doublespend, minerid.
debug=<category>
# Exclude debugging information for a category. Can be used in conjunction
# with -debug=1 to output debug logs for all categories except one
# or more specified categories.
debugexclude=<category>
go get -u github.com/bitcoin-sv/spv-wallet-go-client
Sign all inputs and the output with the same index
SIGHASH_ALL | ANYONECANPAY
0xC1 / 1100 0001
0x81 / 1000 0001
Sign its own input and all outputs
SIGHASH_NONE | ANYONECANPAY
0xC2 / 1100 0010
0x82 / 1000 0010
Sign its own input and no output
SIGHASH_SINGLE | ANYONECANPAY
0xC3 / 1100 0011
0x83 / 1000 0011
Sign its own input and the output with the same index
The tables below illustrate what is signed and what is not signed in an ECDSA siganture depending on the SIGHASH type used.
Items that are always signed
The signature on any input always signs the TXID and VOUT that comprise the Outpoint being spent as well as the version of the protocol that the transaction is being evaluated under and the locktime being applied to the transaction.
Items that are never signed
Unlocking scripts are never signed
SIGHASH_ALL
SIGHASH_ALL signs all inputs and outputs used to build the transaction. Once an input signed with SIGHASH_ALL is added to a transaction, the transaction's details cannot be changed without that signature being invalidated.
SIGHASH_SINGLE
SIGHASH_SINGLE signs all inputs and the output that shares the same index as the input being signed. If that output or any inputs are changed that signature becomes invalidated.
SIGHASH_NONE
SIGHASH_NONE signs all inputs and no outputs. Any output can be changed without invalidating the signature however if any inputs are changed that signature becomes invalidated.
SIGHASH_ALL|ANYONECANPAY
`Once an input signed with SIGHASH_ALL|ANYONECANPAY is added to a transaction outputs cannot be changed or added without that signature being invalidated.
SIGHASH_SINGLE|ANYONECANPAY
SIGHASH_SINGLE|ANYONECANPAY signs the input being signed and the output that shares the same index. If that output is changed that signature becomes invalidated.
SIGHASH_NONE|ANYONECANPAY
SIGHASH_NONE|ANYONECANPAY signs a single inputs and no outputs. This type of signature can be used to easily assign funds to a person or smart-contract without creating an on-chain action.
Use cases
SIGHASH flags are useful when constructing smart contracts and negotiable transactions in payment channels.
Use Case 1 - Crowdfunding
Using ALL | ANYONECANPAY allows a transaction to have a fixed output or fixed outputs while keeping the input list open. That is, anyone can add their input with their signature to the transaction without invalidating all existing signatures.
Use Case 2 - Blank Check
Using NONE allows anyone to add their desired outputs to the transaction to claim the funds in the input.
Use Case 3 - Modular Transaction
Using SINGLE | ANYONECANPAY modularises a transaction. Any number of these transactions can be combined into one transaction.
Please note that after the , the BSV Blockchain will support both the original TDA and the BIP143 Algorithm (with SIGHASH_FORKID), allowing flexibility for devs and users. It means that users will be able to decide how to sign transactions
Maximum block size
This mandatory consensus parameter defines the maximum size, in bytes, of a block. The software will not retrieve or validate any blocks larger than the value of this parameter.
This parameter can be configured using the configuration option “excessiveblocksize” with the value denominated in bytes. This option can be specified on the command line or in the configuration file.
This parameter can also be configured while the software is running using the “bitcoin-cli setexcessiveblock” command (this feature was added in version 1.0.0 of the software). It is important to note that the value of this setting is not persisted when it is set using the “bitcoin-cli” command. If the software is restarted the value of the parameter will revert to the value set in the configuration file or defined on the command line.
Please note that excessiveblocksize is the maximum size block a Miner will accept. The maximum size block a Miner will attempt to produce is governed by a different setting “blockmaxsize” which is usually set to a lower value than excessiveblocksize.
Maximum stack memory usage
This mandatory consensus parameter defines the maximum amount of stack memory that a single script can use during evaluation. If a script attempts to use more than this amount of memory during evaluation, then the evaluation will be terminated, and the script will fail. A script failure will cause a transaction to be deemed invalid and if that transaction is contained in a block, the block will also be deemed invalid.
This parameter can be configured using the configuration option “maxstackmemoryusageconsensus” with the value denominated in bytes. This option can be specified on the command line or in the configuration file.
Method to choose mandatory consensus parameter values
The capacity of the Bitcoin SV network is determined by the Miners that confirm blocks. Miners will analyse the state of the blockchain, the capability of the software, and other factors and determine values for the mandatory consensus parameters. Miners will publish the values that have been chosen.
The recommended method for determining the values of the mandatory consensus parameters is to survey the values that have been published by miners, taking account of the capabilities of the Miner. If you are mining, use similar values. If you are not mining, use higher values.
Note that Miners may change the values that they use so a regular review of the settings is recommended.
Miner nodes Vs Blockchain listeners
We define a node as an instance of Bitcoin SV that build blocks for the purpose of mining. A Blockchain listener is an instance of Bitcoin SV that is not involved in the mining process.
For a listener, we recommend choosing settings at least twice as high as that of the miners. This is in order to give you bandwidth so that when Miners increase their settings in the future, you are unlikely to be forked from the network by having a setting lower than theirs.
If the value is set too low
If your setting is lower than the majority of Miners and a block is mined that exceeds your settings, then your Bitcoin SV instance will reject that block and all future blocks mined on top of it, effectively forking off the network. However, if you are not mining, it is likely that your fork will not be extended, and your instance will simply cease following the longest chain. In this case, the remedy is simply to increase the values of those settings and restart your Bitcoin SV instance. It will then accept the failed blocks and catch up to the rest of the network.
Choosing the ‘unlimited’ option
It is possible to set either of these parameters to effectively unlimited, by choosing a value of “0”. If this option is chosen, there is no risk of forking off the network. However, in the event of an extremely large block being mined it is possible your node could run out of memory and crash. If you have followed best practices and allocated a large swap file and have minimum recommended memory, this is only likely, in an attack scenario. If this happens the remedy is to set your limits similarly to the majority of Miners and restart the node.
Mandatory Settings
Based on the current known Miners settings, the following would be deemed safe:
Safe values
Maximum block size
Maximum script memory usage
Miner
excessiveblocksize=2000000000
maxstackmemoryusageconsensus=100000000
Listener
excessiveblocksize=10000000000
maxstackmemoryusageconsensus=200000000
Currently known values
Maximum block size
Maximum script memory usage
TAAL
excessiveblocksize=1000000000
maxstackmemoryusageconsensus=100000000
QDLNK
excessiveblocksize=1000000000
maxstackmemoryusageconsensus=100000000
Optional settings
With the increasing adoption of Bitcoin SV the transaction volume continues to rise. With the explosive use of data transactions (op_returns), it is possible your Bitcoin SV node will not be able to handle the volume of traffic reaching your mempool or be inundated with computationally heavy requests. As a result, the node will drop transactions to allow higher fee-paying ones in, increasing computation at a later point, or worse, cease to function.
A solution is, to increase these following values from their defaults is to allow the node to remain efficient under high load situations.
Since continuous operation is crucial for an Alert System, Hetzner's sensitivity to port scanning makes it an unsuitable hosting choice for such an application. Please note that the Alert System only requires RPC access to a node and as such can run on different infrastructure than your node. Make sure to configure the proper security rules to restrict access to the RPC interface, for example using Hetzner's firewall rules.
Running the Alert System
In order to run the Alert System for each given network, there are some environment variables that should be set.
Server Configuration
Environment Variable
Description
Example Values
ALERT_SYSTEM_ENVIRONMENT
The environment to start the Alert System with. Set this to the network type you'd like to run on.
mainnet
testnet
stn
ALERT_SYSTEM_BITCOIN_CONFIG_PATH
Path to a valid bitcoin.conf file. Alert System will read the RPC configuration values from this file to communicate to the Bitcoin node.
/home/user/.bitcoin/bitcoin.conf
With the proper environment variables set, the alert-system binary can be run directly without any arguments.
Systemd
To start the install of the Alert System, make sure you use an account that can use su or sudo to install software into directories owned by the root user.
Download the zipped release of your choosing from the Github release page, for this example we are using 0.1.1 which is the latest release at the time of writing:
Locate the file you downloaded and extract it using the unzip command:
Create a symbolic link from a new directory called alert-system to the alert-system-0.1.1 directory you just made by unzipping for easier use and updates:
To run the alert system, pass in the location of the bitcoind configuration file so that it can connect over RPC:
Create the alert-system.service file:
Then start:
Follow the logs using journalctl
Multiple nodes and remote Alert Systems
If you are hosting the Alert System on the same host as the bitcoind, make sure only 1 instance of the Alert System is running on that host.
You can host multiple Alert Systems on a single instance or Kubernetes cluster, but then you will need to make sure they all run on a unique port and take care of any firewall considerations. For these setups it's easier to use a config.json to define the port and RPC credentials for the nodes. An example config can be found in the alert-system repo at app/config/envs/mainnet.json.
Docker images for the Alert System can be found on Docker Hub.
cd alert-system
# Example based on user
ALERT_SYSTEM_BITCOIN_CONFIG_PATH=/home/user/bitcoin-data/bitcoin.conf \
ALERT_SYSTEM_ENVIRONMENT=mainnet \
/home/user/alert-system/alert-system
sudo vim /etc/systemd/system/alert-system.service
[Unit]
Description=BSV Alert System service
After=network.target
[Service]
Type=simple
# Make sure to replace username
Environment="ALERT_SYSTEM_BITCOIN_CONFIG_PATH=/home/user/bitcoin-data/bitcoin.conf"
Environment="ALERT_SYSTEM_ENVIRONMENT=mainnet"
Environment="ALERT_SYSTEM_DATASTORE__SQLITE__DATABASE_PATH=/home/user/alert-system/alert_system_datastore.db"
ExecStart=/home/user/alert-system/alert-system
TimeoutStopSec=1
KillMode=process
Restart=on-abnormal
PrivateTmp=true
# Make sure to replace username
User=user
[Install]
WantedBy=multi-user.target
Each component has its own README which will guide you through the setup process. A developer guide on how to get your dev environment set up and how each of the components works is here:
The alert message format is standardized for all message types. Depending on the alert type, the message can vary in format.
Field
Description
Type
Size (bytes)
Version
Alert key message version = 1.
Signatures are calculated on doublesha256(Version || Sequence Number || Time || Alert Type || Message Body), where || is byte concatenation and will be encoded using just r, and s and the 1 byte header to guarantee a fixed length of 65 bytes.
The alert message format for each type is defined elsewhere. The important detail is that the alert type defines what associated action the Alert System should perform.
Prior to the release of Teranode, the Alert System interfaces with SV Node over the RPC interface. Below is a list of the supported Alert Messages and their associated RPC calls:
Alert Type
Description
Type
RPC Call
RPC Parameters
Alert Messages are valid when they are signed by 3 of 5 current Alert Key Holders. Alert Messages increment by sequence number, and the initial message referenced by sequence number 0 contains the following Set Keys Alert Message:
This message is the valid genesis message for the mainnet instance of the Alert System. The public keys associated with this message are:
The Network Access Rules (NAR) within the BSV blockchain are foundational to its operation, serving as a critical legal and operational framework. These rules are not just guidelines but form a multilateral contract between and among the BSV Association (BSVA) and each node participating in the network. Acceptance of the contract is implicit, established by the very act of a node joining and engaging in relevant activities (including network activities) within the BSV ecosystem.
When a node decides to partake in the BSV network, it inherently agrees to abide by the NAR. This agreement is not formalised through a traditional contract signing; rather, it is a contract that is agreed, confirmed, and automatically in force once a node commences network activities. These network activities include essential functions such as collecting, validating, and accepting blocks, compiling transactions into blocks, attempting to find a proof-of-work for a block, or broadcasting a block to the wider network. Further, if a node uses the node software or takes advantage of the node software license then the contract will also take effect.
This contractual relationship, designed for and compatible with blockchain technology, is pivotal for the BSV network. It ensures that every node, by participating in the network, consents to and is bound by a set of predefined rules and standards. These rules are designed to maintain network integrity, security, and functionality. They confirm the legal framework within which nodes operate, providing clarity and consistency in how the network functions.
The NAR encompass various aspects of network operation, including compliance with laws, adherence to technical standards, and the execution of network activities as per the original Bitcoin Protocol. This comprehensive approach ensures that every participant in the network contributes to a stable, secure, and legally compliant blockchain environment. By agreeing to the NAR, nodes are committing to uphold the principles and protocols that define the BSV network, first laid out in the original Bitcoin White Paper.
What role do mining nodes play in the enforcement of the Network Access Rules?
Mining nodes play a crucial role in the enforcement of the Network Access Rules (NAR). While the decision-making process for NAR is the responsibility of the BSV Association (BSVA), which acts as the steward of the BSV network and is the sole entity authorised to amend the NAR, miners participate in the enforcement of these rules.
Mining nodes enforce the NAR by implementing directives received through the Alert System, which is managed by the BSVA. These directives may only be issued by the BSVA in specific situations as specified in the NAR. Miners' compliance and execution of these directives contribute significantly to maintaining network integrity and help ensure that only honest and lawful transactions are recorded on the BSV blockchain.
Miners are also empowered under NAR to bring contractual claims against other miners who have breached NAR. NAR even contemplates the possibility of miners bringing claims against the BSVA to enforce its provisions.
How do the Network Access Rules impact the day-to-day operations of miners on the BSV network?
The Network Access Rules (NAR) do not alter the day-to-day operations of miners on the BSV network. Miners are already obligated to adhere to these standards and protocols as part of their routine activities. These obligations primarily include following the six steps outlined in section 5 of the Bitcoin White Paper to operate the network under the original Bitcoin Protocol and ensuring compliance with relevant laws. Additionally, miners must respond to various directives, which may encompass security updates and alerts that can impact their mining operations.
In essence, the NAR serve as a framework to enforce these pre-existing behaviours and requirements. Their purpose is to safeguard the network's integrity for the benefit of honest miners and users with a view to ensuring that all participants continue to operate in accordance with understood and binding rules, established legal standards, and best practices.
How do miners stay compliant with the Network Access Rules?
Miners should always run software – whether that be the node software or other software – which allows for receiving alert messages through the Alert System, to facilitate information sharing for security threats, and promptly implement any security directives to ensure both compliance and security of the network.
How does the Alert System affect mining rewards and block propagation for miners?
The Alert System may issue directives that could impact block validation or propagation (e.g., freezing certain unspent transaction outputs (UTXOs)). Compliance with these alerts may therefore temporarily affect mining rewards. However, this procedure is designed to ensure long-term network integrity and value.
For example, a message may be published that directs nodes to invalidate a specific block that includes a transaction that transfers funds which have a freeze order against them since such funds have been identified to be proceeds of crime. In this case the miner who broadcasts that block will lose the block reward from that block and another proof of work solution will need to be found by nodes that do not attempt to transfer coins under the applicable freeze order.
Are there any incentives for miners related to enforcing the Network Access Rules?
Miners are incentivised to comply with the Network Access Rules (NAR) to maintain their mining rewards and network participation as well as to have clarity at being covered by the NAR. The NAR are designed such that they do not impede or adversely impact honest nodes in the long run. They incentivise nodes to have awareness about any current freeze orders and to be as well connected to other nodes as possible so that they will never inadvertently build a block with a double spend in it. There also exists the natural incentive for nodes to ensure the BSV Blockchain is compliant under existing regulatory requirements, to ensure its long term growth and stability.
Are there any consequences for miners who do not follow the Network Access Rules?
Consequences may include blocks being invalidated, losing connections as an eligible peer, or other enforcement actions for non-compliance (all within the confines of the restrictions on the BSV Association (BSVA)’s powers set out in the Network Access Rules (NAR)).
Having blocks a miner produced deemed invalid means the money that was spent to produce the block is wasted since no block reward will be received. This will ensure that miners want to follow the directives issued through the Alert System.
What is the function of the BSV Association?
The BSV Association (BSVA) serves as the principal steward of the BSV network, entrusted with multiple critical functions. Here’s an overview of its key functions:
Stewardship: The BSVA’s primary function is to steward the BSV network. This involves communicating essential information and updates to miners and other network participants, primarily through the Alert System. This system is crucial for disseminating important security updates, alerts, and guidance to maintain the network's integrity and efficiency.
What are the implications for miners operating in jurisdictions with strict regulatory requirements related to digital assets?
Miners in strict regulatory environments must ensure that their operations, including compliance with the Network Access Rules (NAR), align with all applicable local laws.
How can miners ensure the security of their mining infrastructure in the context of the Alert System?
The Alert System adds to the security of all core infrastructure of the network by identifying and alerting all honest participants of malicious behaviour. By listening and acting upon validly signed alerts, honest nodes contribute to the overall security of the BSV network.
Miners, for example, who repeatedly violate the NAR, or who use their infrastructure for processing sanctioned frozen transactions or double spends, may find themselves in breach of applicable laws concerning the prohibited transfer of money.
Who are the alert key holders?
Five parties are designated by the BSV Association (BSVA), who hold mobile devices that are used to sign alert messages only under the circumstances specified in the NAR and within the boundaries specified therein. These parties are responsible to be available on an ad hoc basis for real time responses, and are ultimately responsible for approving the sending of alert messages to the network. A message is signed when it has three out of the five keyholders sign.
The goal is to have a diverse group of key holders who can collectively ensure the security and integrity of the alert system. For security their keys will be rotated on a scheduled basis.
Disclaimer
The content of this document is provided for informational purposes only and is not intended to modify or supersede the contractual rights or obligations of any party to the Network Access Rules. Parties are encouraged to carefully review the Network Access Rules to verify the accuracy of the information presented here. It is assumed that, where necessary, parties will seek guidance from their legal counsel and any other advisors they consider necessary.
Any statements here do not purport and should not be considered to be a guide to, advice on, or explanation of all relevant issues or considerations relating to the contractual relationship established by the NAR. The BSV Association assumes no responsibility for any use to which the BSV network is put by any miner or other third party.
\
SPV Wallet
Complete stand-alone server using the SPV Wallet engine to manage xpubs, utxos, destinations, paymails and transactions. It's non-custodial wallet, which means that it doesn't store any private keys.
SPV Wallet can do SPV and work with BEEF transactions, you can read more about it in below documents.
Important Concepts
BUMP, BEEF and SPV
SPV Wallet work with BUMP Merkle Proof format, which is a way to prove that transaction is included in the block.
After broadcasting or receiving a transaction, SPV Wallet will query Arc API (or wait for a callback) to get BUMP for the transaction. Having BUMP on any level of ancestry for all inputs of the transaction, allows us to send it to the network.
By having this information we can easily verify all merkle proofs which is a part of SPV protocol.
To verify merkleroots we need to have a block headers service running. More about BUMP you can read .
Useful links:
SPV Wallet HTTP Server
SPV Wallet exposes an HTTP server which allows you to interact with database, manage xpubs, paymails and work with transactions. It's a complete stand-alone server using the SPV Wallet engine.
API Documentation can be found in swagger - you can access it by running SPV Wallet and going to http://localhost:3003/swagger/index.html.
SPV Wallet Clients
We strongly encourage you to use one of the SPV Wallet client libraries provided for different languages,
which are abstracting out http connection and handle authentication for you:
We're using on a local machine, once you're ready to start, initialize a project with npm init -y and install the BSV Blockchain official SDK.
Installation
Deployment guide to run your own SPV Wallet
Step 1
Set up your own with sufficient credit or a valid payment method.
Step 2
Authentication
Authenticate as admin
To authenticate within the SPV Wallet as an admin, you need to use admin HD key pair.
At the SPV Wallet side the admin key pair is recognized by the admin xpub which need to be configured ().
When you have the admin xpriv, you can now create SPV Wallet Client for admin API:
Educational Support and Software Development: The BSVA also focuses on providing educational resources and supporting software development initiatives. This function is vital in equipping the BSV community with the necessary knowledge and tools to optimise network participation and foster technological innovation within the blockchain space.
Enforcement of the Network Access Rules (NAR): As a party to the NAR, the BSVA has well-defined duties and obligations towards network miners and nodes, as set out in NAR. The association ensures that these rules are adhered to, and it can be held accountable for any breaches or overreaching actions. This enforcement is key to maintaining a fair, secure, and orderly network.
Compliance with Legal Directives: A significant part of the BSVA’s role involves enforcing legal directives, particularly regarding the freezing or reassignment of unspent transaction outputs (UTXOs). Utilising the Alert System, the BSVA facilitates network compliance with relevant court orders, thereby aligning the BSV network with relevant legal standards and regulatory requirements.
In essence, the BSVA's role is to ensure that the BSV network operates within a secure, legal, and efficient framework, balancing the needs of network participants with the overarching goal of maintaining a stable and trustworthy blockchain environment.
GorillaPool
excessiveblocksize=1000000000
maxstackmemoryusageconsensus=100000000
maxmempool=8000
maxsigcachesize=TBC maxscriptcachesize=TBC
maxorphantx=TBC
ALERT_SYSTEM_DISABLE_RPC_VERIFICATION
If this is set to true, then the Alert System will not attempt to verify the provided RPC credentials on startup. This is useful if bitcoind is not running.
false
ALERT_SYSTEM_ALERT_WEBHOOK_URL
Webhook URL for the Alert System to send human readable alert messages to. See later in the doc for details.
http://example.com/webhook
ALERT_SYSTEM_P2P__PORT
Port for libp2p to serve on. (Defaults to 9906)
9906
ALERT_SYSTEM_WEB_SERVER__PORT
Port for the local apiserver to serve on. (Defaults to 3000)
3000
ALERT_SYSTEM_LOG_OUTPUT_FILE
Rather than logging to stdout, configure the server to log directly to a file on disk.
/var/log/alert-system
ALERT_SYSTEM_DATASTORE__SQLITE__DATABASE_PATH
Path to where the SQLite3 database for the alert-system should be saved. (Defaults to ./alert_system_datastore.db
Alert -key message timestamp in Unix timestamp / Unix epoch format as (seconds since 1970-01-01T00:00 UTC).
uint32
4
Alert Type
Alert key message type.
uint32
4
Signatures
Signature data concatenated
Signature[N]
65*N
Message
Alert message
Variable Bytes
Depends on alert type
Informational Message
Informational broadcast to the network
0x01
N/A
N/A
Freeze UTXO
Build Your First Transaction
To create your first transcation you need to send some BSV into a locking script you control. Let's set up our local node.js environment with a key we can use.
Run the above code by copying it into createKey.js and running node createKey.js
Now you should get something in your console which looks like this:
To continue developing and testing, this address will require some funding. This can be done by sending BSV to this wallet, and due the low cost of transactions only a few satoshis will suffice ($0.01 equivalent is recommended). This way, you also ensure that you're not affected if you would lose access to the keys.
If you don't have any BSV, you can find out how to buy it here, or ask the BSV community on X or Discord to send you some funding.
Once you've sent an initial funding transaction to this address, grab the whole transaction from Whats On Chain by pasting in the txid to the search box.
Once mined, a green button which says "Raw Tx" will be visible, which allows you to download the full transaction bytes as a hex string file. That's going to be our sourceTransaction which will fund the transaction we are going to define with the SDK. Copy the hex string into a file in the working directory called .transactions. The file contents should look something like this:
You can then construct your first transaction by copying the code below into createTx.js and running node createTx.js.
You should see a response like this:
Congratulations
You're a BSV Developer.
You can keep running the same script - it will keep appending new transactions to the .transactions file until you run out of funds. BSV is so cheap that this could be a few thousand transactions later.
In the mean time, you can create your own Bitcoin ScriptTemplates by defining your own classes like so:
To create this output you simply add the class to an output:
Unlocking it in a future transaction you can simply do:
To check that the script works you can then run:
Ask the AI if you want to learn more, or join our discord if you need help from a human.
If you want to contribute new ScriptTemplates of your own design there's a repo for that here.
For more guidance from the documentation - jump here.
To authenticate as user, first user and his xpub must be added by admin to SPV Wallet.
To register user, admin need to make a following request to SPV Wallet:
Authenticate with users xpub
To authenticate within the SPV Wallet as a user, you simply need to create a new SPV Wallet Client for users API.
Authentication using Access key
Another way of authenticate as a user is by use of access key.
Create
To authenticate as user with access key, first user must create an access key by making a following call:
In response, you can find the following important properties:
Key - which is actually an additional private key and is not stored on the SPV Wallet side, so it is displayed to user only once and user is responsible for storing it
ID - which actually can be used for checking the state of the access key (if it was revoked or when it was created) or revoking it.
Use
To authenticate as user with access key, you need to create a new SPV Wallet Client for users API with the access key.
Revoke
Whenever a user believes that a particular access key has been compromised or is no longer needed, it can be revoked to prevent any further use.
To revoke an access key, a user needs to make the following call:
Register a root domain name you would like to use for the wallet. This will be how counterparties address users of your wallet: [email protected] The domain will be used as a root domain, and the cloud formation template will create subdomains under it.
Step 3
Pick the AWS region closest to your customer(s). To determine which region is closest to your current location you can use a service like Cloud Ping.
Step 4
Launch the software using one of the CloudFormation template links below for your chosen region.
Region
CloudFormation template link
AP
CA
If you don't know which link to pick, just use .
Step 5
Fill in the required template settings:
Stack name - this name will be dispayed on the list of Cloud Formation stacks in the AWS console
Domain name - type the domain nama that you registered at the step 2
Hosted zone ID for domain - choose exactly the one that is matching the domain name above
Step 6
After submitting stack creation it will take up to 30 minutes to create all resources. You can check the status in the Resources tab.
Prerequisite
Make sure you have AWS CLI installed and authenticated
Step 4
Issue the following command and find hosted zone id for registered domain in the .
ℹ️Make sure to use the id without the prefix /hostedzone/
Step 5
Replace variables described below with chosen options in the following command and run it to deploy the stack.
What resources are created?
· VPC with CIDR 10.0.0.0/16
· EKS Cluster with a Single Node Group (2 x t3.small instances)
The ‘Rules’ comprise a multilateral legal agreement between and among the Association and all Nodes.
The Rules include the Master Rules (Part I), the General Rules (Part II), the Enforcement Rules (Part III), the Dispute Resolution Rules (Part IV), and the Interpretive Rules (Part V), but do not include the recitals in the Background to the Rules.
The Rules supersede the Unilateral Contract as between and among the parties to the Rules in relation to its subject matter, without prejudice to any accrued rights and liabilities any party to the Rules may have under that earlier agreement.
Agreement to the Rules
Each Node confirms and communicates its agreement to the Rules when it:
(a) conducts any Network Activity;
Network Activities and Block Reward
Each time a Node conducts a Network Activity, such Node agrees that it will use best endeavours to undertake the following six steps to run the Network set out in the Bitcoin White Paper:
(a) new transactions are broadcast to all Nodes;
Network access criteria
Each Node severally represents and warrants to the Association and to each other Node (which representations will be deemed to be made upon entry to the Rules and repeated by each Node every time such Node carries on any Relevant Activity, as well as at all times that the Rules remain applicable to that Node) that:
(a) the Node’s conduct of any Relevant Activity is in accordance with the Bitcoin Protocol;
Node responsibilities
Each Node agrees that it will not, directly or indirectly, do or attempt to do any of the following:
(a) conduct any Relevant Activity otherwise than in accordance with the Rules;
Node acknowledgements
Each Node acknowledges, agrees, and accepts that unless expressly stated elsewhere in the Rules:
(a) the Association is not under any obligation to Nodes or any other person to monitor and enforce compliance with the Rules (or any similar agreement the Association has with a third party), even though the Association may carry out such activities;
Nodes’ individual and collective obligations
Unless otherwise expressly provided in the Rules and subject to clause I.7.2, the obligations of each Node under the Rules are independent of the obligations of each other Node, and the liability of each Node will be several and extend only to any loss or damage arising out of its own breach.
A Node’s liability under the Rules will be joint and several together with any other Nodes or third parties which are, in the reasonable and good faith opinion of the Association, acting together with that Node pursuant to an agreement or understanding (whether formal or informal, but not including the Rules).
Liability
In this clause I.8 references to liability include all present and future liabilities, actual or contingent, of every kind arising under or in connection with the Rules including liability in contract, tort (including negligence), misrepresentation, restitution, or otherwise.
Nothing in the Rules limits any liability which cannot legally be limited, including liability for: (i) death or personal injury caused by negligence; and (ii) fraud or fraudulent misrepresentation.
Suspension
The Association may suspend the rights of, and any obligations owed by any party to, a Node (the ‘Suspended Node’) by notice where the Association determines reasonably and in good faith that:
(a) to do otherwise may be a violation of, be inconsistent with, or expose the Association or the Network to any liability under Applicable Laws;
Governing law
The Rules and any dispute or claim arising out of or in connection with them or their subject matter, existence, negotiation, validity, termination, or enforceability (including any non-contractual disputes or claims) will be governed by and construed in accordance with the law of England and Wales
\
SV Node
Quick start
The svnode-quickstart scripts offer a streamlined way to set up a BSV Blockchain SV Node. These helper scripts automate various steps of the installation process, significantly reducing the time and effort required compared to manual setup. They provide an efficient solution for quickly getting an SVNode operational, while the detailed manual installation instructions outlined below offer a comprehensive guide for those who prefer or require a thorough understanding of each step.
The svnode-quickstart scripts also provide an option to sync a snapshot, which can significantly expedite getting your setup operational. However, users should carefully read the snapshots disclaimer regarding trust and security considerations here before proceeding.
Manual installation
The following instructions describe installing BSV Blockchain SV Node using tools available in most mainstream Linux distributions. The assumption has been made that you are using a Bourne-like shell such as bash.
To start the install of SV Node, make sure you use an account that can use su or sudo to install software into directories owned by the root user.
Download the zipped release of your choosing, for this example we are using 1.2.2 which is the latest release at the time of writing:
Confirm downloaded file sha hash matches those provided at for the version you have downloaded.
Locate the file you downloaded and extract it using the tar command followed by the argument xzf followed by the file name. The argument xzf means eXtract the gZipped tar archive file. For example, for a 64-bit tar archive in your current directory, the command is:
Create a symbolic link from a new directory called bitcoin to the bitcoin-sv-1.2.1 directory you just made by unzipping for easier use and updates:
Create a bitcoin-data directory to put bitcoin data in (or else Bitcoin will put data in ~/.bitcoin by default):
Data folder considerations
The bitcoin-data folder will contain the logs, blocks, UTXO set and various other files the SV Node needs to function. For mainnet this folder will get very big, around 350GB for the UTXO set and 12TB for the blocks as of January 2024. The UTXO set store in bitcoin-data/chainstate is used for lookups to validate transactions and should be stored on a high-performant SSD. Depending on your use case, the bitcoin-data/blocks folder can be stored on slower, cheaper HDD storage.
If setting up the node in AWS, see for more details on a recommended setup.
Config
Create a bitcoin.conf file in the directory to configure the settings to run your node using:
A detailed list of available options can be found in . Below is an example bitcoin.conf file used by a node on the mainnet:
Systemd
To run Bitcoind, pass in the location of the configuration file as well as the location of where to store the bitcoin data:
Create the bitcoind.service file:
Then start:
The SV Node will now start and you can monitor progress in the log file. It will take several days for a fresh sync of the entire chain as of January 2024.
Configuration
This guide will help you to know the most important configuration options for SPV Wallet.
Order of resolving configuration
The configuration is resolved in the following priority
Environment variables - the environment variables are prefixed with SPVWALLET_ and are in uppercase. They have the highest priority when resolving the configuration.
Configuration file - the configuration file is resolved next. The default configuration file is config.yaml in the working directory. You can also specify custom configuration file path using C flag in the command line.
If you don't specify the configuration file and environment variables, the default configuration will be used - it's resolved in
Configuration File
We store the configuration in a file called config.example.yaml in the root of the project. You can copy this file to config.yaml and modify it to your needs.
The most important configuration options are:
Going throught highlighted options:
The auth section contains the admin_key which is used for admin api authentication. This key is used to authenticate the admin api calls.
The cache section contains the engine option which can be set to freecache or redis. The freecache
Callback is an Arc feature that allows the wallet to receive notifications about broadcasted transactions. It is useful because it limits the need for polling the node for transaction status.
The paymail section contains the domains option which is used to define the list of domains.
The beef section with the use_beef option is used to enable or disable beef paymail capability support.
You can read more about the SPV and BEEF in the section.
The metrics section allows to enable or disable Prometheus metrics.
Environment Variables
You can also set the configuration options using environment variables. The environment variables are prefixed with SPVWALLET_ and are in uppercase. For example, the auth.admin_key can be set using the SPVWALLET_AUTH_ADMIN_KEY environment variable.
(c) uses or takes any benefit of the Node Software Licence.
In the Rules, the term ‘Relevant Activity’ means any and all of the activities in clause I.2.1.
Any person who has not agreed and does not agree to the Rules should not undertake any Relevant Activity.
(b) each Node collects new transactions into a block;
(c) each Node works on finding a difficult proof-of-work for its block;
(d) when a Node finds a proof-of-work, it broadcasts the block to all Nodes;
(e) nodes accept the block only if all transactions in it are valid and not already spent; and
(f) nodes express their acceptance of the block by working on creating the next block in the chain, using the hash of the accepted block as the previous hash.
Each Node may compete to earn a ‘Block Reward’ by undertaking Network Activities subject to and in accordance with the Rules. This Block Reward may comprise: (i) transaction fees; and (ii) other block incentive fees (‘Block Subsidies’), subject to the Block Subsidies decreasing over time in accordance with the Bitcoin Protocol.
No party to the Rules represents or guarantees that any person will earn any Block Rewards.
Each Node acknowledges that, except as may be provided for expressly in the Rules, no fees, payments, or reimbursements are due or may become due to it, from the Association or any Affiliate of the Association regarding such Node’s performance of any of its obligations under the Rules or its conduct of any Relevant Activity.
(b) if the Node is a legal entity, it is duly organised and validly existing under the laws of the jurisdiction of its organisation and incorporation and, if applicable under such laws, in good standing;
(c) the Node has the power and (in the case of an individual) full capacity to: (i) enter the Rules and any other documentation relating to the Rules; (ii) to perform its obligations under the Rules and any other documentation relating to the Rules; and (iii) it has taken all necessary action to authorise such entry and performance;
(d) all governmental and other consents, licences, authorisations, permits, contracts, and other approvals (if any) that are required to enable the Node to enter into the Rules and any other documentation relating to the Rules and perform its obligations under the same have been obtained by it and are in full force and effect, and all conditions of the same have been complied with;
(e) by the Node entering into the Rules, conducting any Relevant Activity, and performing its obligations or exercising any rights under the Rules, it will not violate any Applicable Laws, any provision of its constitutional documents, or any third-party rights binding on it or any of its Affiliates;
(f) without prejudice to the generality of clause I.4.1(e) above, by the Node entering into the Rules, conducting any Relevant Activity, and performing its obligations or exercising any rights under the Rules, it will not violate any Data Protection Laws;
(g) neither that Node nor any of its Affiliates is a Sanctions Restricted Person; and
(h) the Node’s obligations under the Rules constitute its legal, valid, and binding obligations in accordance with the Rules, enforceable in accordance with their terms subject to applicable bankruptcy, reorganisation, insolvency, moratorium, examinership, fraudulent conveyance laws, or any other similar laws affecting creditors’ rights generally and subject, as to enforceability, to equitable principles of general application (regardless of whether enforcement is sought in a proceeding in equity or at law).
Each Node agrees that its rights under the Rules will be suspended if and for so long as any of its representations or warranties in clause I.4.1 are untrue.
(b) misuse, damage, overload, disrupt, or cause a significant adverse effect to the Network or the Network Database;
(c) use any Malicious Code, including any programmes or software that may, in the Association’s reasonable and good faith opinion, interfere adversely with the normal operation of the Network or the collection, storage, processing, or transmission of any data or transactions via the Network; or
(d) access any part of the Network without authorisation or otherwise than in accordance with the Rules.
Each Node further agrees that it will always and at its own cost and without delay:
(a) take all lawful action as may reasonably be required to ensure the application of the Rules to it;
(b) comply in all respects with Applicable Laws in connection with the performance of its obligations under the Rules and its conduct of any Relevant Activity;
(c) without prejudice to that Node’s other obligations under the Rules: (i) follow and abide by the Bitcoin Protocol when conducting any Network Activities; and (ii) act honestly within the meaning of the Bitcoin White Paper;
(d) only carry out Network Activities using either: (i) a version of the Node Software that includes all released functionalities (unless the Association has expressly designated those functionalities as discretionary in writing); or (ii) other software of its own choosing so long as it abides by and is compatible with the Bitcoin Protocol and the Rules, and allows Nodes to receive informational messages broadcast by the Association via the Network (each a ‘Message’);
(e) comply with the applicable terms of any Node Software Licence if it is using the Node Software;
(f) maintain adequate systems, equipment, processes, and controls to allow it to receive and respond to any notices and system notifications from the Association, including Messages, and to perform its obligations under the Rules in an efficient and timely manner;
(g) notify the Association as soon as possible of any potential performance or vulnerability threat of significance to the Association, the Network, or Nodes generally; and
(h) use best endeavours not to introduce material into the Network or Network Database which: (i) is malicious; (ii) the control, ownership, possession, or distribution of is prohibited under Applicable Laws; (iii) is technologically harmful; or (iv) may reasonably result in significant cyber-risks or vulnerabilities to us, the Network, or Nodes generally.
(b) nothing in the Rules is to be construed or interpreted as the Association taking or accepting any responsibility or liability for the roles, responsibilities, or obligations of any Node or third parties;
(c) the Association is not obligated to exercise (or to not exercise) any of its powers under the Rules, but if such powers are exercised, the Association undertakes to act with reasonable care and skill in the exercise of the relevant power(s); and
(d) the Association cannot and does not guarantee the Network’s reliability, integrity, or performance.
Any party to the Rules may bring a separate action or actions against any Node under the Rules, or release any claim they have against any other Node, without affecting the liability of any other party to the Rules and irrespective of whether any other party is joined in any such action.
Subject to clause I.8.2:
(a) each Node irrevocably releases and forever discharges all other Nodes from all liability arising directly or indirectly from any Step taken by that Node and its Affiliates in good faith according to the express requirements of a Directive;
(b) the Association will have no liability to any Node bringing a claim or prospectively bringing a claim if that Node fails to notify the Association of such claim promptly or in any event no more than six months from the date when that Node was first aware, or ought reasonably to have become aware, of any of its alleged grounds to make a claim, or from the date of the event giving rise to the claim having first occurred (whichever is the earlier). Such notice must be in writing and provide sufficient details for the Association to understand and respond to the proposed claim;
(c) the Association will not be liable to any Node for any step taken reasonably and in good faith in performing (or purporting to perform) any obligation it may have under the Rules or in exercising (or purporting to exercise) any power or discretion it may have under the Rules; and
(d) the Association will not be liable for the following types of loss: (i) loss of profits; (ii) loss of sales or business; (iii) loss of agreements or contracts; (iv) loss of anticipated savings; (v) loss of use or corruption of software, data, or information; (vi) loss of or damage to goodwill; (vii) pure economic loss arising out of or in connection with the Rules; or (viii) indirect or consequential loss.
(b) the Suspended Node has breached any of Part I of the Rules (Master Rules);
(c) the Suspended Node (being an individual) dies or, because of illness or incapacity (whether mental or physical), becomes incapable of managing its affairs or is detained under any mental health legislation; or
(d) the Suspended Node (being a company, corporation, other body corporate, organisation or association) has ceased to exist, is insolvent or unable to pay its debts as they become due, or there is a material risk to that Node’s creditworthiness or financial status.
The db section contains the datastore section which contains the engine option which can be set to sqlite or postgresql. The sqlite is the default option. You can also define details about your database in this section.
The arc section contains:
the url and token which are used for getting and broadcasting transactions.
the callback section which is used to receive notifications about broadcasted transactions from ARC.
the deployment_id option is used to define the deployment id used annotating api calls in XDeployment-ID header. This value will be randomly generated if not set.
The custom_fee_unit option is used for transaction fee calculation. The fee_unit option is used as the fee value if custom_fee_unit is configured.
The block_headers_service section contains the auth_token and url options used to communicate with Block Headers Service to make SPV.
# start in background
daemon=1
# Select network -- comment out all for mainnet
#testnet=1
#stn=1
#regtest=1
# Maintain at most <n> connections to peers
maxconnections=20
# Maximum number of inbound connections from a single address.
# Not applicable to whitelisted peers.
maxconnectionsfromaddr=1
# Ports - Leave commented for defaults
#port=8333
#rpcport=8332
# Accept command line and JSON-RPC commands
server=1
rpcworkqueue=600
rpcthreads=16
#rpcallowip=0.0.0.0/0
rpcuser=CHANGE_ME
rpcpassword=CHANGE_ME
# Required Consensus Rules for Genesis
excessiveblocksize=10GB
maxstackmemoryusageconsensus=100MB
# Mempool usage allowance
maxmempool=8GB
# Maintain a full transaction index, used by the getrawtransaction rpc call
txindex=1
# Cache options
dbcache=8GB
maxsigcachesize=256
maxscriptcachesize=256
# TX options
# Minimum mining transaction fee, 1 sat / kb
minminingtxfee=0.00000001
# Max number and size of related Child and Parent transactions per block template
#limitancestorcount=100
#limitdescendantcount=100
#limitancestorsize=25000000
#limitdescendantsize=25000000
# ZeroMQ notification options
#zmqpubhashtx=tcp://127.0.0.1:28332
#zmqpubhashblock=tcp://127.0.0.1:28332
# Debug options
# can be: net, tor, mempool, http, bench, zmq, db, rpc, addrman, selectcoins,
# reindex, cmpctblock, rand, prune, proxy, mempoolrej, libevent,
# coindb, leveldb, txnprop, txnsrc, journal, txnval.
# 1 = all options enabled.
# 0 = all off (default)
#debug=1
# debugexclude to ignore set log items, can be used to keep log file a bit cleaner
debugexclude=libevent
debugexclude=leveldb
debugexclude=zmq
debugexclude=txnsrc
debugexclude=net
# Setting to 1 prevents bitcoind from clearning the log file on restart. 0/off is default
#shrinkdebugfile=0
# Stores the block data in files of 2GB on disk
# the default of 128MB will result in lots of small files
preferredblockfilesize=2GB
# Mining, biggest block size you want to mine
blockmaxsize=4GB
# When mining, consider switching to a pruned node
# Using prune and txindex is only possible in 1.1.1+
#prune=100000 # Keep only last ~100GB of blocks
#txindex=0
# Non-mining businesses that do not want to run the Alert System can enable
# the following settings to remain in sync with any validly processed
# DAR Alert Messages.
#enableassumewhitelistedblockdepth=1
#assumewhitelistedblockdepth=6
# Prevent possible memory exhaustion attacks
maxpendingresponses_getheaders=50
maxpendingresponses_gethdrsen=10
# Tunings options
#threadsperblock=32
#maxparallelblocks=4
#scriptvalidatormaxbatchsize=128
#maxparallelblocksperpeer=3
#maxstdtxvalidationduration=500
#maxstdtxnsperthreadratio=1000
#maxnonstdtxvalidationduration
# Example based on user
/home/user/bitcoin/bin/bitcoind \
-conf=/home/user/bitcoin-data/bitcoin.conf \
-datadir=/home/user/bitcoin-data -daemon
sudo vim /etc/systemd/system/bitcoind.service
[Unit]
Description=Bitcoin service
After=network.target
[Service]
Type=forking
# Make sure to replace username
ExecStart=/home/user/bitcoin/bin/bitcoind -conf=/home/user/bitcoin-data/bitcoin.conf -datadir=/home/user/bitcoin-data -daemon
ExecStop=/home/user/bitcoin/bin/bitcoin-cli -conf=/home/user/bitcoin-data/bitcoin.conf -datadir=/home/user/bitcoin-data stop
ExecReload=/bin/kill -s HUP $MAINPID
Restart=on-abnormal
TimeoutStopSec=300
PrivateTmp=true
LimitNOFILE=65536
# Make sure to replace username
User=user
[Install]
WantedBy=multi-user.target
auth:
# xpub used for admin api authentication
admin_key: xpub661MyMwAqRbcFgfmdkPgE2m5UjHXu9dj124DbaGLSjaqVESTWfCD4VuNmEbVPkbYLCkykwVZvmA8Pbf8884TQr1FgdG2nPoHR8aB36YdDQh
# ...
# other auth options
cache:
# cache engine - freecache/redis
engine: freecache
# ...
# other cache options
db:
datastore:
# enable datastore debug mode
debug: false
# datastore engine - sqlite/postgresql/mysql/mongodb (experimental)
engine: sqlite
# in this section you can define details about your database
# ...
arc:
url: https://arc.taal.com
token: mainnet_06770f425eb00298839a24a49cbdc02c
# deployment id used annotating api calls in XDeployment-ID header - this value will be randomly generated if not set
_deployment_id: spv-wallet-deployment-id
callback:
enabled: false
host: https://example.com
# token to authenticate callback calls - default callback token will be generated from the Admin Key
_token: 44a82509
# custom fee unit used for calculating fees (if not set, a unit from ARC policy will be used)
_custom_fee_unit:
satoshis: 1
bytes: 1000
block_headers_service:
auth_token: mQZQ6WmxURxWz5ch
# URL used to communicate with Block Headers Service (BHS)
url: http://localhost:8080
paymail:
beef:
use_beef: true
domains:
- localhost
# Prometheus metrics configuration
metrics:
enabled: false
Where:
${Stack_Name} - this name will be used to refer the stack in any following command
TransactionEvent is sent when transaction is made or its status changes (e.g. from "unconfirmed" to "mined")
The XpubOutputValue maps xpub ids to actual satoshi values. It's crucial to note that these values can be either positive or negative.
Based on that you can determine if this is outgoing (negative) or incomming (positive) transaction from the particual xpubID perspective.
Subscribing to Webhooks
To receive HTTP-based notifications on a specified URL, clients need to make request with admin-keyauthentication:
where only the url is required.
The client must run an HTTP server that listens on the specified URL to receive events from the spv-wallet.
Additional security layer to make sure that only the spv-wallet instance can send notifications is based on tokenHeader and tokenValue.
If these are defined, for each request, spv-wallet will include such header (<tokenHeader>: <tokenValue>) and the client should check if it equals to what was defined during the subscription process.
Unsubscribing from Webhooks
Subscriptions are stored in the spv-wallet's database and persist until the client unsubscribes.
To unsubscribe, the client should make a request authenticated with admin-keyauthentication:
Request with the list of events from spv-wallet to defined webhook
The spv-wallet will send a POST request containing a list of events to the defined webhook URL as soon as possible.
While processing events, if new events arrive in the input channel before the current batch is dispatched, these new events are accumulated and included in the next webhook call.
To prevent excessively large payloads, the maximum number of events included in a single webhook call is capped at 100.
The webhook request always contains an array of events in its JSON payload. In scenarios with low event frequency, this array might often contain only a single event.
The json body of the request with events will look like this:
Webhook client implementation
There is no need for potential clients to implement those webhook logic and endpoint events listeners on their own.
Client libraries provides the way to simplify webhook integration, please check the examples in your preferred language.
[
{
"type": "TransactionEvent",
"content": {
"xpubId": "some-xpub-id",
"transactionId": "some-transaction-id",
"status": "MINED",
"xpubOutputValue": { "xpub-id-1": 1000, "xpub-id-2": -1000 }
}
},
{
// possible other event of the same or different type
}
// ...
]
PART V - INTERPRETIVE RULES
Part V - Interpretive Rules
Principles of interpretation
The following principles of interpretation apply to the Rules:
(a) references to parties are to the Association and Nodes, and not to any third parties;
(b) references to a person will include a natural person, corporate, or unincorporated body (whether or not such body has a separate legal personality);
(c) references to a company will include any company, corporation, or other body corporate, wherever and however incorporated or established;
(d) a reference to any of a Node’s obligations under the Rules will include an obligation not to procure, permit, or suffer that thing to be done;
(e) a reference to writing or written excludes fax but includes being recorded by any means and, includes email and messages in any human-readable format or representing words in any visible form sent through the Network;
(f) a reference to signing includes an electronic signature, but only where signed through a secure operating system or platform which, in the Association’s reasonable opinion: (i) allows the signature to be uniquely linked to the signatory and capable of identifying them; and (ii) provides a link to the signed data in such a way that any subsequent change in the data is detectable;
(g) any reference to a legal term for any action, remedy, method of judicial proceeding, legal document, legal status, court, official, or any legal concept or thing will, in respect of any jurisdiction other than England and Wales, be deemed to include a reference to that which most nearly approximates to the legal term in that jurisdiction which is equivalent to that in England and Wales;
(h) unless the context otherwise requires, words in the singular will include the plural, and words in the plural will include the singular;
(i) unless the context otherwise requires, the words ‘or’ and ‘and’ will be interpreted such that ‘A or B’ means ‘A or B or both,’ ‘either A or B’ means ‘A or B, but not both,’ and ‘A and B’ means ‘both A and B’; and
(j) any words following the terms including, include, in particular, for example, or any similar expression will be interpreted as illustrative and will not limit the sense of the words preceding those terms.
Glossary
The following definitions apply to the Rules:
Term
Definition
RPC Interface
The BSV SV Node JSON-RPC API allows developers to interact with the BSV blockchain through a set of remote procedure calls. This document outlines the available commands and their usage.
The RPC interface gives full administrative control over your node. It can shut down the node, export private keys, manipulate the blockchain, and move funds. Never expose the RPC port to the public internet. Bind to 127.0.0.1, use firewall rules, and if you need to provide blockchain data to external clients, place a proxy in front that enforces a strict allowlist of read-only methods. See below for details.
Overview
The JSON-RPC API provides a way to communicate with the BSV SV Node to perform various operations such as querying blockchain data, managing transactions, and retrieving network information.
JSON-RPC is a remote procedure call (RPC) protocol encoded in JSON. It allows for calling methods on a server from a client and receiving responses in a structured manner.
To use the JSON-RPC API, you need to configure your BSV SV Node to accept JSON-RPC commands. This involves setting up the node with the appropriate RPC credentials and network settings.
Configuration
Enable RPC: Ensure that the bitcoin.conf file has the following settings:
Set the RPC port (optional — defaults are used if omitted):
Network
Default Port
Making Requests
Requests to the JSON-RPC API are typically made via HTTP POST. Below is an example of how to structure a request:
Examples
Here is an example of a curl command to get blockchain info:
You can also use the installed bitcoin-cli to run these commands from the node's command line
Security
General Rules
Never expose the RPC port to the public internet. RPC authentication uses HTTP Basic Auth, which transmits credentials as base64 — effectively plaintext without TLS. Even with strong passwords, unauthenticated network scanners can discover and probe the port.
Bind to localhost only unless you have a specific need for remote RPC access. Use rpcbind=127.0.0.1 and rpcallowip=127.0.0.1.
Building a Public API Proxy
If you need to expose blockchain query functionality to third-party applications or the public, do not expose the node's RPC interface directly. Instead, place an application-layer proxy in front of the node that enforces a strict allowlist of safe, read-only methods.
A recommended allowlist for a public-facing proxy:
Methods to rate-limit aggressively: getrawmempool (verbose), gettxoutsetinfo, getblock (verbosity 2), sendrawtransaction, and sendrawtransactions are computationally expensive and can be used for denial-of-service if left unrestricted.
Methods that must never be proxied: stop, addnode, disconnectnode, setban, setnetworkactive, invalidateblock, all wallet methods, all frozen TXO methods, and any method that modifies node state. See the section in the RPC methods reference.
Available Methods
The full list of available commands can be generated with the help command
And you can get more information about a specific method using the help <command> call.
A full list of methods is also available in . The most commonly used methods are:
General Commands
getblockchaininfo: Provides information about the current state of the blockchain. (Preferred over the deprecated getinfo.)
help: Lists all commands, or provides help for a specified command.
Blockchain Queries
getblockhash: Returns the hash of the block at a specified height.
getblock: Returns the block details for a specified hash.
getrawtransaction: Returns raw transaction data for a given transaction ID.
Transaction Submission
sendrawtransaction: Submits a raw transaction to the network.
sendrawtransactions: Submits multiple raw transactions in a single call.
Mining Commands
getmininginfo: Provides information about the current state of mining, including network hash rate, difficulty, and mining configuration.
getminingcandidate: Retrieves a candidate block for mining, including transactions and other necessary information to start mining.
submitminingsolution: Submits a solution for a mined block to the network, attempting to add it to the blockchain.
Public RPC Access
If you don't want to run your own node, a free, unauthenticated public endpoint is available at https://bsv-rpc.publicnode.com — operated by Allnodes under the PublicNode brand and powered by the BSV Association. It supports read-only chain queries, transaction broadcast, and mempool inspection over HTTPS with no API key required.
The public endpoint is suitable for prototyping, lightweight dashboards, SPV helpers, and broadcast fallback. It is not suitable for production custody, deep historical queries, or workloads that need an SLA.
See for full details, code examples, allowed methods, and machine-readable specs (OpenAPI + Postman).
Error Handling
Errors in the JSON-RPC API are returned with an error object. This object contains a code and a message indicating the nature of the error.
Common Error Codes
-32600: Invalid Request
-32601: Method Not Found
-32602: Invalid Params
Manage & Maintain
How to: get access to EKS, get admin keys, read logs
Accessing EKS cluster
AWS Console
Steps 1-4
Step 1
Open
Step 2
Make sure you're in the same region you chose in installation .
Step 3
Click the name (link like) of your top level stack, the one without the NESTED badge.
Step 4
Open Outputs tab and copy the value of the EKSConstructClusterMasterRoleOutput*** , starting just after the role/
Step 5
Open user menu at the right top corner and click Switch role button
Step 6
Fill the form with:
Account - account number of your AWS account
Role - the role that you copied in
Display Name - whatever name meaningful for you (it will be listed later in the user menu)
After filling the form, click Switch Role button. If everything is correct, you will be switched to that role (otherwise after clicking the button, it looks like nothing happend - so you need to fix the values provided in the form).
Step 6b
After switchin the role the user menu after clicking the role name at the top right should look like on the picture above.
Notice the role name and color of the badge at instead of user name.
Step 7
Navigate to
Choose your active cluster.
Now in the tab Resources you can see all the pods, deployments, config maps that were created for you during the installation process.
Terminal (kubectl)
Step 1
Make sure you have AWS CLI installed and authenticated
Step 2
Make sure you have kubectl installed
Step 3
Now you need to obtain "update kubeconfig command" from outputs of the installed stack.
Step 3a
Open
Step 3b
Make sure you're in the same region you chose in .
Step 3c
Click name of your top level stack, the one without the NESTED badge. This should open the details of the stack.
Step 3d
Step 4
Issue copied command from the the previous step. It should look like this:
This will configure your kubectl context and use it, so just after issuing the command you should be able to use kubectl to manage your cluster.
Step 5
Check if everything is configured properly configure by issueing any kubectl command, for example:
If everything is ok you should get the output like this:
Retrieving SPV Wallet Admin Keys
In order to maintain the application you may need to access the Admin Console using admin private key.
Also in case of developing own integration with SPV Wallet, it is common to have a need for authenticating as admin.
Admin keys are generated and stored in k8s secret during deployment by an automated script.
To retrieve it follow instructions below
Prerequisites
You need to have ability to Switch Role in AWS Console like in the instruction in the section
Ensure that you switched the role to the "EKS Master" role.
Step 1
Navigate to and choose your active cluster (click its name)
Step 2
Open Resources tab.
Retrieving Block Headers Service API key
In order to maintain or query Block Headers Service you may need to retrieve API key required for authentication within Block Headers Service. Below you can find instruction how to obtain this key.
Step 1
Navigate to and choose your active cluster (click its name)
Step 2
Open Resources tab.
Step 3
Choose Secrets from the left menu
Accessing logs
Below you can find instructions how to access components logs.
Prerequisites
You need to have kubectl installed and configured like in the instruction in the section
Step 1
First get the list of available deployments
It should output something like this:
Step 2
Now choose and copy the name from the list of the component you want to see the logs,
The following description is providing examples in http requests, but we strongly encourage you to use one of the SPV Wallet client libraries provided for different languages, which can be easily configured and handle authentication for you:
HTTP Authentication
To authenticate against the SPV Wallet, one need to sign the request and provide the following headers:
Authentication headers
Auth headers
x-auth-key -> xpub
x-auth-hash -> sha256 hash of the body string
x-auth-nonce -> random string
Signing Message Algorithm Overview
The algorithm is presented below:
To sign a message you must possess an extended private key (xPriv).
Retrieve the extended public key (xPub) from the xPriv.
Set the xPub in x-auth-xpub header.
Authenticate as admin
To authenticate within the SPV Wallet as an admin, you need to use admin HD key pair.
At the SPV Wallet side the admin key pair is recognized by the admin xpub which need to be configured ().
User
Authentication using HD keys of user
Register users xpub
To authenticate as user, first user and his xpub must be added by admin to SPV Wallet.
To register user, admin need to make a following request to SPV Wallet:
Authenticate with users xpub
To authenticate within a SPV Wallet as a user, you simply need to use your xpub and sign the request with your xpriv.
Authentication using Access key
Another way of authenticate as a user is by use of access key.
Create
To authenticate as user with access key, first user must create an access key by making a request:
In response, you will receive a json with the following properties:
key - which is actually an additional private key and is not stored on the SPV Wallet side, so it is displayed to user only once and user is responsible for storing it
id - which actually can be used only on endpoints that can be used for checking the state of the access key (if it was revoked or when it was created)
Use
When communicating with SPV Wallet,
Retrieve public key (PubKey) from the AccessKey (key property from the response of the create access key request).
Set the PubKey in x-auth-key header.
Generate a random and unique number and encode it as hex, this is the authentication nonce (AuthNonce).
ℹ️ Possible further development path:
add access key scopes for example: READ, WRITE or even more granular
add expiration date/time
Revoke
Whenever a user fills that access key is compromised, or it wouldn't be needed anymore, it is possible to revoke such access key, so it can't be used to authenticate.
To revoke an access key user need to make a request:
the protocol implementation of the Bitcoin White Paper as set out at: https://protocol.bsvblockchain.org/;
Bitcoin White Paper:
has the meaning set out in recital A of the Background to the Rules;
Bitcoin, Bitcoin SV, or BSV:
has the meaning set out in recital A of the Background to the Rules;
Block Reward:
has the meaning set out in clause I.3.2 of the Rules;
Block Subsidy:
has the meaning set out in clause I.3.2 of the Rules;
Business Day:
a day other than a Saturday, Sunday, or public holiday in England or Switzerland;
Change Notice:
has the meaning set out in clause II.5.2 of the Rules;
Control:
the beneficial ownership of more than 50% of the issued share capital of a company or the legal or de-facto power to direct or cause the direction of the affairs of a company or entity, and ‘Controls’ and ‘Controlled’ will be interpreted accordingly;
Data Protection Laws:
(a) any laws, legislation, regulation, by-law, or subordinate legislation;
(b) any binding order, judgment or decree of any court or arbitrator or tribunal having jurisdiction or contractual authority any party’s assets, resources, or business (as applicable); or
(c) any direction, policy, decision, rule, or order that is binding on any party and that is made or given by any governmental, regulatory, or supervisory authority;
in each case which relates to the processing of Personal Data and as amended, extended or re-enacted, including the Privacy and Electronic Communications Regulations 2003 (as amended by SI 2011 no. 6), the Data Protection Act 2018 and Regulation 2016/679 of 27 April 2016 of the European Parliament and of the Council on the protection of individuals with regard to the processing of personal data and on the free movement of such data as each is amended in accordance with the Data Protection, Privacy and Electronic Communications (Amendments etc) (EU Exit) Regulations 2019 (as amended by SI 2020 no. 1586) and incorporated into UK law under the UK European Union (Withdrawal) Act 2018 and which:
(i) has the force of law in any part of the world where any party (as the case may be) is located or does business or conduct any Relevant Activity; and
(ii) is binding on any party (as applicable) or any party’s assets (as applicable) in any part of the world;
Decision:
any order, judgment, decree, direction, or requirement of any kind issued by a court or a competent tribunal, including any tribunal of arbitration or adjudication;
Direct Decision:
has the meaning set out in clause III.4.2 of the Rules;
Direct Decision Event:
has the meaning set out in clause III.4.1 of the Rules;
Directive:
has the meaning set out in clause III.1.1 of the Rules;
Directive Event:
has the meaning set out in clause III.1.2 of the Rules;
Enforcement Event:
has the meaning set out in clause III.3.1 of the Rules;
Indirect Decision:
has the meaning set out in clause III.5.2 of the Rules;
Indirect Decision Event:
has the meaning set out in clause III.5.1 of the Rules;
Intellectual Property Rights:
patents, utility models, rights to inventions, copyright, and neighbouring and related rights, moral rights, trademarks, and service marks, business names, and domain names, rights in get-up and trade dress, goodwill, and the right to sue for passing off or unfair competition, rights in designs, rights in computer software, database rights, rights to use, and protect the confidentiality of, confidential information (including know-how and trade secrets), and all other intellectual property rights, in each case whether registered or unregistered and including all applications and rights to apply for, and be granted, renewals, or extensions of, and rights to claim priority from, such rights, and all similar or equivalent rights or forms of protection which subsist or will subsist now or in the future in any part of the world;
Malicious Code:
code, files, scripts, agents, or programmes intended to do harm to the Network, the Association, other Nodes, or third parties (or made with reckless indifference as to whether they may cause such harm), and whether effected by means of automatic devices, scripts, algorithms, or any similar manual processes;
Message:
has the meaning set out in clause I.5.2(d) of the Rules;
Network:
(a) the Bitcoin blockchain (and any test blockchains) containing block height #556767 with the hash
‘000000000000000001d956714215d96ffc00e0afda4cd0a96c96f8d802b1662b’ and that contains the longest persistent chain of blocks which are valid under the Rules; or
(b) all relevant communication channels between peers;
Network Activities:
has the meaning set out in recital D of the Background to the Rules;
Network Database:
the distributed ledger relating to the Network;
Node:
has the meaning set out in recital D of the Background to the Rules, but does not include the Association;
Node Software:
any software made available in the Repository on the Repository or elsewhere under the Node Software Licence, any prior version of that software, and any software derived from the same;
Node Software Licence:
has the meaning set out in recital G of the Background to the Rules;
Personal Data:
has the meaning given to it under Data Protection Laws;
Purpose:
has the meaning set out in clause III.6.3 of the Rules;
Relevant Activity:
has the meaning set out in clause I.2.2 of the Rules;
Repository:
the Association’s Github repository made available at https://github.com/bitcoin-sv/bitcoin-sv/, or such other code repository as the Association may specify for the purposes of the Rules;
Rules:
has the meaning set out in clause I.1 of the Rules, as varied from time to time in accordance with clause II.5 of the Rules;
Sanctions Authority:
Switzerland, the United Nations, the European Union (or any of its member states), the United Kingdom, and in each case their respective sanctions, governmental, judicial, or regulatory institutions, agencies, departments, and authorities, including the Swiss State Secretariat for Economic Affairs, the Swiss Federal Council, the United Nations Security Council, His Majesty’s Treasury, the United Kingdom’s Office of Financial Sanctions Implementation, and the United Kingdom’s Department of International Trade;
Sanctions List:
any of the lists issued or maintained by a Sanctions Authority designating or identifying persons that are subject to Sanctions, in each case as from time to time amended, supplemented, or substituted;
Sanctions Restricted Person:
a natural person or legal entity that is: (a) listed on any Sanctions List; (b) resident, domiciled, or located in, or incorporated, or organised under the laws of, a country or territory that is the target of any Sanctions; (c) a government of any country or territory that is the target of any Sanctions, or an agency or instrumentality of such a government; (d) otherwise identified by a Sanctions Authority as being subject to Sanctions; or (e) is at least 50% owned (whether legally or beneficially) and/or Controlled by any person or entity which falls into the foregoing categories or is acting or purporting to act on behalf of any such person or entity;
Sanctions:
any economic, financial, or trade sanctions laws, regulations, embargoes, or restrictive measures administered, enacted, or enforced by any Sanctions Authority, including any such law or regulation enacted, promulgated, or issued by any Sanctions Authority after the date of the Rules and including any enabling legislation, executive order, or regulation promulgated under or based under the authorities of any of the foregoing by any Sanctions Authority;
Step:
has the meaning set out in clause III.6.2 of the Rules;
Suspended Node:
has the meaning set out in clause I.9 of the Rules;
Swiss Rules:
has the meaning set out in clause IV.1.1 of the Rules;
Unilateral Contract:
has the meaning set out in recital B of the Background to the Rules;
Website:
the Association’s website at bsvblockchain.org/network-access-rules or such other website or online portal as the Association may specify for the purposes of the Rules.
Affiliate:
any entity that directly or indirectly Controls, is Controlled by, or is under common Control with, another entity;
Applicable Laws:
in respect of any Node:
(a) any laws, legislation, regulation, by-law, or subordinate legislation;
(b) any rule or principle of the common law or equity;
(c) any binding order, judgment, or decree of any court, or arbitrator or tribunal, having jurisdiction or contractual authority over that Node or the Association (as applicable) or any of that Node’s or the Association’s assets, resources, or business (as applicable); or
(e) any direction, policy, decision, rule, or order that is binding on that Node or the Association and that is made or given by any governmental, regulatory, or supervisory authority;
in each case as amended, extended, or re-enacted and which:
(i) has the force of law in any part of the world where that Node or the Association (as the case may be) is located or does business or conducts any Relevant Activity; and
(ii) are binding on that Node or the Association (as applicable) or either of that Node’s or the Association’s assets (as applicable) in any part of the world;
Association and we, our, or us:
each has the meaning set out in recital A of the Background to the Rules;
Bitcoin Protocol:
Mainnet
8332
Testnet
18332
Regtest
18443
Restart Node: Restart your BSV SV Node to apply the changes.
Use a reverse proxy with TLS
if remote access is required. Place nginx, HAProxy, or a similar proxy in front of the RPC port with a valid TLS certificate.
Use rpcauth instead of rpcuser/rpcpassword to avoid storing plaintext credentials on disk.
Use firewall rules (iptables, security groups, etc.) as a second layer of defence even when rpcallowip is configured.
-32603
: Internal Error
-32700: Parse Error
Consider using rpcauth instead of rpcuser/rpcpassword. The rpcauth option stores a salted hash in the configuration file rather than plaintext credentials. You can generate an rpcauth line using the share/rpcauth/rpcauth.py script included with the node.
The RPC interface provides full administrative control over your node. Misconfigured access can lead to node shutdown, fund theft, network isolation, and chain manipulation. Treat RPC access with the same care as root/SSH access to the host.
~/bitcoin/bin/bitcoin-cli -datadir="/home/ubuntu/bitcoin-data" help submitminingsolution
submitminingsolution "<json string>"
Attempts to submit a new block to the network.
Json Object should comprise of the following and must be escaped
{
"id": n, (string) ID from getminingcandidate RPC
"nonce": n, (integer) Miner generated nonce
"coinbase": "", (hex string, optional) Modified Coinbase transaction
"time": n, (integer, optional) Block time
"version": n (integer, optional) Block version
}
Result:
Nothing on success, error string if block was rejected.
Identical to "submitblock".
NAME READY UP-TO-DATE AVAILABLE AGE
bsv-block-headers-service 1/1 1 1 3h
bsv-spv-wallet 1/1 1 1 3h
bsv-spv-wallet-admin 1/1 1 1 3h
bsv-spv-wallet-web-backend 1/1 1 1 3h
bsv-spv-wallet-web-frontend 1/1 1 1 3h
In the example from picture above the value which you should copy would be:
spv-wallet-EKSConstructEksMastersRole***3-J***t
If you're setting role to switch for the first time, additional view will be displayed. All you need to do there is to click another Switch role button
If you want to switch back to your original role (which doesn't have permissions to access EKS but has different permissions) use the Switch back button
Next time when you want to use this EKS Master Role, all you need to do is to open this menu again and click the role name on the Role history list.
If you have multiple kubectl contexts, you can also setup different name of the created context and of the created user configuration.
To do so, before you issue the coppied command, add those additional arguments to it:
--alias myContextName - It will set the name of created context to the myContextName
--user-alias myUserConfigName - it will set the name of created context config for user to the myUserConfigName
We don't provide any integration with logs collectors / viewers, like Kibana or Cloud Watch. Although we're trying to output the logs in a format consumable by them, it is up to you to setup those tools correctly and collect the logs from the applications.
You can add the flag --follow at the and of this command to follow the logs from the application.
MainNet Activation
: Chronicle will activate on MainNet at block height 943,816 (Target is 12:00 midday 07-Apr-2026)
Please ensure you have upgraded SV Node prior to the activation height set to ensure business continuity.
Background
The Chronicle release is a follow-up of the Genesis upgrade in 2020 which restored many aspects of the Bitcoin protocol that had been modified in previous software updates, including the removal of most limit-based consensus rules, replacing them with miner configurable settings that give node operators the autonomy needed to set their limits as they determine practical.
The changes introduced in the Chronicle release are detailed in the sections below, outlining the removal of specific restrictions and requirements within the Bitcoin protocol to allow for greater flexibility and configurability for node operators.
Release Summary
To summarize the Chronicle release, the following points should be outlined:
Restoration of Bitcoin's Original Protocol: The Chronicle release aims to restore the original Bitcoin protocol by re-installing specific opcodes and removing listed restrictions, while also balancing stability for businesses that depend on the current state.
Transaction Digest Algorithms: The BSV Blockchain will now support the Original Transaction Digest Algorithm (OTDA), in addition to the current BIP143 digest algorithm, ensuring compatibility and flexibility for developers and users. This restores the original Bitcoin transaction digest algorithm, enabling developers to have greater flexibility in utilizing Bitcoin Script. Usage of the OTDA will require setting the new CHRONICLE [0x20] sighash flag.
Selective Malleability Restrictions: The Chronicle Release removes restrictions that were put in place to prevent transaction malleability. To address concerns about the reintroduction of sources of transaction malleability, the application of malleability restrictions will depend on the transaction version field. Transactions signed with with a version number higher than 1 [0x01000000] will allow relaxed rules, removing strict enforcement of malleability-related constraints. The restrictions relevant are:
Minimal Encoding Requirement
Low S Requirement for Signatures
NULLFAIL and NULLDUMMY check for OP_CHECKSIG and OP_CHECKMULTISIG
Business Impact and Flexibility: In line with the BSV Blockchain's commitment to stability, existing users and applications using the BIP143 digest (without CHRONICLE) will remain unaffected by the Chronicle update. For developers aiming to leverage the original protocol's behavior, the Chronicle release offers the option to utilize the Original Transaction Digest Algorithm (OTDA) and the flexibility to determine malleability-related restrictions for transactions.
1. Transaction Digest Algorithms
As mentioned above, in the Chronicle Release, the Original Transaction Digest Algorithm (OTDA) is being reinstated for use.
This change will depend on the usage of the new CHRONICLE [0x20] Sighash bit. By default, users who do nothing will retain the current behavior (with CHRONICLE disabled). It doesn't matter if the transaction configuration involves multiple signatures within a script or across multiple inputs. The table below describes all possible scenarios and their expected results:
Input/Transaction Config
CHRONICLE
TDA
Single input, single signature
0
BIP143
Single input, single signature
1
OTDA
2. Increase the Limit on the Size of Script Numbers
The consensus limit MAX_SCRIPT_NUM_LENGTH_AFTER_GENESIS will be increased from 750KB to 32MB. Node operators can set their policy limit for the size of script numbers using the maxscriptnumlengthpolicy configuration parameter.
This limit is enforced during script execution.
3. Selective Malleability Restrictions
The Chronicle Release will remove malleability-related restrictions during script evaluation. For any transactions signed with a version field greater than 1 [0x01000000], the restrictions below will no longer apply to the transaction. This behavior requires users and developers to "opt-in", as any transactions that continue to use a version field of 1 [0x01000000] will keep these restrictions. The malleability-related restrictions being removed are:
Minimal Encoding Requirement Removal
Update the script processing so that numbers are not required to be expressed using the minimum number of bytes.
Remove SCRIPT_VERIFY_MINIMALDATA and associated logic from the software
Remove MinimallyEncoded() and IsMinimallyEncoded(..) methods
Remove bsv::MinimallyEncoded() and bsv::IsMinimallyEncoded(..) functions.
Low S Requirement for SignaturesRemoval
Remove the requirement that the signature must be the low "s" value. See BIP-146
NULLFAIL and NULLDUMMY check for OP_CHECKSIG and OP_CHECKMULTISIG Removal
Remove the requirement that if an OP_CHECKSIG is trying to return a FALSE value to the stack, that the relevant signature must be an empty byte array. Also remove the requirement that if an OP_CHECKMULTISIG is trying to return a FALSE value to the stack, that all signatures passing to this OP_CHECKMULTISIG must be empty byte arrays.
Remove the requirement that the dummy stack item used in OP_CHECKMULTISIG is an empty byte array.
The following examples are the combined results of the removal of the LOW_S and NULLFAIL rules.
Notation:
These scripts will return a TRUE to the stack as before:
These scripts will return a FALSE to the stack as before:
These scripts that previously failed immediately will return TRUE under the Chronicle rules:
These scripts that previously failed immediately will return FALSE under the Chronicle rules:
MINIMALIF Requirement Removal
The input argument to the OP_IF and OP_NOTIF opcodes is no longer required to be exactly 1 (the one-byte vector with value 1) to be evaluated as TRUE. Similarly, the input argument to the OP_IF and OP_NOTIF opcodes is no longer required to be exactly 0 (the empty vector) to be evaluated as FALSE.
Clean Stack Policy Removal
The script engine should not require that the stack has only a single element on it on completion of the execution of a script.
Remove SCRIPT_VERIFY_CLEANSTACK and associated logic from the software.
Data Only in Unlocking Script Removal
The node will no longer require that unlocking scripts only include data and associated pushdata op codes. Functional Opcodes will be permitted.
It should be noted that the unlocking script is evaluated, the resulting main stack is kept, but the conditional and alt stacks are cleared. The locking script is then evaluated. Therefore any OP_RETURN use in the unlocking script simply leads to the end of unlocking script execution - not script execution as a whole.
There are specific use cases for "showing your work" like this in the unlocking script. Typically it is not necessary to include intermediate values, and simply passing the result of any calculation as push data would be sufficient.
The scriptCode verified by OP_CHECKSIG in the unlocking script will be from the last seen OP_CODESEPARATOR to the end of the locking script.
For a transaction containing the unlocking script:
And locking script:
The scriptCode used when verifying S1 during execution of the OP_CHECKSIG in the unlocking script would be:
Whereas the scriptCode used when evaluating S0 with the OP_CHECKSIG in the locking script would be:
4. Opcodes
The opcodes listed below will be re-instated.
Implementation should exhibit standard behavior. i.e. If the opcode produces an error, the code should immediately return the result of a call to set_error with the appropriate error message and code.
Opcodes do not check if the supplied operands are of the expected type. Rather if an opcode expects a particular data type on top of the stack (tos), it will interpret whatever it finds as that data type.
If an opcode expects values on the stack and they are not present, then an error should be returned.
OP_VER
Opcode number 98, hex 0x62
OP_VER pushes the executing transaction's version onto the stack. The transaction version is the first four bytes of the transaction containing the executing script.
OP_VERIF
Opcode number 101, hex 0x65
Compares the tos with the executing transaction's version as an equivalence comparison as part of the following traditional if-then-else expression: OP_VERIF [statements] [OP_ELSE [statements]] OP_ENDIF
Logically equivalent to OP_VER OP_EQUAL OP_IF.
OP_VERNOTIF
Opcode number 102, hex 0x66
Compares the tos with the executing transaction's version as an equivalence comparison as part of the following expression:
OP_VERNOTIF [statements] [OP_ELSE [statements]] OP_ENDIF
Logically equivalent to OP_VER OP_EQUAL OP_NOTIF
OP_SUBSTR
Originally opcode number 127. Now has value 179, hex 0xb3
Returns substring defined by start index and length.
A zero-length source string generates an error. A negative length generates an error. If the specified length is greater than the source string, the opcode generates an error.
E.g. executing the script below would remove the desired length and start index of the substring.
The string "BSV Blockchain" would be replaced by "Block" on the top of the stack.
OP_LEFT
Originally opcode number 128. Now has value 180, hex 0xb4
Produces a substring consisting only of the specified number of leftmost characters.
E.g. Executing the script below would leave "BSV" on the top of the stack.
Zero-length strings are allowed.
OP_RIGHT
Originally opcode number 129. Now has value 181, hex 0xb5
Produces a substring consisting only of the specified number of rightmost characters.
E.g. Executing the script below would leave "chain" on the top of the stack.
Zero-length strings are allowed.
OP_2MUL
Opcode number 141, hex 0x8d
Multiplies the number on the top of the stack by 2.
OP_2DIV
Opcode number 142, hex 0x8e
Divides the number on the top of the stack by 2.
OP_LSHIFTNUM
Opcode number 182, hex 0xb6, previously OP_NOP7
Performs a numerical shift to left, preserving sign.
OP_RSHIFTNUM
Opcode number 183, hex 0xb7, previously OP_NOP8
Performs a numerical shift to right, preserving sign.
The rest of the Opcodes remain intact; their description can be found in the corresponding document.
CO : curve order = 0xFFFFFFFF FFFFFFFF FFFFFFFF FFFFFFFE BAAEDCE6 AF48A03B BFD25E8C D0364141
HCO : half curve order = CO / 2 = 0x7FFFFFFF FFFFFFFF FFFFFFFF FFFFFFFF 5D576E73 57A4501D DFE92F46 681B20A0
P1, P2 : valid, serialized, public keys
S1L, S2L : low S value signatures using respective keys P1 and P2 (1 <= S <= HCO)
S1H, S2H : signatures with high S value using respective keys P1 and P2 (HCO < S < CO)
F : any BIP66-compliant non-empty byte array but not a valid signature
Hosted, no-auth JSON-RPC endpoints for the BSV mainnet — when to use them, when not to, and how to call them.
A public RPC endpoint is a hosted SV Node JSON-RPC interface that anyone can call over HTTPS without running their own node, registering an account, or supplying an API key. Public endpoints lower the barrier to building on BSV: you can prototype against mainnet in minutes, run a one-shot script, or fall back to a hosted node when your own infrastructure is unavailable.
This page is a companion to RPC Interface. The methods, parameters, and JSON shapes documented there apply unchanged to public endpoints — what differs is where you send the request and what you can expect from a shared, hosted node.
About this service. The default endpoint below is an SV Node operated by under their brand and is powered by the BSV Association as a free, open, unauthenticated entry point to BSV mainnet. It is intentionally a shared service — please use it accordingly: it is not a replacement for running your own node when you handle user funds, need deep historical data, require an SLA, or have privacy-sensitive workloads. See .
Available endpoints
Operator
Powered by
Network
Endpoint URL
Auth
Notes
The PublicNode landing page lives at and reports live request statistics for the gateway. The actual JSON-RPC URL is the one in the table above.
Use cases
Public endpoints are well-suited to read-mostly, low-trust, or low-volume workloads where the cost of running a full node is not justified.
1. Prototyping & developer onboarding
The single biggest reason public endpoints exist. A developer evaluating BSV can fetch the chain tip, decode a transaction, or push a test broadcast within minutes — no Bitcoin SV binary, no bitcoin.conf, no UTXO sync, no firewall changes.
2. Lightweight read clients & dashboards
Status pages, "current block height" widgets, fee dashboards, and similar read-only UIs typically need a handful of cheap RPC calls (getblockcount, getblockchaininfo, getdifficulty, getmempoolinfo). A public endpoint covers this without operational overhead. Note: a full block explorer is not a good fit — explorers need historical block and transaction data which a pruned node cannot serve. Use an unpruned node for that.
Because the PublicNode endpoint sets Access-Control-Allow-Origin: *, it can be called directly from a browser — useful for static sites and client-side dashboards. (Note: calling any RPC from the browser exposes your usage pattern to the operator. Don't do this for anything sensitive.)
3. SPV-style verification helpers
SPV wallets and applications using the sometimes need a node round-trip — for example, to validate a parent transaction referenced by a BEEF, fetch a block header by hash, or sanity-check that a broadcast tx is in the mempool. A public endpoint is a reasonable secondary source for these checks alongside ARC and miner APIs.
4. Transaction broadcast fallback
If your primary broadcast path (ARC, a miner submission API, your own node) is degraded, sendrawtransaction against a public endpoint is a useful last-resort fan-out target. Public endpoints relay the transaction into the P2P mesh just like any other node.
5. CI / ephemeral environments
Test pipelines that need to validate against a real chain tip — e.g., "does this tx I just built deserialize cleanly?" or "is fee policy still X?" — can hit a public endpoint instead of standing up a full node in CI.
6. Research & data exploration
One-off scripts that walk recent blocks, compute fee statistics, or pull transaction shapes for analysis. The pruned-node caveat (below) matters here: deep historical traversal is not what public endpoints are for.
When not to use a public endpoint
Public endpoints are a convenience, not infrastructure. Move to your own node — or a paid, SLA-backed provider — when any of the following apply:
You handle user funds. Exchanges, custodians, payment processors, and merchant gateways must run their own validating node. Any hosted service — however well-operated — can serve a stale or partial view of the chain, and you should be the one validating the blocks that move your customers' money.
You need historical block or transaction data. The public node is pruned — it retains only ~2–3 days of block data. getblock and getrawtransaction against older blocks/transactions will fail. Block headers remain available for all heights, but for full historical data use your own unpruned node, an explorer API, or an archival service.
Calling the endpoint
The wire protocol is the standard SV Node JSON-RPC 1.0 over HTTPS, identical to the local interface documented in . The only differences are:
The URL is the public hostname instead of http://127.0.0.1:8332.
There is no Authorization header — public endpoints accept anonymous requests.
Requests must be HTTPS.
curl
Node.js (fetch)
Python (requests)
Browser (CORS-enabled)
Batch requests
The SV Node accepts JSON-RPC batches — send an array of request objects and receive an array of responses. This is the most efficient way to fan out cheap reads from a public endpoint.
What's allowed and what isn't
The following snapshot reflects the PublicNode endpoint at the time of writing. Other operators may apply different policies; always probe before depending on a method.
Allowed (verified working)
Category
Methods
Restricted (returns -32701 Method ... is not allowed)
help, getpeerinfo, getwalletinfo, listunspent, dumpprivkey, setban, addnode, uptime, and other wallet/peer/admin RPCs. These are operator-only on shared infrastructure.
Not implemented on this build
estimatefee, generate, stop, invalidateblock — these return -32601 Method not found either because the method has been removed from SV Node or is disabled on the gateway.
Pruned node with transaction index
The PublicNode node runs in pruned mode with txindex=1. This combination means:
Block data is deleted outside a rolling window of roughly 2–3 days (~400 blocks, size-dependent). Check pruneheight in getblockchaininfo for the current cutoff.
Block headers are always available.getblockheader works for any block, regardless of pruning.
In short: the node knows what the chain tip is and can prove headers all the way back to genesis, but it can only serve full block and transaction data for the most recent ~400 blocks. If you need deep historical data, run your own unpruned node.
Error handling
Public endpoints surface three error families on top of the standard SV Node error codes:
Code
Meaning
Example trigger
For full error semantics see the Error Handling section in .
Operational guidance
A few practical rules for building against a public endpoint:
Treat it as untrusted infrastructure. Validate everything you can locally. Hashes, merkle proofs, and signatures should be checked client-side — never assume the endpoint is honest. SPV verification with the is the right pattern.
Cache aggressively. Block headers, confirmed transactions, and chain-tip-derived values are cheap to cache and reduce both your latency and the operator's load.
Back off and jitter. Honour 429s and 5xxs with exponential backoff. Don't hammer a shared service.
Quickstart: machine-readable specs
Two ready-to-use artefacts ship alongside this page so you don't have to retype the same JSON-RPC envelopes by hand.
OpenAPI 3.1 spec — drop into Swagger UI, Redoc, Mintlify's API playground, or any OpenAPI-aware client. Documents the JSON-RPC envelope, all verified-allowed methods as named request/response examples, and the gateway-specific error codes.
Postman collection — import via File > Import > Upload Files in Postman (also accepted by Insomnia, Bruno, and Hoppscotch). Pre-filled with working example bodies and sample responses captured from the live endpoint.
Both ship with the endpoint URL as a variable (rpcUrl / the OpenAPI server) defaulting to https://bsv-rpc.publicnode.com, so you can repoint either at a self-hosted node without editing individual requests.
See also
— full reference for SV Node JSON-RPC
— complete method list with sensitivity classifications
You need wallet, peer, or admin RPCs. Methods such as getwalletinfo, listunspent, dumpprivkey, getpeerinfo, setban, addnode, stop, and similar are blocked on the shared endpoint — and rightly so. They expose either the operator's node state or operator-only authority.
You need a strict SLA, predictable latency, or guaranteed throughput. The public endpoint is best-effort. The CDN in front of it can return 5xx, rate limits can tighten without notice, and the service is sized for community use — not for one consumer's burst traffic.
You need privacy. Every call you make is visible to the operator and to whatever CDN sits in front of them. If the pattern of your queries is sensitive (e.g. monitoring a specific address), assume it is being observed.
You need mining or block-template flows. Use a node you control. Mining RPCs reflect that node's mempool view — not yours.
Transaction lookups work within the prune window.getrawtransaction succeeds for transactions in retained blocks thanks to the transaction index. For transactions in pruned blocks, it returns "No such mempool or blockchain transaction".
The UTXO set is complete.gettxout works for any unspent output regardless of whether its block has been pruned — the UTXO set is maintained independently.
TX decode failed
sendrawtransaction with invalid hex
-26
TX rejected by mempool policy or consensus
Double-spend, low fee, non-final, oversized
HTTP 429
Rate-limited by the gateway
Too many requests from one IP — back off and retry
HTTP 5xx
Upstream node or CDN problem
Retry with jitter; consider failing over to a different endpoint or your own
Have a fallback. Configure at least one alternative source — your own node, a different public endpoint, ARC, or an explorer API — and fail over on repeated errors.
Don't leak addresses you care about. Every gettxout / getrawtransaction call you make tells the operator which UTXOs and txids you're interested in. For privacy-sensitive workloads, run your own node.
Keep your usage well-mannered. Public endpoints exist because operators choose to subsidize them. Hammering one with a scrape job is the fastest way to get them taken down for everybody.
Default double spend and merkle proof notification callback endpoint.
X-FullStatusUpdatesbooleanOptional
Whether we should have full status updates in callback or not (including SEEN_IN_ORPHAN_MEMPOOL and SEEN_ON_NETWORK statuses).
X-MaxTimeoutintegerOptional
Timeout in seconds to wait for new transaction status before request expires (max 30 seconds, default 5)
X-SkipFeeValidationbooleanOptional
Whether we should skip fee validation or not.
X-ForceValidationbooleanOptional
Whether we should force submitted tx validation in any case.
X-SkipScriptValidationbooleanOptional
Whether we should skip script validation or not.
X-SkipTxValidationbooleanOptional
Whether we should skip overall tx validation or not.
X-CumulativeFeeValidationbooleanOptional
Whether we should perform cumulative fee validation for fee consolidation txs or not.
X-CallbackTokenstringOptional
Access token for notification callback endpoint. It will be used as a Authorization header for the http callback
X-CallbackBatchbooleanOptional
Callback will be send in a batch
X-WaitForstringOptional
Which status to wait for from the server before returning ('QUEUED', 'RECEIVED', 'STORED', 'ANNOUNCED_TO_NETWORK', 'REQUESTED_BY_NETWORK', 'SENT_TO_NETWORK', 'ACCEPTED_BY_NETWORK', 'SEEN_ON_NETWORK')
Each Node agrees that it will use best endeavours to procure that each of its Affiliates will comply with the obligations and restrictions in the Rules as if they applied to that Affiliate in the same manner that they apply to that Node (with any necessary alterations made).
The relationship of the parties
Nothing in the Rules is intended to or will be deemed to: (a) create any partnership, unincorporated association, or joint venture between any parties to the Rules; (b) cause any party to the Rules to become an agent for another party to the Rules (whether as a fiduciary or otherwise); or (c) authorise any party to the Rules to make or enter any commitments for or on behalf of another party to the Rules.
Entire agreement
Without prejudice to any accrued rights under the Unilateral Contract:
(a) the Rules constitute the entire agreement and understanding between and among the parties with respect to their subject matter;
No implied terms
No terms are implied into the Rules: (a) by trade, custom, practice, or course of dealing; (b) by statute, to the fullest extent permitted by law (including the terms implied by Part II of the Supply of Goods and Services Act 1982); or (c) which restrict the Association’s exercise of powers under the Rules or otherwise.
Changes to the Rules
The Association may change all or any of the terms in the Rules.
The Association will notify Nodes of any changes to the Rules on the Website or using any of the other methods described in clause II.14 (a ‘Change Notice’). Each Node agrees to check the Website at reasonable intervals for any new Change Notice.
Assignment
The Association may at any time assign, mortgage, charge, subcontract, delegate, declare a trust over, or deal in any other manner with any or all of its rights and obligations under the Rules.
Nodes are not entitled to assign, mortgage, charge, subcontract, delegate, declare a trust over, or deal in any other manner with any or all of their rights or obligations under the Rules, whether by operation of law or otherwise.
Indemnity
In this clause II.7, a reference to the Association will include the Association, each Affiliate of the Association, and the Association’s employees, officers, contractors, subcontractors, and agents.
Each Node agrees to indemnify the Association and to keep the Association always indemnified against all or any reasonable liabilities, costs, claims, damages, losses, or expenses (including any direct, indirect, or consequential losses, loss of profit, loss of reputation, and all interest, penalties and legal costs, calculated on a full indemnity basis), and all other professional costs or expenses arising out of or in connection with:
Tax
Any payment required by the Rules will be made without a tax deduction unless required by law (in which case, the receiving party will be entitled to receive such amounts as will ensure that the net receipt, after tax, is the same as it would have been had no deduction been made).
Intellectual property
Subject to any rights expressly granted under the Node Software Licence, the Association reserves all of its rights, title, and interest in and to the Node Software, including all Intellectual Property Rights.
Third-party rights
Except as may be expressly provided elsewhere in the Rules, a person who is neither a party to the Rules nor any party’s successor or assignee will have no rights under the Contracts (Rights of Third Parties) Act 1999 or otherwise to enforce any term of the Rules.
Without prejudice to the Association’s rights to vary the Rules in clause II.5, any rights the Association may have to terminate or rescind the Rules or agree to any variation, waiver, or settlement in connection with them are not subject to the consent of any third party even if it extinguishes or alters any entitlement that such third party may have to enforce any term of the Rules.
Rights and remedies
The rights and remedies provided under the Rules are cumulative and are in addition to, and not exclusive of, any rights and remedies each party to the Rules may have in law or equity.
No waiver
Any failure or delay by any Node or by the Association to insist upon strict performance of the Rules or to exercise or enforce any rights or remedies or any provision under the Rules will not constitute a waiver thereof unless that party has agreed to the waiver and expressly stated it to be such in writing, signed by it or on its behalf.
Set-off
The Association maysetoff any amount that any Node owes it against any amount the Association owes to that Node under the Rules or otherwise, whether such debt is owed now or at any time in the future, whether it is liquidated or not and whether it is actual or contingent. If the liabilities set off are expressed in different currencies or cryptocurrencies, the Association may convert either liability at a reasonable market rate of exchange determined by the Association for the purpose of the set-off. However, the Association is not obliged to exercise its rights under this clause II.13.
Each Node will pay any amounts due under the Rules in full without any set-off, counterclaim, deduction, or withholding (other than, subject to clause II.8.1, any deduction or withholding of tax as required by law).
Notices
Any notice or communication in respect of the Rules, including one containing a Directive, may be given in writing in any manner described below only and, subject to clause III.2.2, will be deemed effective at the time indicated:
To any Node:
(a) effective immediately: if delivered by hand to any address associated with a Node’s or any of its Affiliates’ Relevant Activities, including any registered office or premises or data centres owned, occupied, operated by, or otherwise associated with that Node or any of its Affiliates;
Severability
In the event any clause of the Rules is for any reason found invalid or unenforceable in any respect, such invalidity or unenforceability will not affect the validity of any remaining clauses, which will remain in full force and effect as if the invalid or unenforceable clause was never a part of the Rules.
Language
The Rules are made in the English language. Where there is any conflict in meaning between the English language version of the Rules or any translation in any other language, the English language version will prevail, and the translation will be for reference only.
(b) each Node acknowledges and agrees that, in entering the Rules, it has not relied on and will have no remedy in respect of any oral or written representations, warranty, or other assurance or prior understandings (including in connection with any recitals in the Background to the Rules) except as expressly provided for or referred to in the Rules; and
(c) each Node agrees that it will have no claim against any other Node or the Association for innocent misrepresentation, negligent misrepresentation, or negligent misstatement based on any statement in the Rules.
By conducting any Relevant Activity following the publication of a Change Notice, each Node is deemed to have accepted and to be bound by any changes described therein (irrespective of whether the Node or its agents have read such Change Notice). If a Node does not agree, it will cease to conduct any Relevant Activity immediately.
Save as set out in this clause II.5, no variation of the Rules will be effective unless issued by or on behalf of the Association.
(a) such Node’s breach, negligent performance, or failure or delay in performance of the Rules;
(b) the enforcement of the Rules by the Association against that Node or its Affiliates; or
(c) any claim made against the Association by any other Node or a third party to the extent that such claim arises out of or in connection with the indemnifying Node’s breach or negligent performance, or failure or delay in performance, of the Rules.
(b) effective immediately: if sent by electronic messaging system, by email or by messages or notifications through any Network-related software or other distributed ledger system, including communication by means of airdrop or transaction data transmission, in programming or in natural language, to any address or wallet controlled by or associated with that Node or any of its Affiliates (or which the Association reasonably determines in good faith is so controlled or associated) or in respect of which that Node or any of its Affiliates has an interest at the time of transmission;
(c) effective at 9:00 am UTC on the seventh Business Day after posting: if sent by pre-paid registered post to any registered office or premises or data centres owned, used, occupied or operated by that Node or any of its Affiliates;
(d) effective immediately: if published on the Website or the Repository.
To the Association:
(e) effective at 9:00am UTC on the next Business Day following delivery: if delivered by hand to the Association’s registered office on a Business Day or if sent by email to [email protected] or to such address as the Association specifies for that purpose on the Website; and
(f) effective at 9:00am UTC on the seventh Business Day after posting: if sent by pre-paid registered post, including airmail, to: BSV Association, Grafenauweg 6, 6300 Zug, Switzerland.
All notices under the Rules will, unless sent electronically, be signed by or on behalf of the sender. Notices which are sent electronically (other than pursuant to II.14.1(d)) will be digitally authenticated by the sender.
All notices provided under the Rules will be in English or accompanied by a certified translation.
This clause II.14 does not apply to the service on the Association of any notice of legal proceedings or other documents in any legal action, arbitration, or other form of dispute resolution process.
RPC Methods
Complete reference of all JSON-RPC methods available in the BSV SV Node, including sensitivity classifications for operators and proxy builders.
This page lists every RPC method exposed by the BSV SV Node. Methods are organised by function, with the most commonly used categories first. A Sensitive Endpoints reference at the end groups all methods that should be restricted or never exposed publicly.
Blockchain
Method
Description
Raw Transactions
Method
Description
Mining
Method
Description
Network
Method
Description
Block Size
These methods control consensus-critical block size parameters.
Method
Description
Control
Method
Description
Utilities
Method
Description
Miner ID
These methods manage the Miner ID protocol, which allows miners to cryptographically identify themselves in coinbase transactions.
Method
Description
Frozen TXO
These methods manage the Frozen Transaction Output system, which allows freezing and confiscating UTXOs as part of the BSV legal enforcement framework.
Method
Description
Safe Mode
Method
Description
Wallet
Sending
Method
Description
Key Management
Method
Description
Encryption
Method
Description
Querying
Method
Description
Address Management
Method
Description
Other
Method
Description
Hidden Methods
These methods do not appear in help output. They exist for debugging, testing, and advanced operational use. You can still call them directly or view their help with help <command>.
Blockchain
Method
Description
Control
Method
Description
Wallet
Method
Description
Sensitive Endpoints
Critical — Must never be exposed to untrusted parties
These methods can shut down the node, steal or move funds, export private keys, manipulate the chain, or alter consensus rules. Exposing any of these publicly is equivalent to giving full control of the node.
Node control
Method
Risk
Chain manipulation
Method
Risk
Network isolation
Method
Risk
Fund theft and key exposure (wallet)
Method
Risk
Frozen TXO manipulation
Method
Risk
Miner ID
Method
Risk
High — Restrict to operators only
These methods modify node state, create keys, alter fees, or trigger potentially disruptive operations. They should only be accessible to node operators on trusted networks.
Method
Risk
Moderate — Restrict to trusted clients
These methods reveal operational details about the node, its peers, its configuration, or its wallet state. They are read-only but leak information useful for fingerprinting, deanonymisation, or attack planning.
Method
What it reveals
getblockhash height
Returns the hash of the block at a specified height.
getblockheader "hash" ( verbosity )
Retrieves the block header with the given hash.
getblockstats blockhash ( stats )
Provides statistical information about a block.
getblockstatsbyheight height ( stats )
Provides statistical information about a block at a given height.
getchaintips
Returns information about all known blockchain tips.
getchaintxstats ( nblocks blockhash )
Provides statistics about the total number of transactions in the chain.
getdifficulty
Returns the proof-of-work difficulty as a multiple of the minimum.
gettxout "txid" n ( include_mempool )
Retrieves information about an unspent transaction output.
Moves a balance between accounts (internal bookkeeping only).
invalidateblock "blockhash"
Permanently marks a block as invalid, causing a chain reorganisation.
reconsiderblock "blockhash"
Removes invalidity status from a block, potentially triggering a reorg.
softrejectblock "blockhash"
Soft-rejects a block from peers.
setmocktime timestamp
Sets the node's internal clock. Testing only — can break time-locked transactions on non-regtest.
echo
Echoes back input. Testing only.
echojson
Echoes back input as JSON. Testing only.
resendwallettransactions
Re-broadcasts all unconfirmed wallet transactions.
stop
Shuts down the node.
setmocktime
Manipulates the node's internal clock. Hidden.
invalidateblock
Marks a block as invalid — forces chain reorganisation. Hidden.
reconsiderblock
Reverses block invalidation — can trigger reorgs. Hidden.
softrejectblock
Rejects blocks from peers. Hidden.
acceptblock
addnode
Adds arbitrary peers — eclipse attack vector.
disconnectnode
Disconnects peers — can isolate the node from the network.
setban
Bans peers by IP/subnet — network isolation.
setnetworkactive
dumpprivkey
Exports private keys in plaintext WIF format.
dumpwallet
Exports the entire wallet (all keys) to a file.
walletpassphrase
Unlocks the wallet for spending.
walletpassphrasechange
addToConsensusBlacklist
Freezes UTXOs at the consensus level — affects block validation.
addToPolicyBlacklist
Freezes UTXOs at the policy level.
removeFromPolicyBlacklist
Removes UTXOs from the policy blacklist.
clearBlacklists
revokeminerid
Revokes a miner ID. Irreversible.
pruneblockchain
Deletes block data from disk. Irreversible.
rebuildjournal
Forces journal rebuild. Temporary disruption.
clearinvalidtransactions
Clears invalid transaction tracking.
prioritisetransaction
getpeerinfo
All peer IPs, versions, connection details.
getaddednodeinfo
Manually added peer IPs.
getnettotals
Network bandwidth — operational fingerprinting.
Wallet functionality in SV Node is intended for testing and basic operational use. For production environments, wallet management — including key storage, transaction signing, and UTXO management — should be handled by dedicated external wallet software or HSM-backed signing services, not the node's built-in wallet.
The wallet RPC methods are only available when the node is compiled with wallet support and not started with -disablewallet. Most mining and enterprise deployments should run with the wallet disabled.
The methods listed below should be restricted to trusted operators or never exposed through proxies. See the Security section for guidance on building a safe public proxy.